Other Furnaces
I've already posted articles on this blog about how I made different types of furnaces, like a large rectangular one and some other somewhat strange devices. I've made a few others too, and this is another attempt to document that process.

Not much to say really. The main structure is plastic baby toys, the kind that fit into each other and babies can chew on. They have an interesting shape though. I glued them onto heavy metal washers so they stand upright, then added plastic flower pieces on the edges and bottom to make them look like drainage pipes.

And here they are, the same ones after going through the painting process. I started with a black undercoat on everything, then did a metallic dry brush on the metal parts, and an orange dry brush on everything for that rusty look.
After that I dabbed yellow paint on the parts where paint is supposed to be, but I deliberately didn't follow it perfectly. I think I also manually added a few rust lines with very diluted black paint, and finished with a thick brown wash over the top for that extra rusty effect.

And there you have it, my rusty baby toys!


Mimics

Just a quick post to document my current collection of Mimics. I really love Mimics. They're super fun to paint. The half-decor aspect and those big purple parts make them very enjoyable to work on.


Flea Market Haul

I wanted to document the stuff I find at flea markets. All of these are things I found and have either reused or plan to reuse in projects.
There are Skylanders figurines with interesting shapes, including a dragon one that I repainted. I also picked up plastic shapes like fake rocks, mounds, bushes, and logs. Some I used almost as is (the rocks and logs worked great).
I found barriers too. The small ones I mounted on cardboard to make fences, which turned out well. The big ones I sometimes cut up to salvage the textures for making wood pieces.
The different figurines got turned into statues or I painted them directly. The herbivore became its own figurine. And that little house in the bottom left? I covered it with fake planks and turned it into a cottage.


I keep finding this Skylanders bases as well. You know, the portal thing where you put the figurines? It's basically already a perfect summoning circle. Wouldn't take much to turn it into something awesome. Pretty sure there's space underneath for LEDs too, so I could add some cool colored lighting effects. It's been sitting in my box for years. Really need to convert it into a proper summoning circle with lights one of these days.


When I saw this Roman assault chariot from Playmobil I immediately thought it would be perfect for a conversion project. I'm thinking either a goblin assault chariot or a static goblin tower.
I'm picturing wooden protection panels where each plank is a different size - really messy and chaotic looking. This could totally work as a goblin piece.
Dogs

Just sharing a few photos of some dogs I painted with my speedpaints. Speedpaints are really quite magical because even on miniatures like these that are relatively smooth (at least the brown dogs), just a single coat of speedpaint gives a relatively acceptable effect. A more experienced painter could have done something much better, but I'm fine with that quality level.
Similarly on the wolf in the middle, it's also a single layer of speedpaint, and since there are lots of details, it looks even better. Speedpaints have really been a revolutionary discovery for me in the way I paint. I go 3 to 4 times faster and I enjoy it much more because I can put painted stuff of very good quality on the table much more quickly and easily.

Disney Furnitures

Quick share about some furniture pieces in my collection that are actually from Disney toys. The two beds are Elsa and Anna's beds from a Frozen castle toy set. I think the chest, wardrobe and chair come from a Tangled toy.
The little figurines are completely the wrong size, but the small furniture elements are perfect scale and super practical to reuse. They're made in one solid piece of plastic, the chest actually opens so you can put things inside, there's nothing to assemble, it's super solid and works right out of the box.
It's obviously very expensive if you buy it new just for that, but if you get the chance to find some, they're perfect.
Debris

I don't really have photos of the build process for these debris pieces. I made a batch of 2x2 tiles like you see, following the Wyloch technique (at least in terms of shape with small walls, not using the same materials).
I needed to make tiles to indicate that the path was blocked, so I made big debris pieces like that. The majority of the space is filled with crumpled aluminium foil, on top of which I glued some foam bricks, pieces of stuff that came from here and there, a little bit of wood for collapsed beams, and then a mixture of dirt and spackle to cover it all.
It works well, but if I had to do it again, I wouldn't put it directly on tiles. I'd make it as a scatter terrain element that I can place wherever I want to indicate that something is blocked. Because in the end it turned out really well, but I can only use it when I'm using tiles of that specific size. I can much more difficultly use it on a battle map for example.
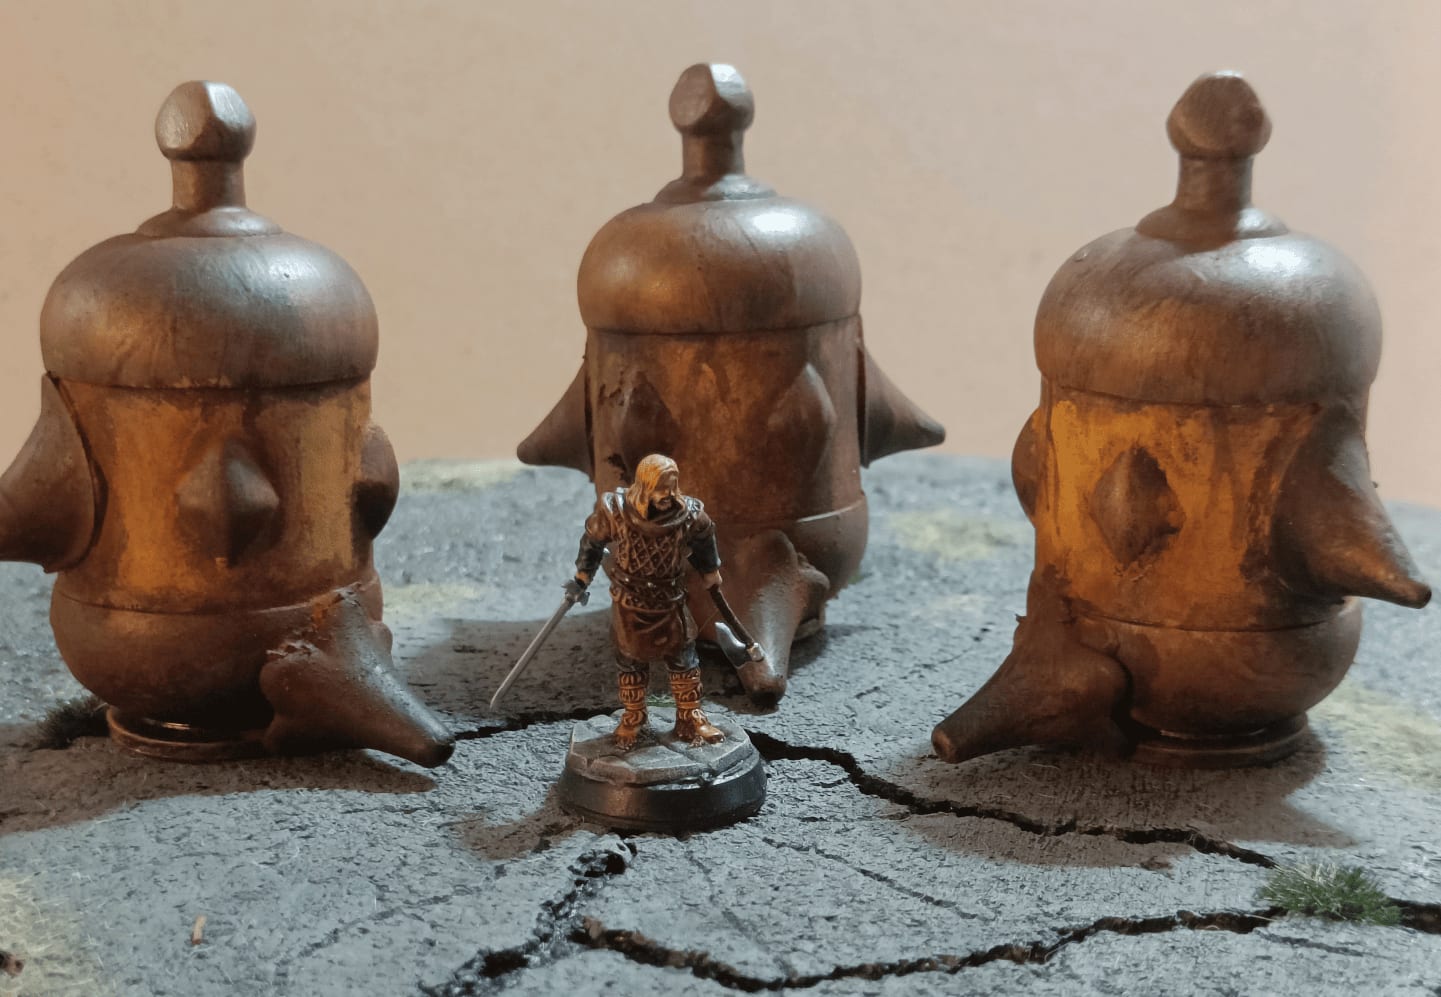
Clip-under Doors

I'm going to document a set of doors I made.
I had started making foam tiles like you can see in this first image, but they're a bit thick. To be able to indicate that there's a door on the right or on the left, it was difficult for me to position the doors I already had. Either they clipped onto walls (but I stopped putting walls on the edges of my tiles), or they lay flat to separate two rooms, which works well on a flip mat but doesn't work very well here.
So I needed something I could put on the sides to indicate a door that can be opened. I needed those doors to be sturdy and not fall easily. I thought a bit about the right design to manage to do that and that's what I'm going to document here.

Here's the heart of what I'm making. I have this base piece, which is a wooden plank. I don't remember where I got it from, but I recovered a big bag of them from a wooden construction toy set for kids. They're all exactly the same size, about 3cm wide, which is perfect size for my tiles.
What I did was glue a small piece of right-angled plastic at the bottom. I found it at a hardware store. Not even sure what it's meant for, maybe molding or electrical wires. The advantage is that the right angle is already built into the material, so I don't have to make it myself. That's important because if I made it, it might not be perfectly straight, but with this I know it is, and it's going to be solid too.
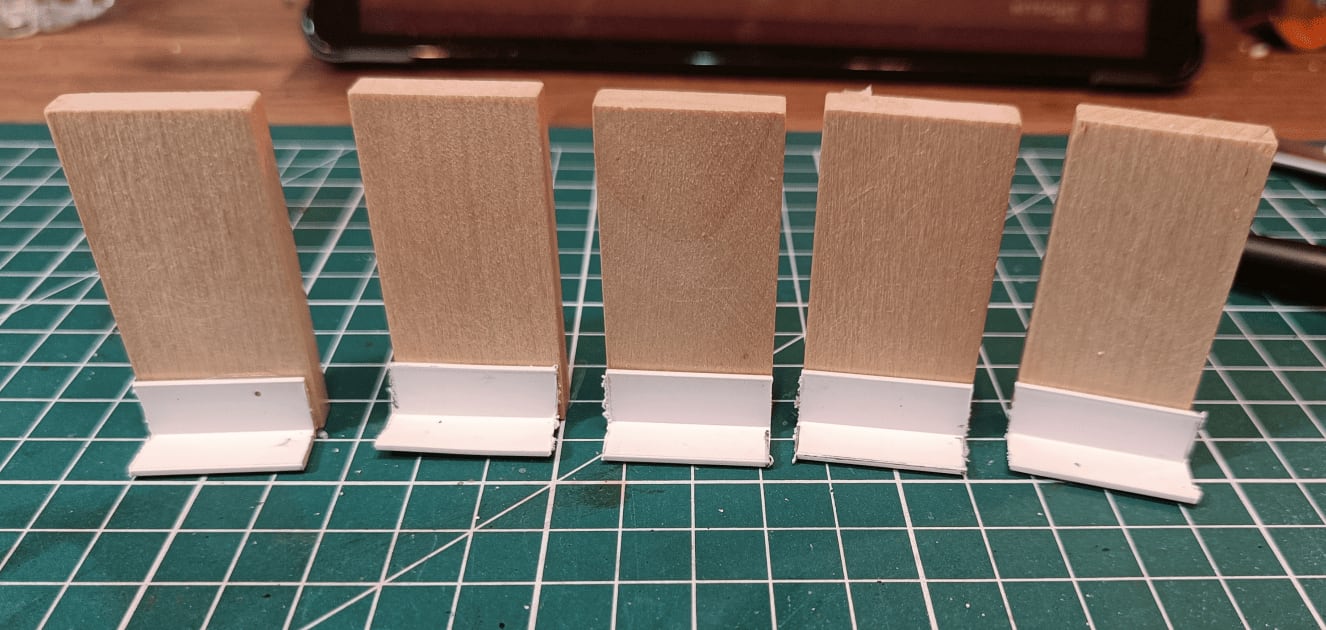
I set up my little assembly line so I could make them all together. I start by gluing this small piece at a right angle at the bottom, which serves two purposes: it helps make sure the door stays flat on the ground, and it's a little thing I can slide underneath the tile to make sure it holds well.

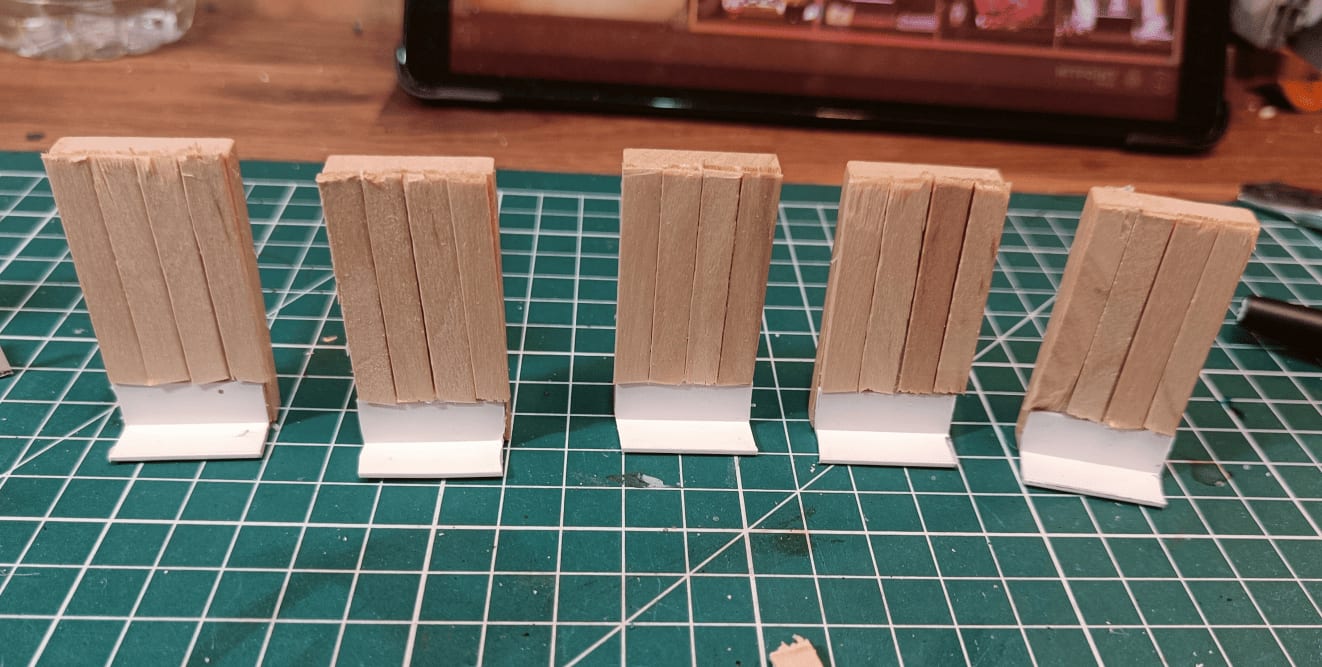
Next up, I glued the wooden pieces directly on top. I searched through my collection of coffee stirrers and popsicle sticks. My idea was to be able to glue a certain number of them side by side without having to cut them lengthwise.
If I used popsicle sticks, they would stick out a little bit, so I took other wooden sticks that were a bit smaller. That way, it allows me to place them side by side. I'm really trying to simplify everything I can in my assembly line as much as possible, so the less I have to cut, the better off I am.
That's why I glued them all on top, and you can see that I made them stick out above. That way, it allows me to cut them flush once they're glued, rather than having to measure in advance.
And there you have it, with the top cut off.
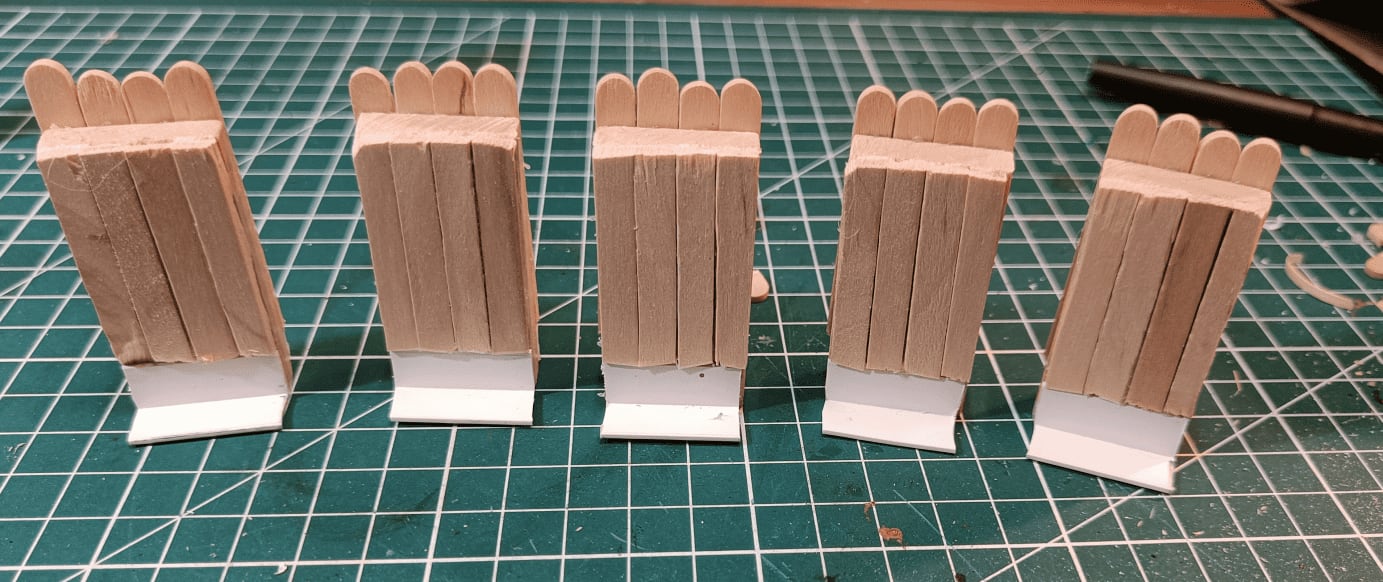
I'm doing the same operation on the other side, but I also took the opportunity to sand the top a bit where I cut to make it a little smoother.

And there you have it, all the planks are glued! As you can see, I added a little piece of foam at the bottom to compensate for the width added by the small pieces of wood. The next step will be to cover all of this with foam that will be used to represent stone.

I covered everything with foam boards that I carved to look like stone, and glued different things for the handle.

And there you have it! This is what it looks like once painted. I just did the dry brush on the stone and on the wood. I'll go over it again with a black wash afterwards, which will help to even it all out a little bit better.

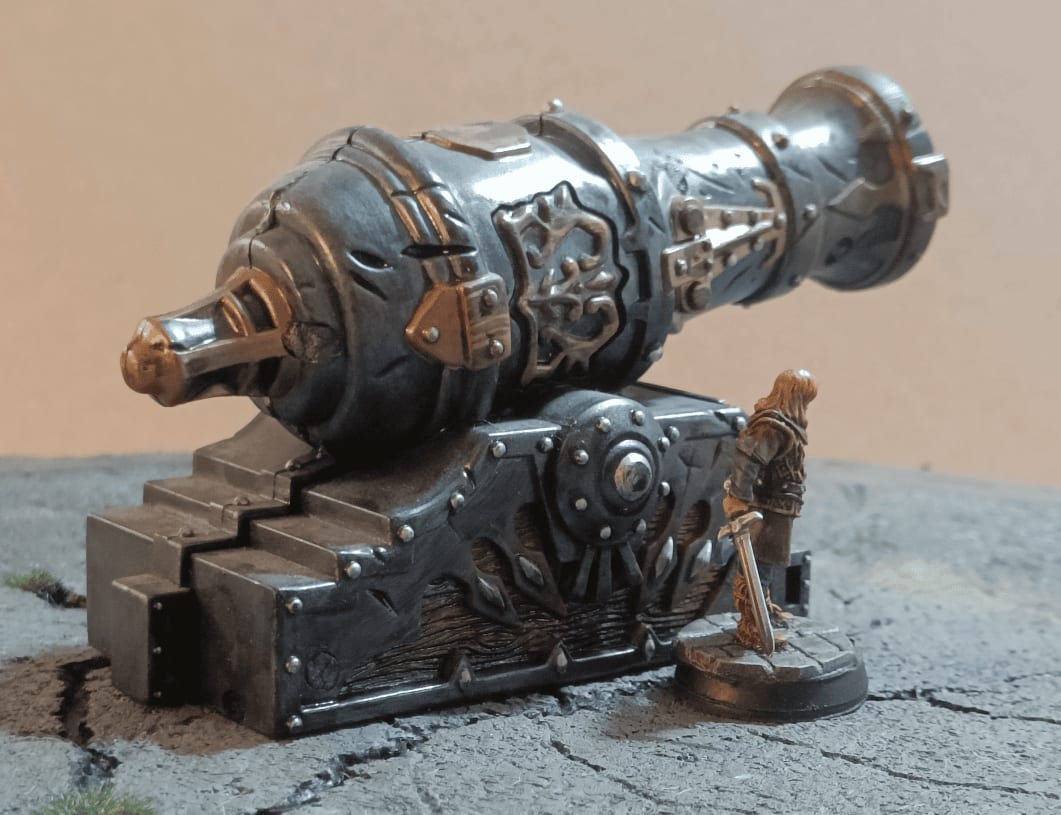
Cannon

Here are some beauty shots of a terrain piece I made when I first started painting. The cannon itself I recovered from some children's game I found at a yard sale, though I can't remember which game anymore.
I didn't do anything special to it. The piece was already like that with a pretty decent sculpture. I just painted it. This was really at my very beginning when I was discovering dry brushing and learning how to paint metal. It was practice for me to figure out what worked well with metallic paints, which parts needed silver, which could be gold, and how to apply washes.
I think I ended up giving this piece away because it was way too specific. None of my role playing game sessions ever needed a huge cannon like that, so it was just taking up space.


Bridge Beauty Shots
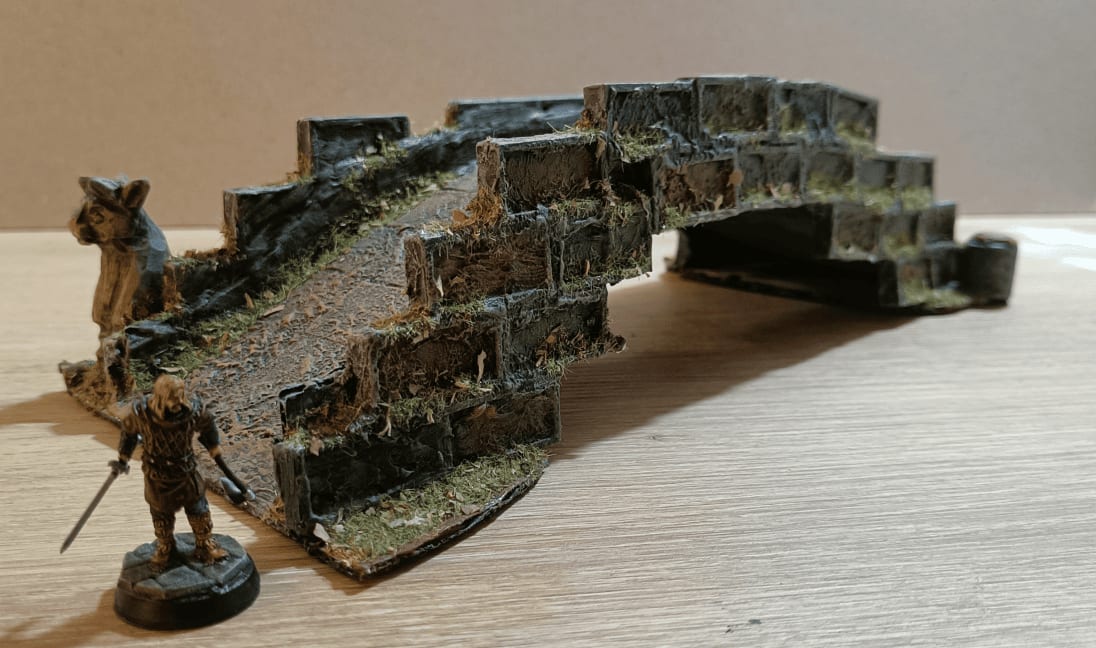
Here are some photos to document the only bridge I have in my collection. It's something I made super quickly without really knowing where I was going, which isn't the most beautiful thing I ever made, but it has roughly the right proportions and works well when I need to have a bridge. It's sturdy and didn't cost me much.


The main structure is made from standard cardboard packaging, the kind you receive parcels in. The bricks on the sides are made with plastic dominoes that I glued together. The surface of the bridge itself is small square tiles that I recovered from a pseudo Scrabble game. I glued them to make it look a bit like paving stones.
Then I covered everything with filler, pushing it well into all the holes in the dominoes and spreading it roughly on top. Next I painted everything, and all the areas that were particularly ugly (meaning a lot of them) I covered with flocking to hide the mess.
Water Tank

I made this element for my asylum scenario and reused it later in a distillery scenario. The idea was to create a very large barrel or tank with liquid inside.

At its core, it's really just a cardboard cup that I sanded and surrounded with popsicle sticks. Of course we're going to embellish all that a bit, but there you have it - that's what it's made of at its very foundation.

I taped the popsicle sticks to a support so I could have them all next to each other. That made it super easy to scratch the surface with a Swiss Army knife to create the wood grain marks.
Way easier than doing them one by one. Plus I only needed the marks on one side, so having them all fixed in place meant I could work on them in blocks all at once.

I checked the height and it's roughly the same as a decorative ladder I got from an Mantic crate.
I added small pieces of cardboard on top to symbolize metal plates. Just crumpled up some cardboard and glued the elements so they overlap each other. This makes it really easy to hide the joints where you'd see the cup underneath.
I also added a hoop around it - just a strip of cardboard with a few small steampunk-style decorations to give it a metallic look.

The size is perfect! There's enough room to fit a figurine inside. We've already reused it in a couple of scenarios where a monster gets stuck inside.

Here's a painted version before I added the Nuln Oil on the metallic parts.


We finish with a few beauty shots of the completed element with a miniature next to it to show the scale a little bit.