Ending the Sandpoint / Magnimar campaign
We used to be playing every other Sunday evening, and had an ongoing D&D 5e campaign running. It started as an initiation table, based on the Rise of the Runelords Pathfinder Adventure Path and evolved into an intrigue campaign in the city of Magnimar.
Then, COVID hit our table, and I moved to another city, which should have killed our game. Instead, almost 2 years after our last game, we all took one week off from work and gathered in my new house, to play a full week of D&D. What's the point of being an adult, if you can't do this kind of things?
From a DM point of view, running a marathon game during a whole week, to close a campaign that was put on a hiatus for 2 years had its share of challenges, but was also pretty rewarding. I have very fond memories of this whole campaign, so I'm a bit sad to have to end it, but I'm also grateful that we could end it properly and not add it to the pile of other unfinished campaigns.
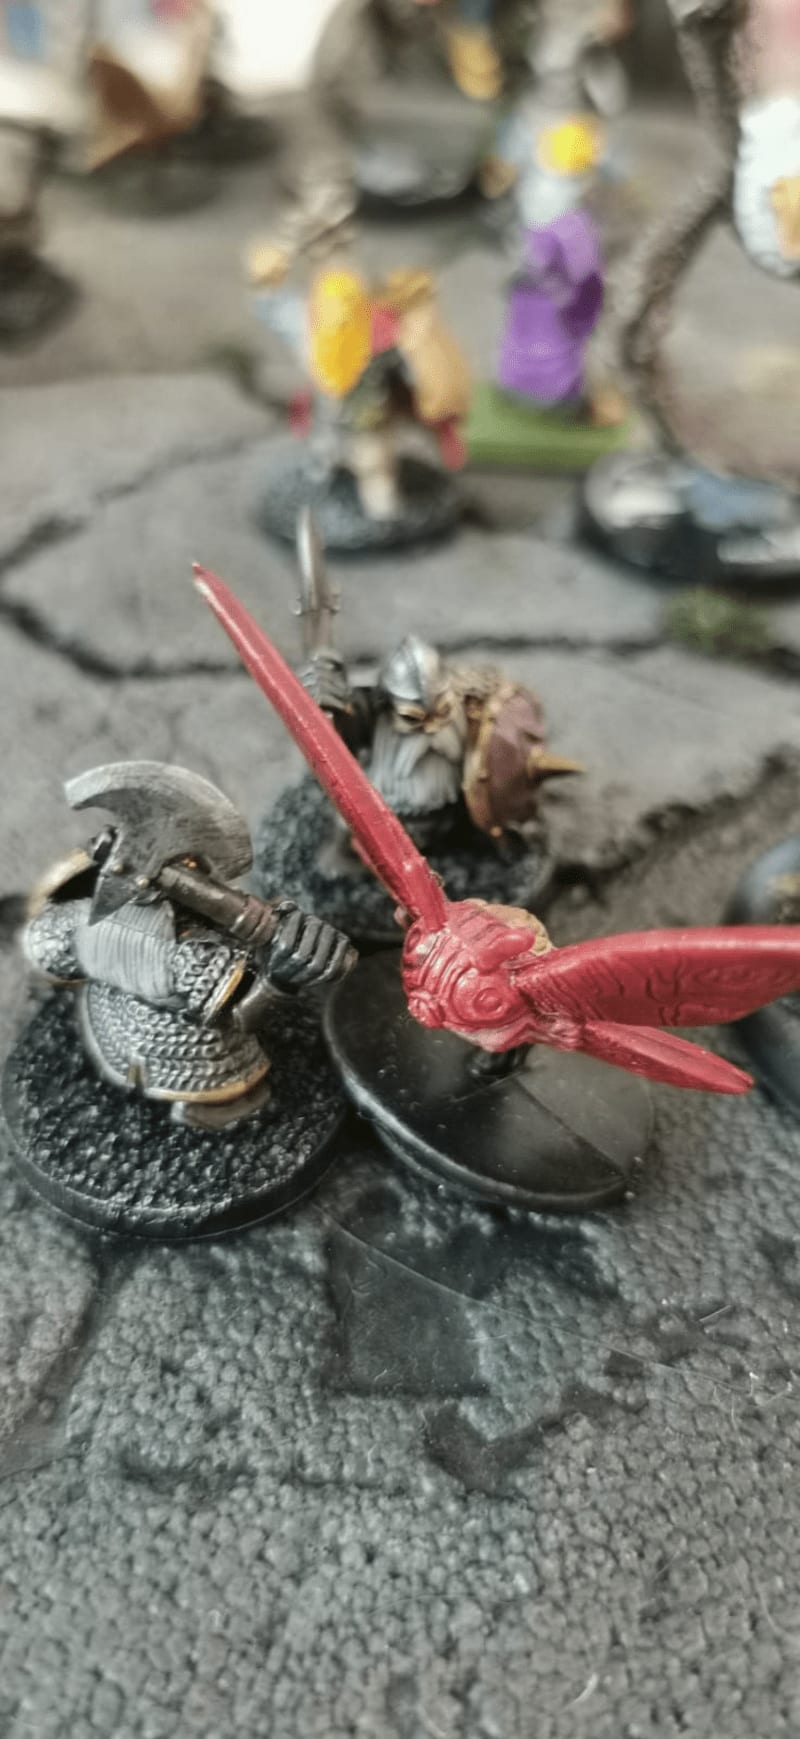
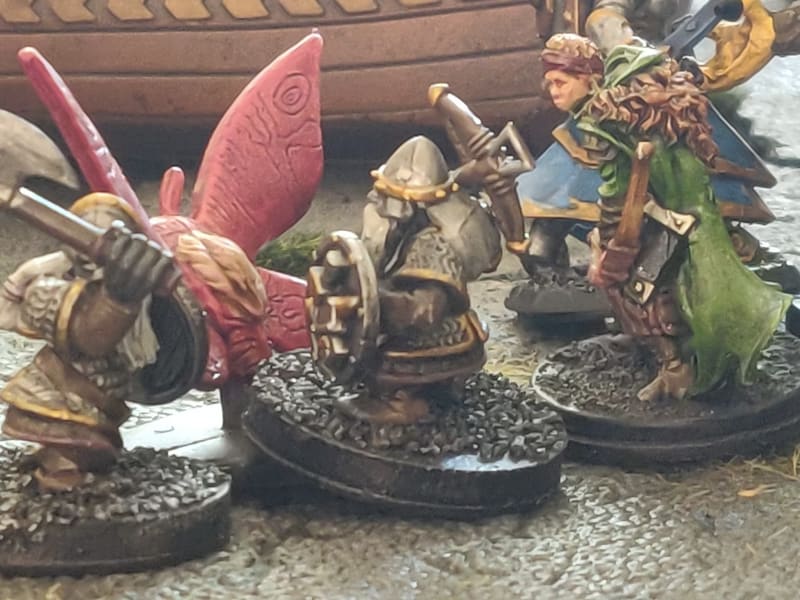
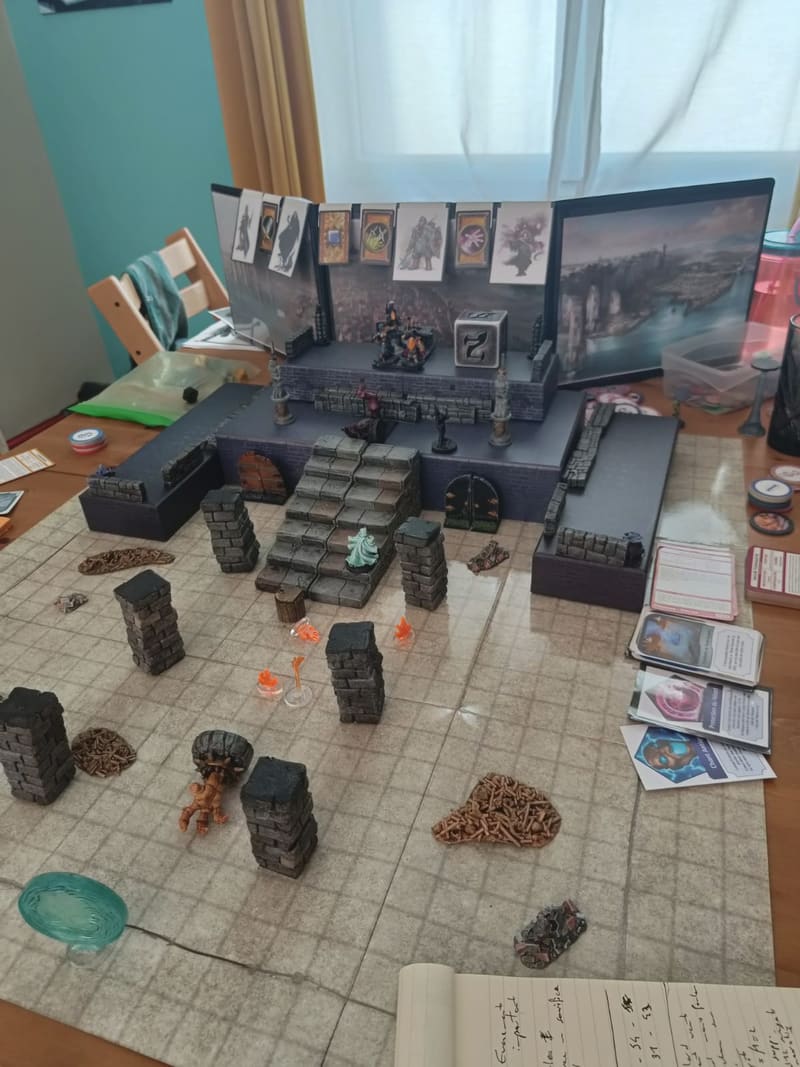
But without further introduction, let me share with you the pictures of the various scenes of this intense week.
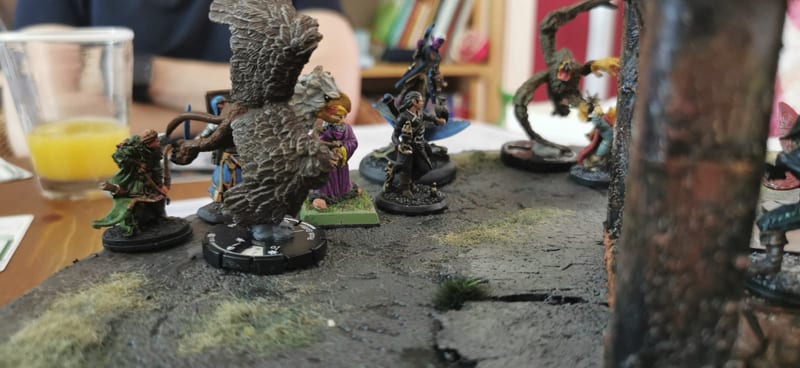
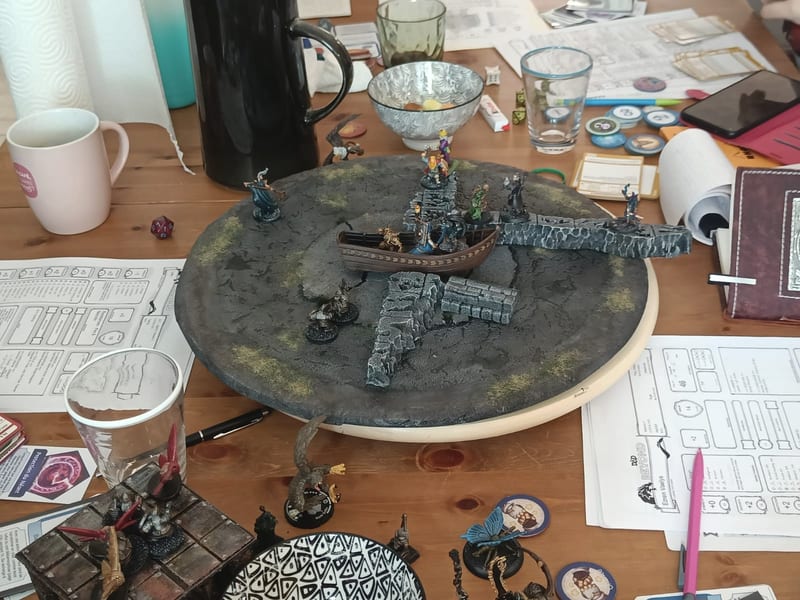
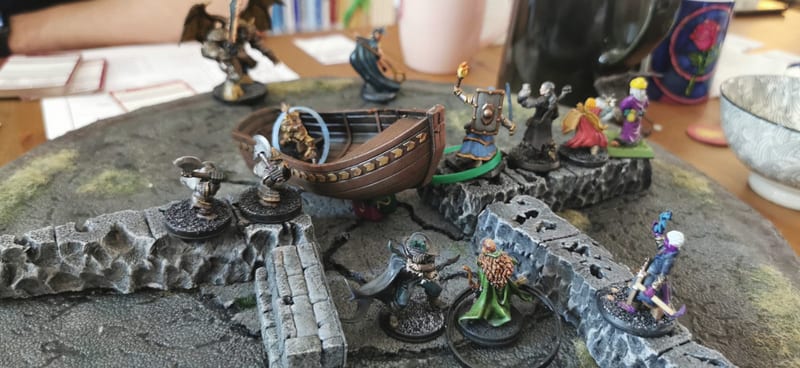
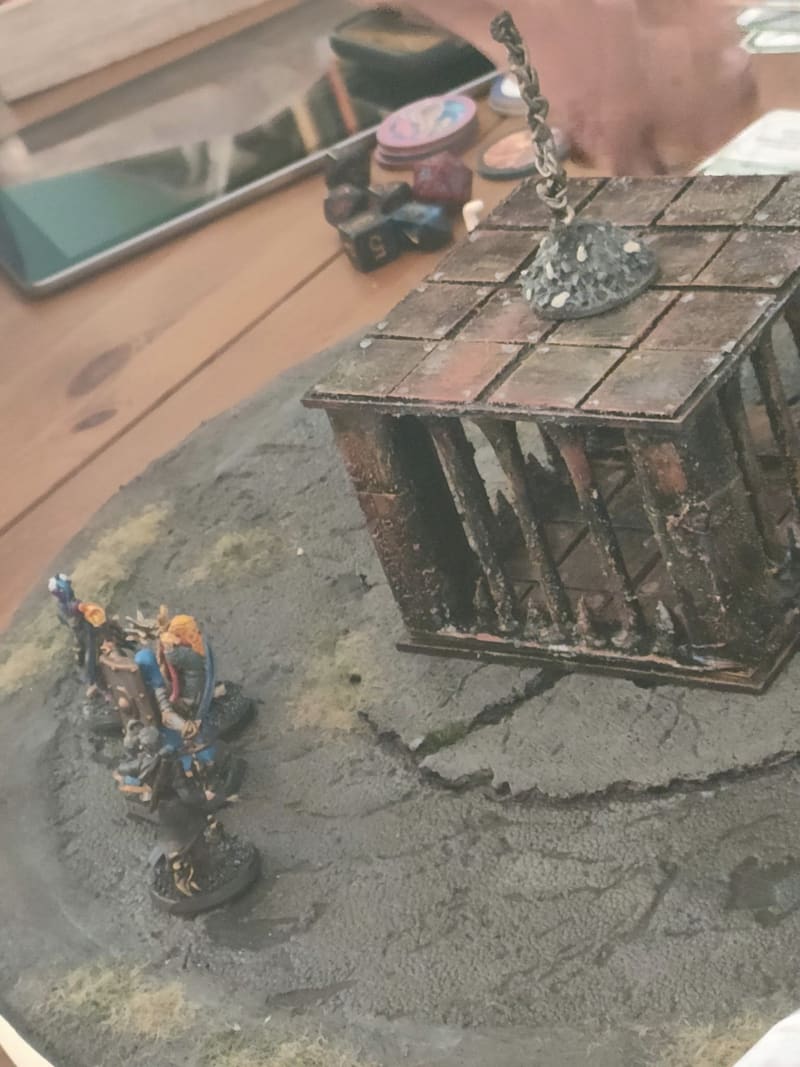
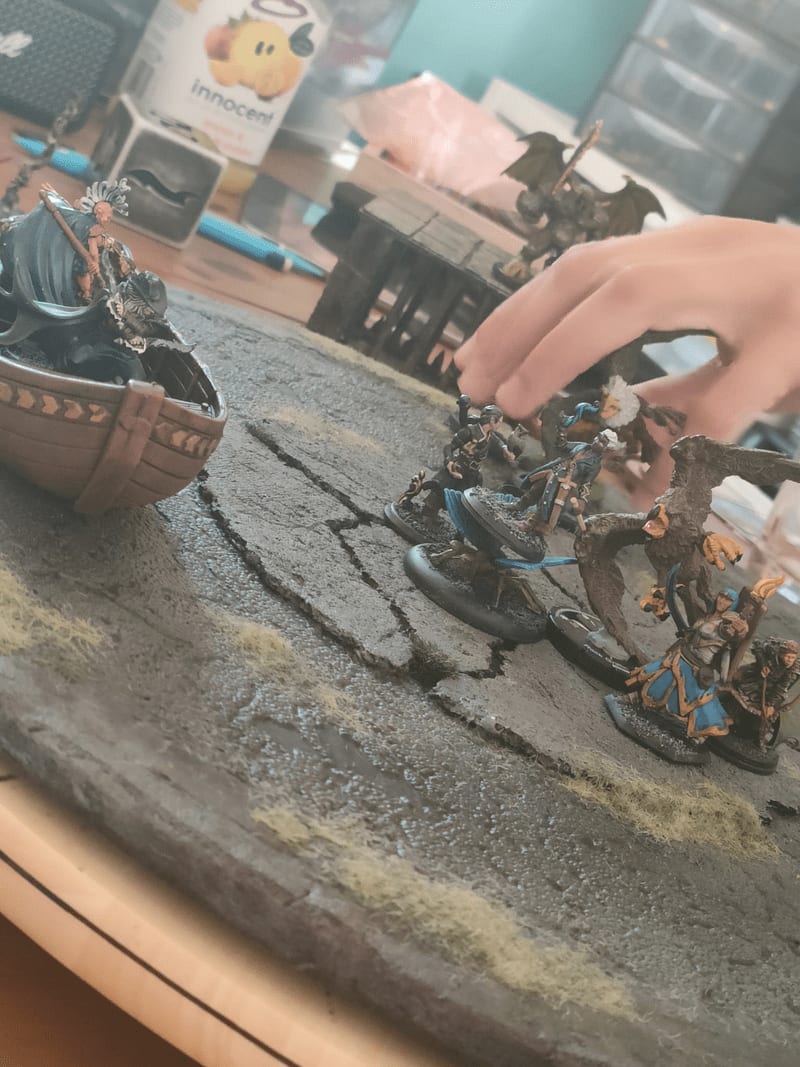
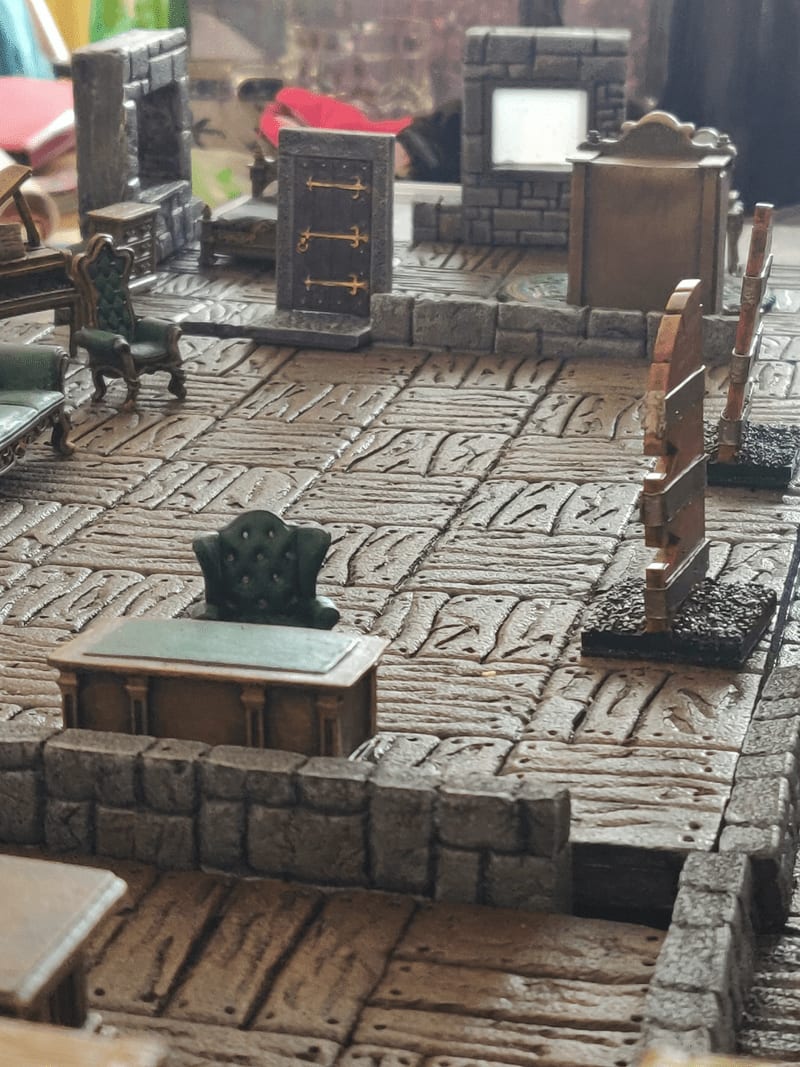
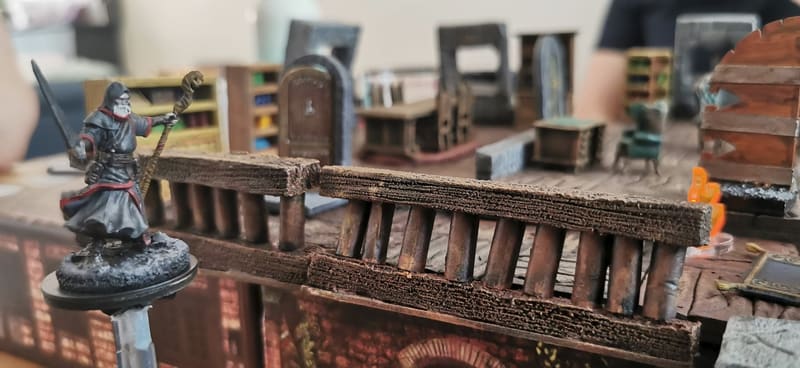
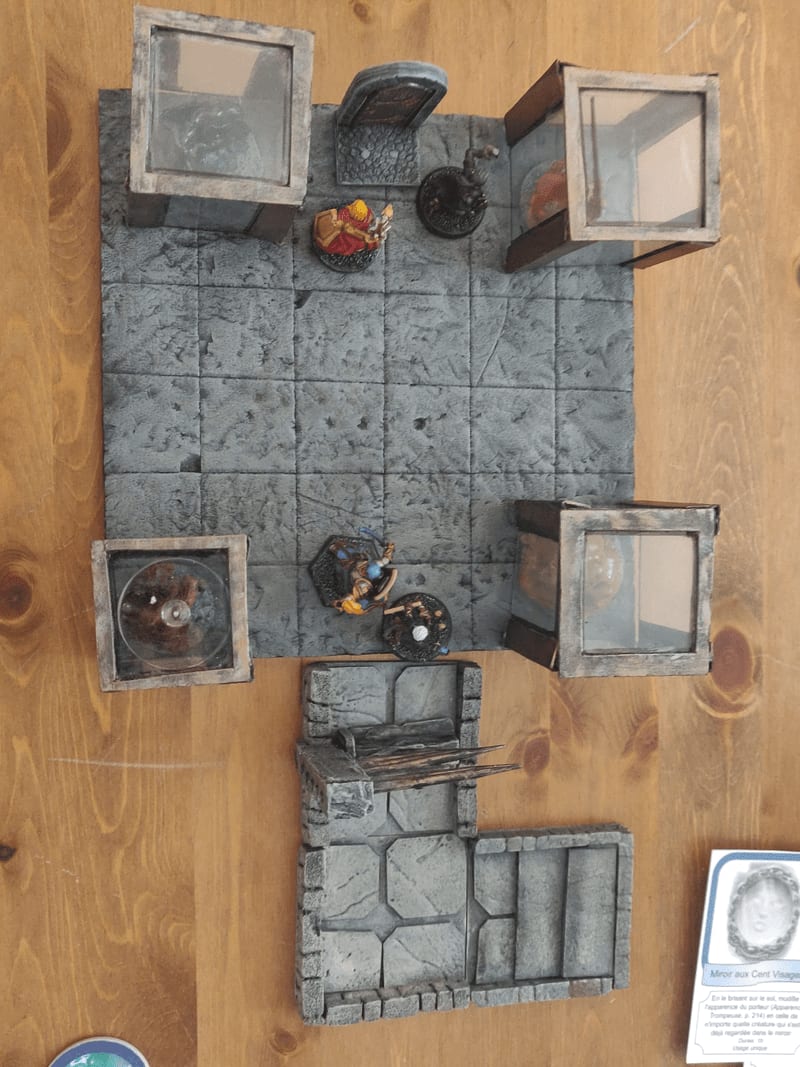
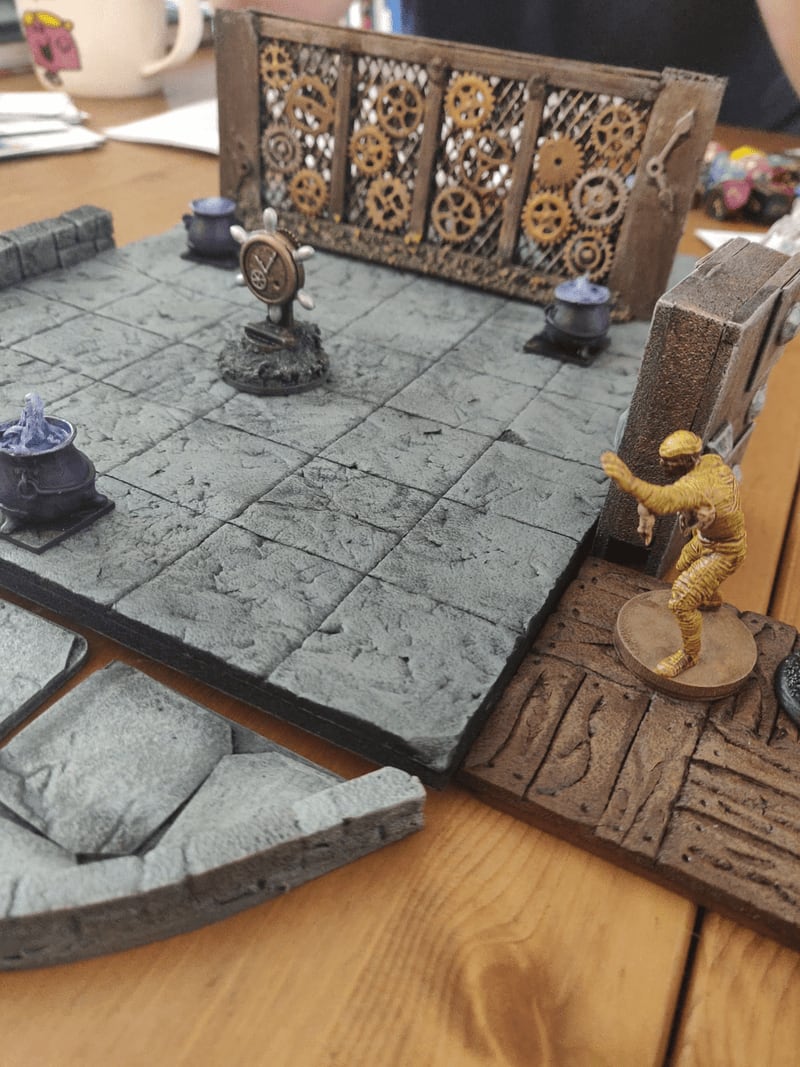
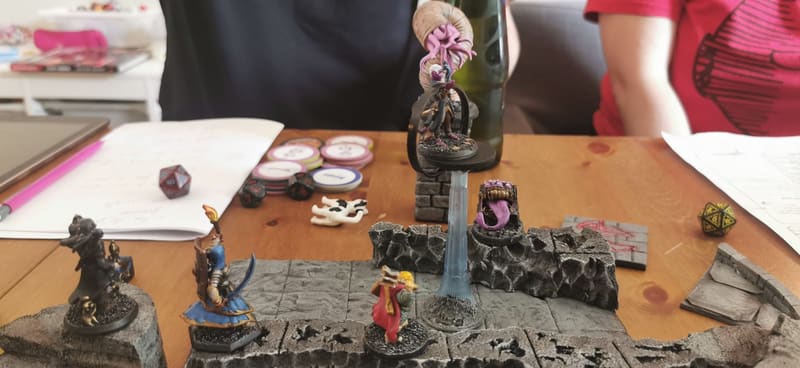
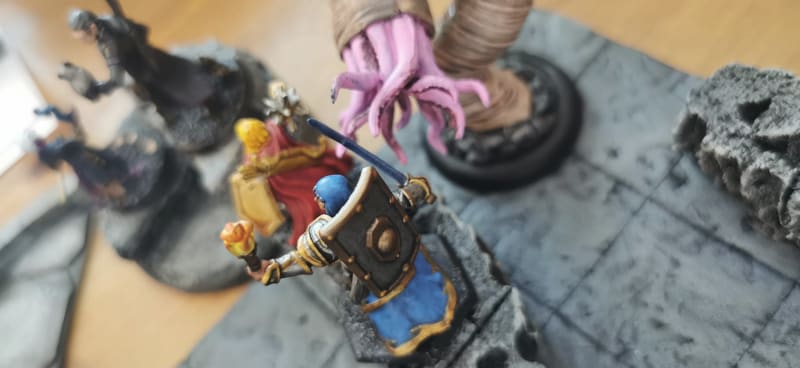
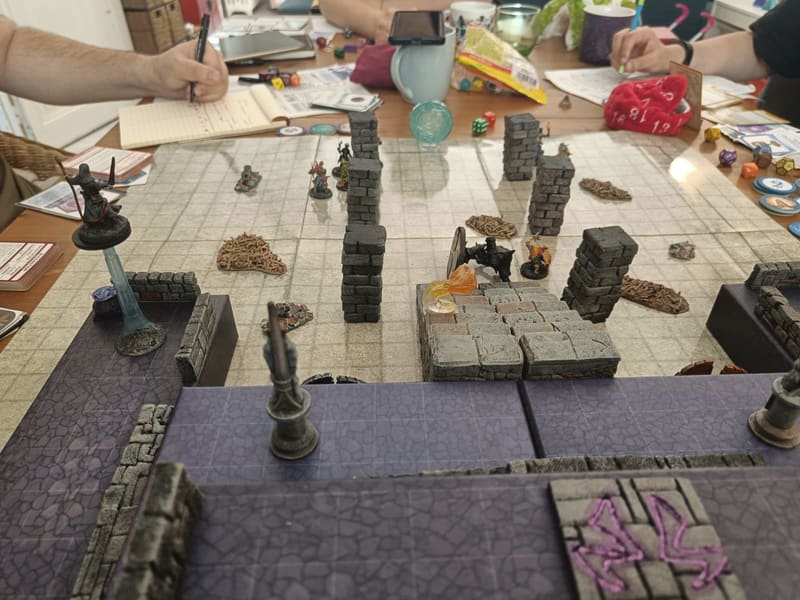
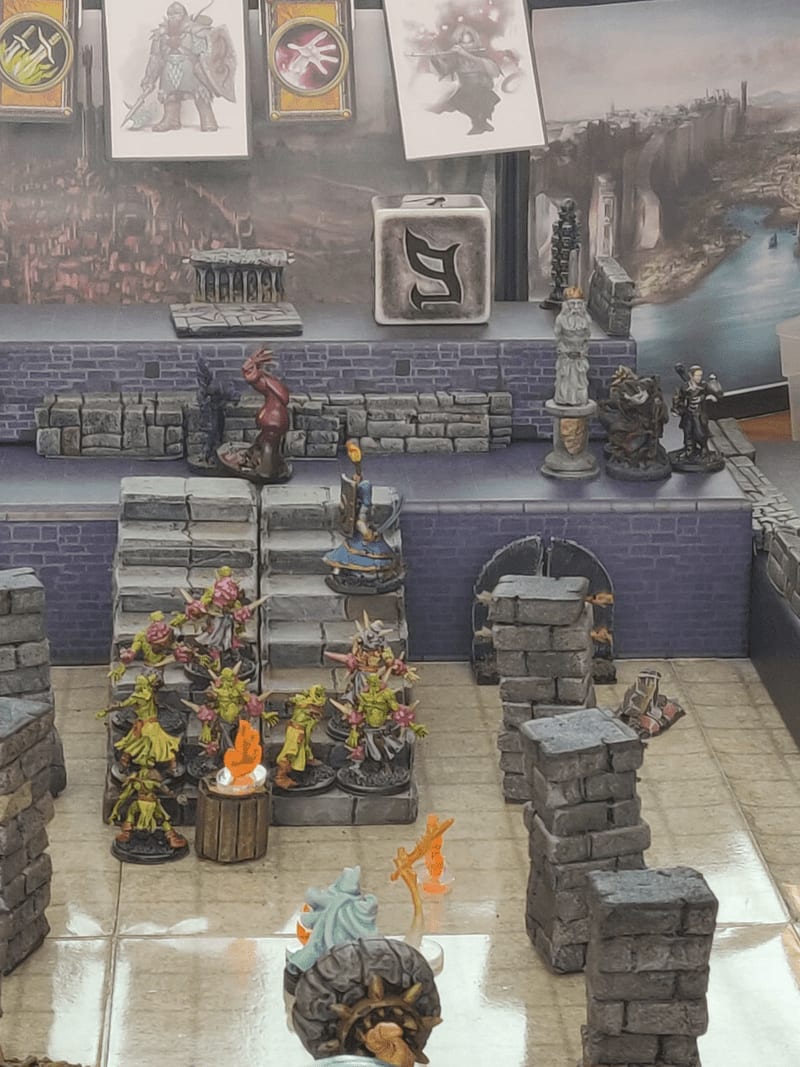
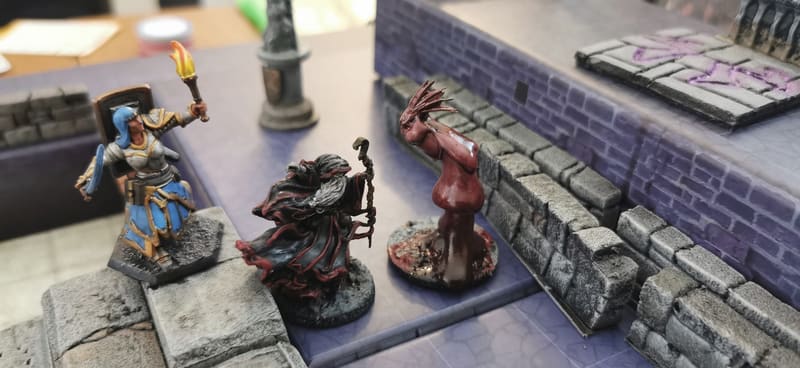
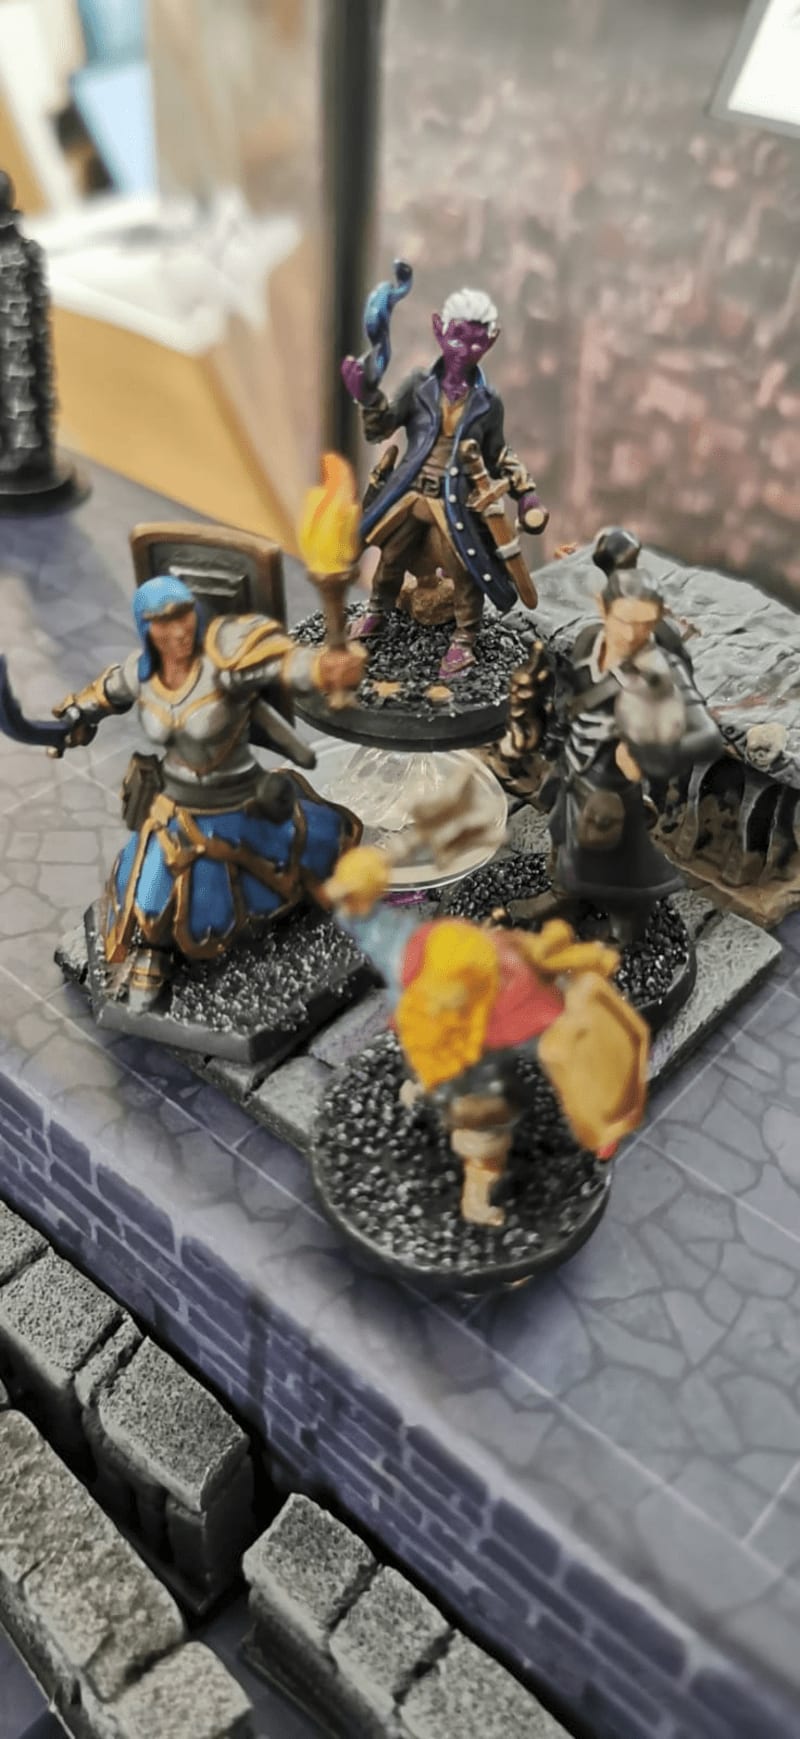
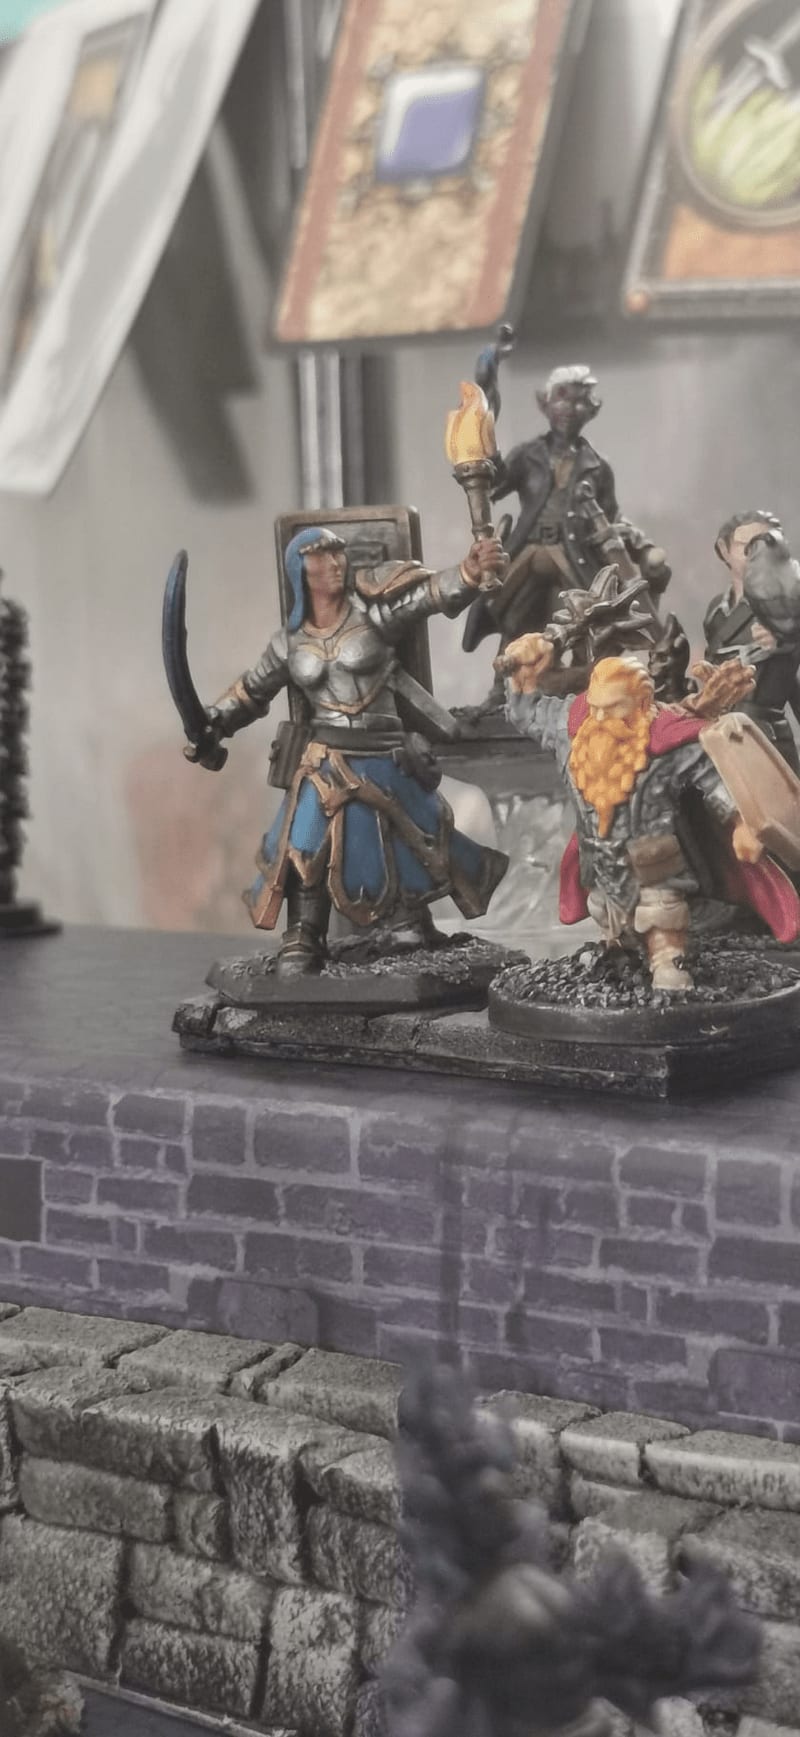
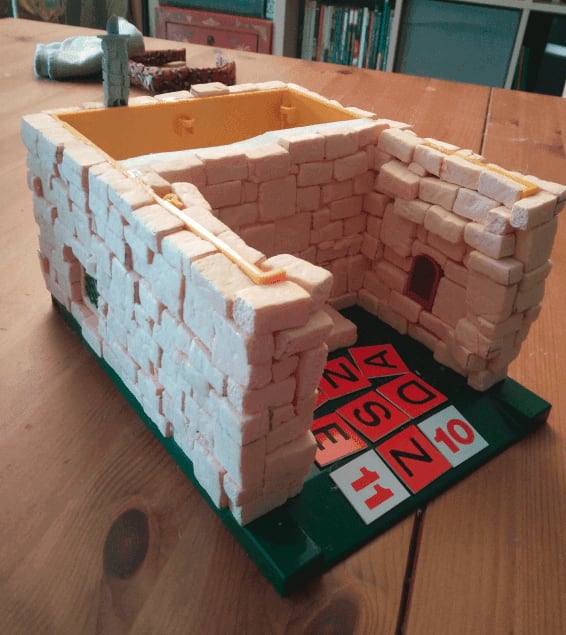
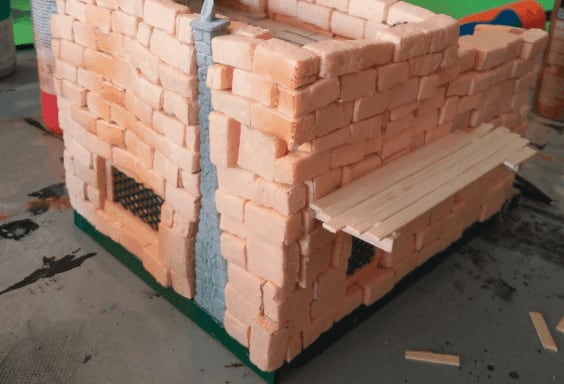
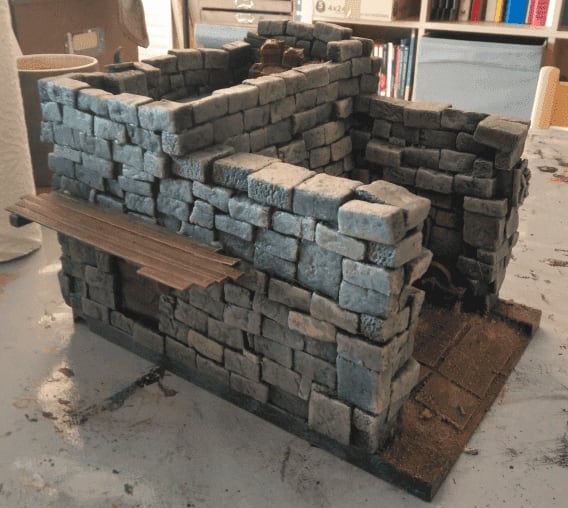
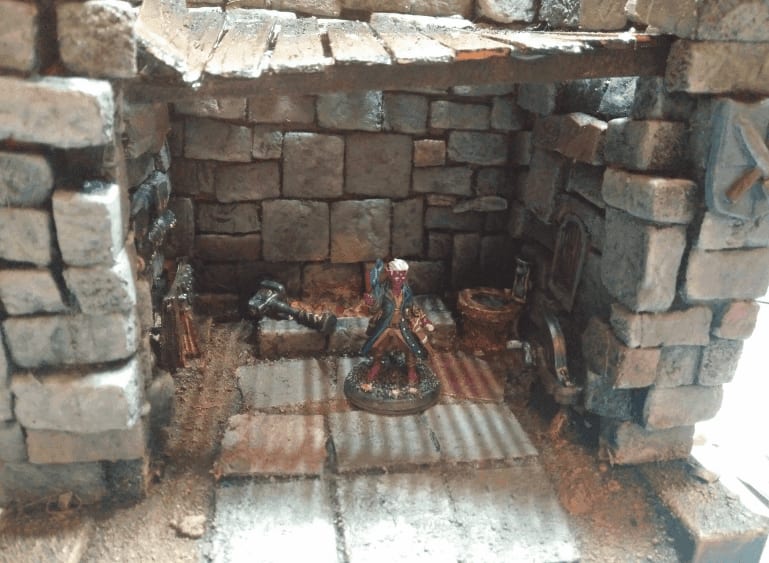
Scene 1: Saving Lord Deverin
The first session started with a bang. The group had to save one of the City Council Members from a certain death. The poor NPC had been injustly accused of consorting with devils and was thrown into the lowest depth of the City Prison: the Underworld, where horrible creature lurks.
While his cage was being lowered, a band of rival adventurers riding a floating barge attempted to capture him (they planned on asking for a ransom); while at the same time a group of bat-worshipper Derros, led by a Bat Demon was trying to kill both the PCs and the rival group.
I had completely forgotten that my group had access to teleportation spells, so what I had planned as a timed rescue attempt ended up much more quickly into a flying chase.


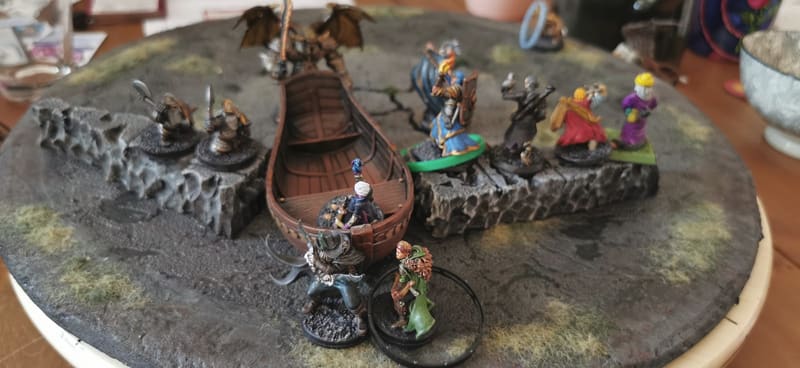


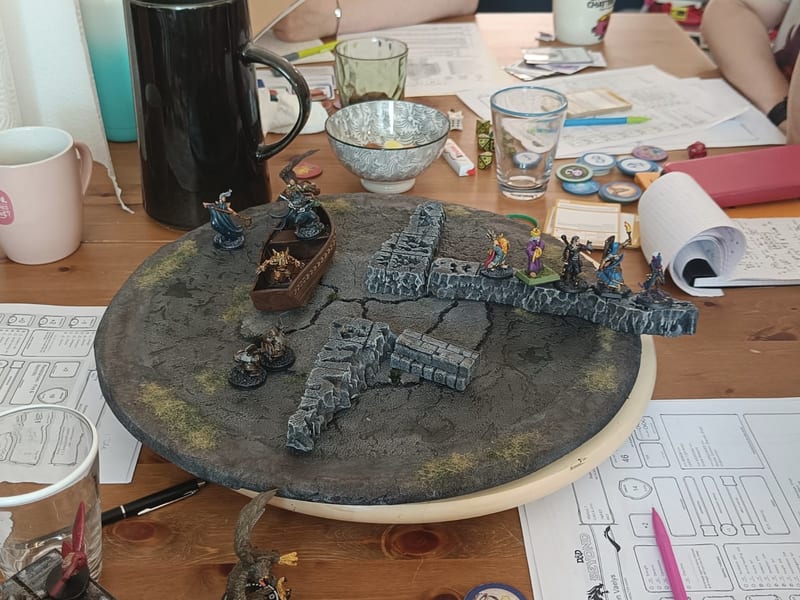
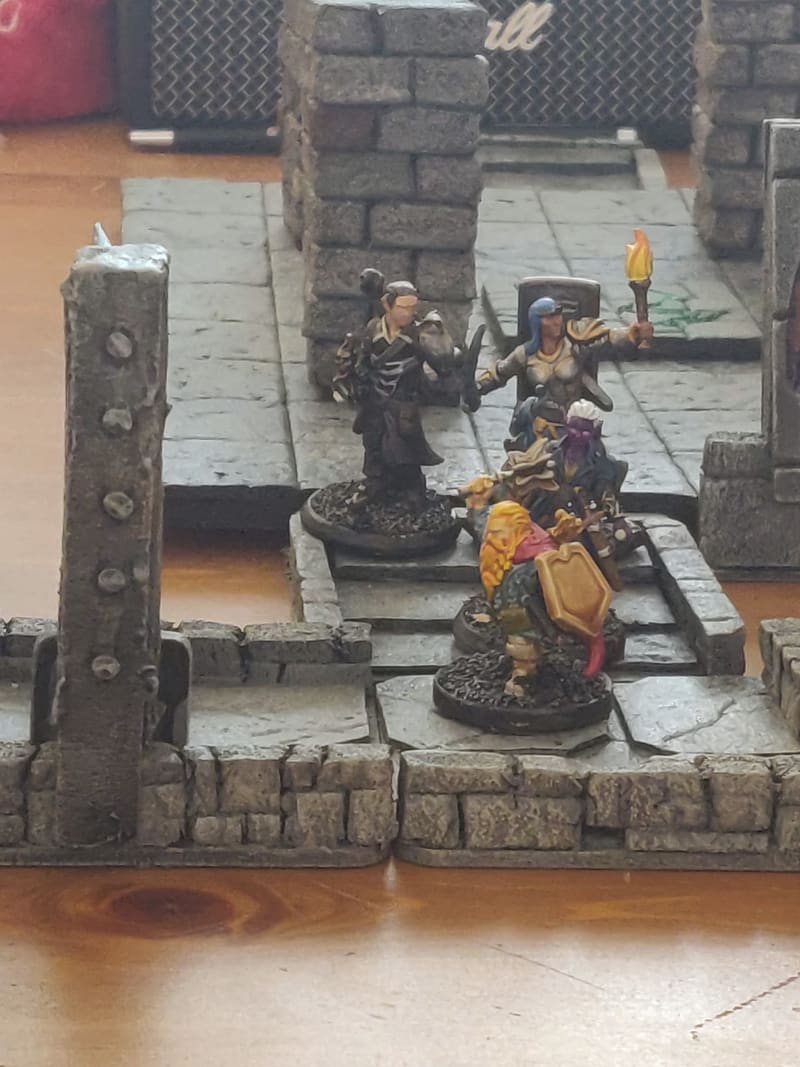
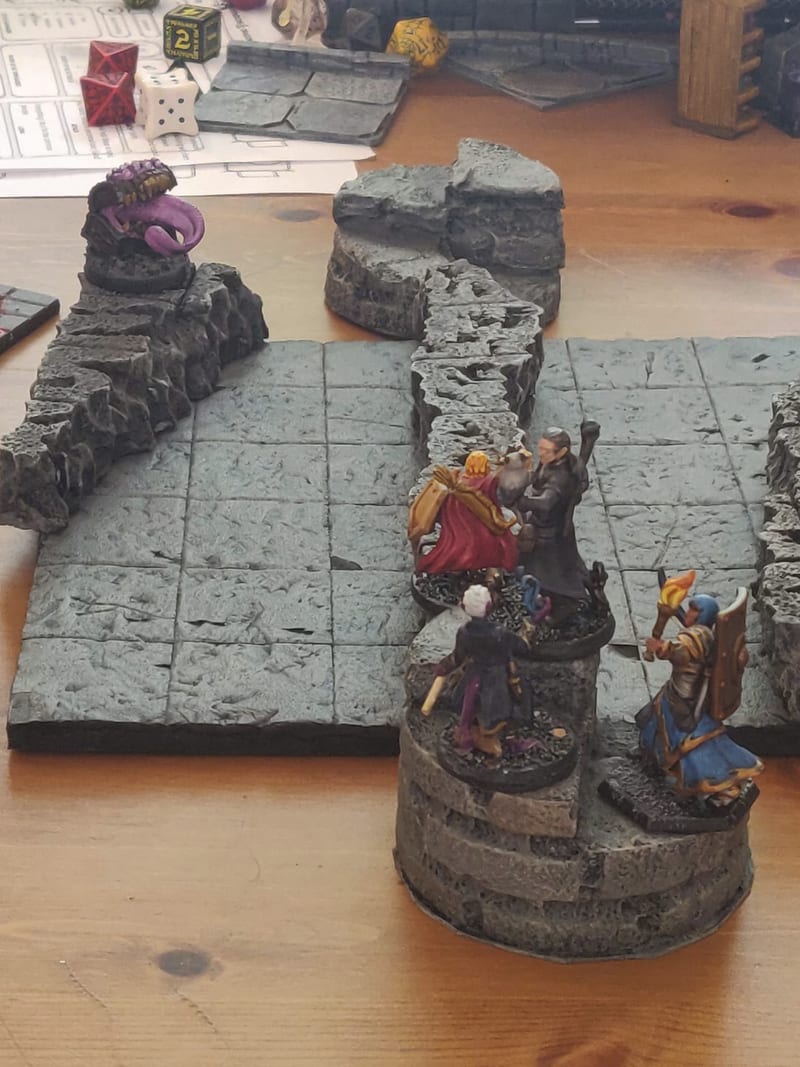
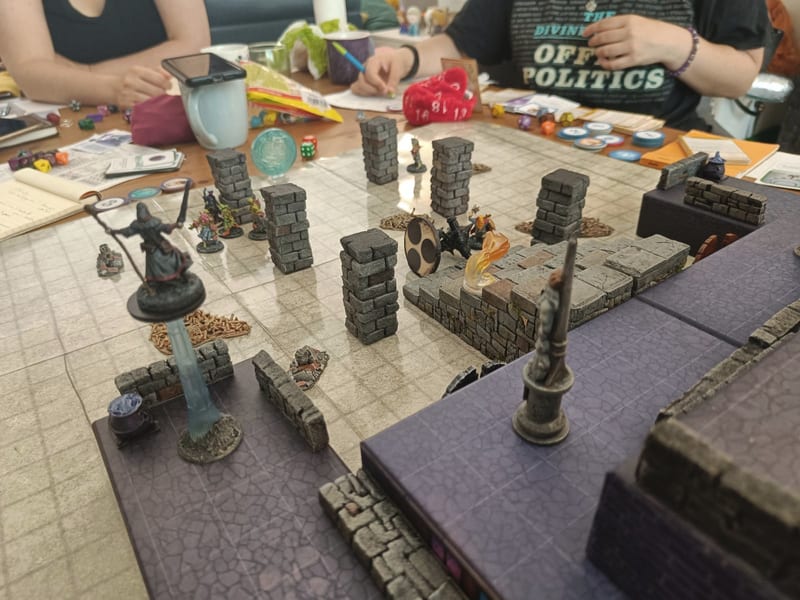
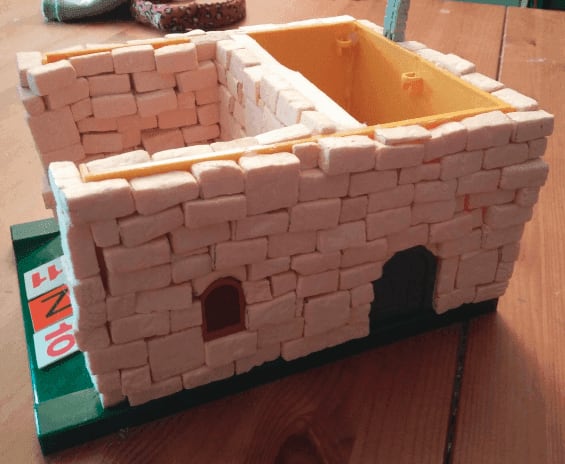
Getting back to the surface
After having saved Lord Deverin (and get rid of the rival group), the PCs went on looting the rival camp, and headed back to the surface, fighting a Roper on their way.


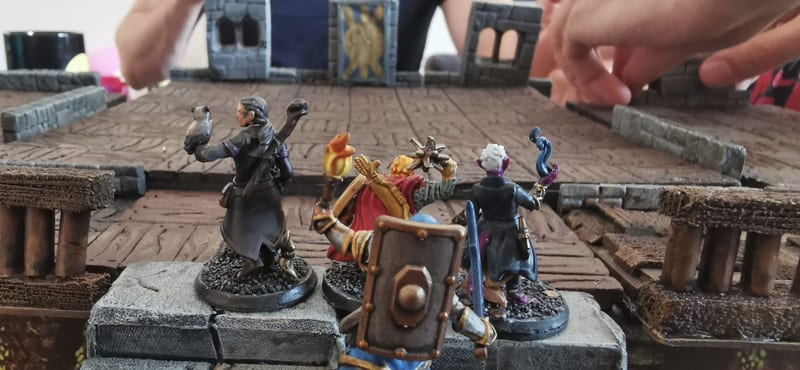
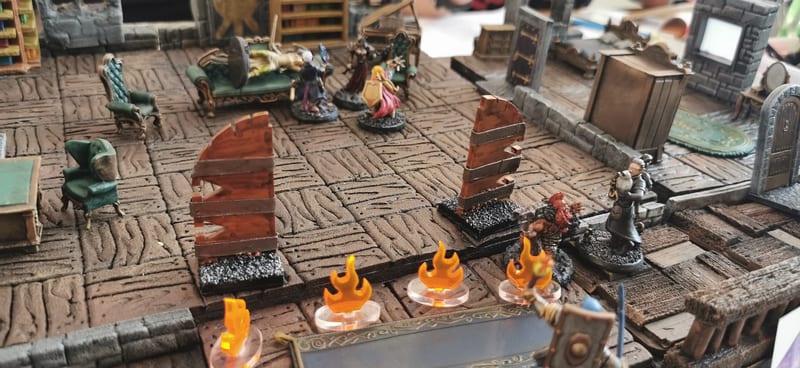
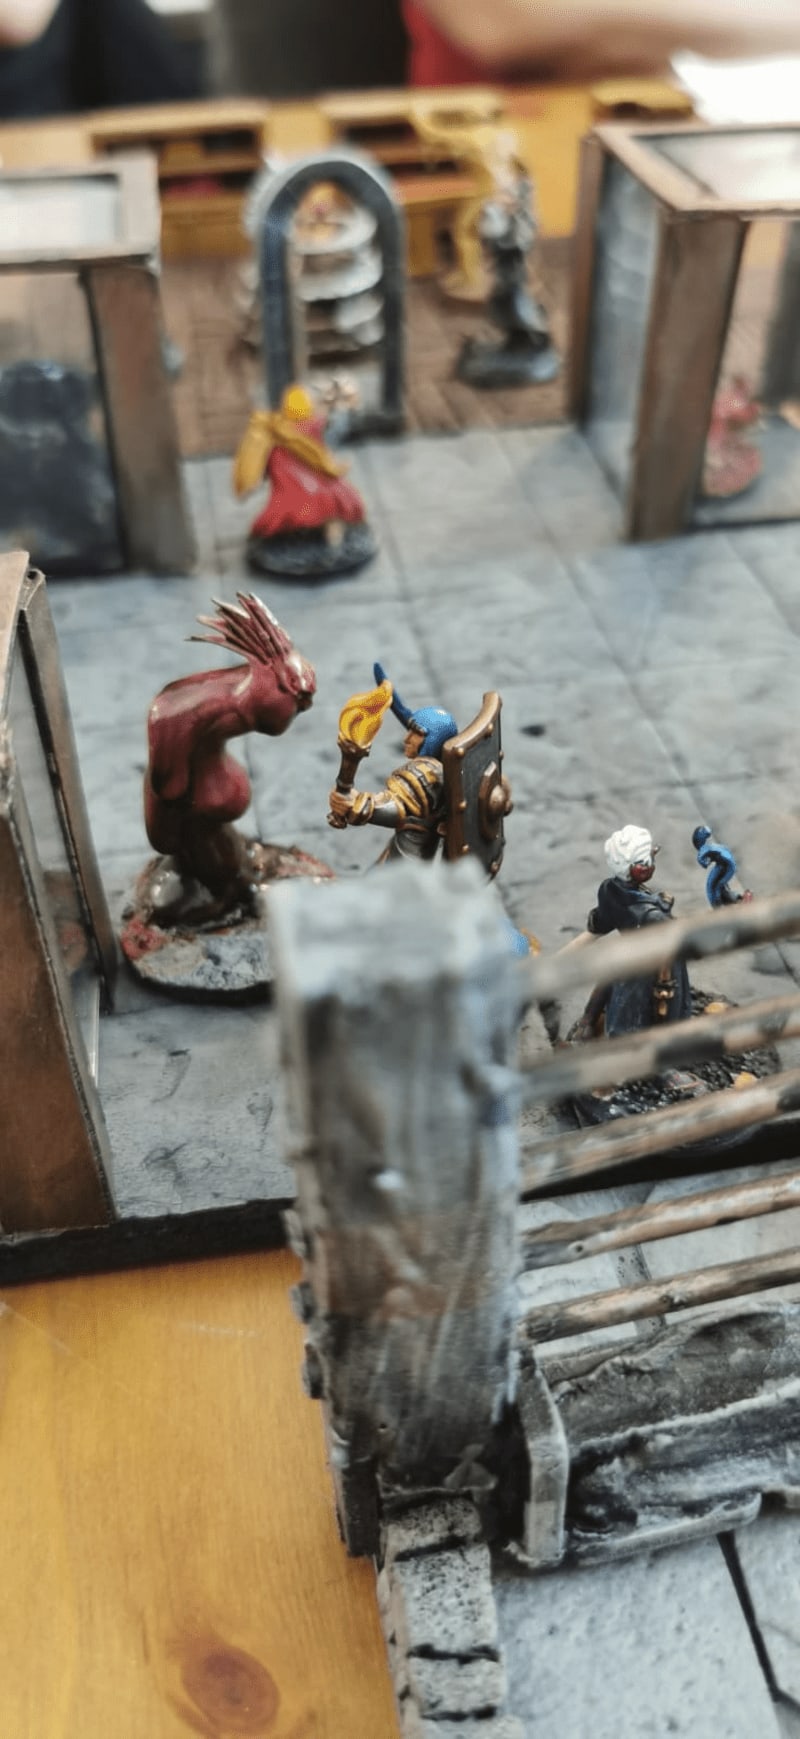
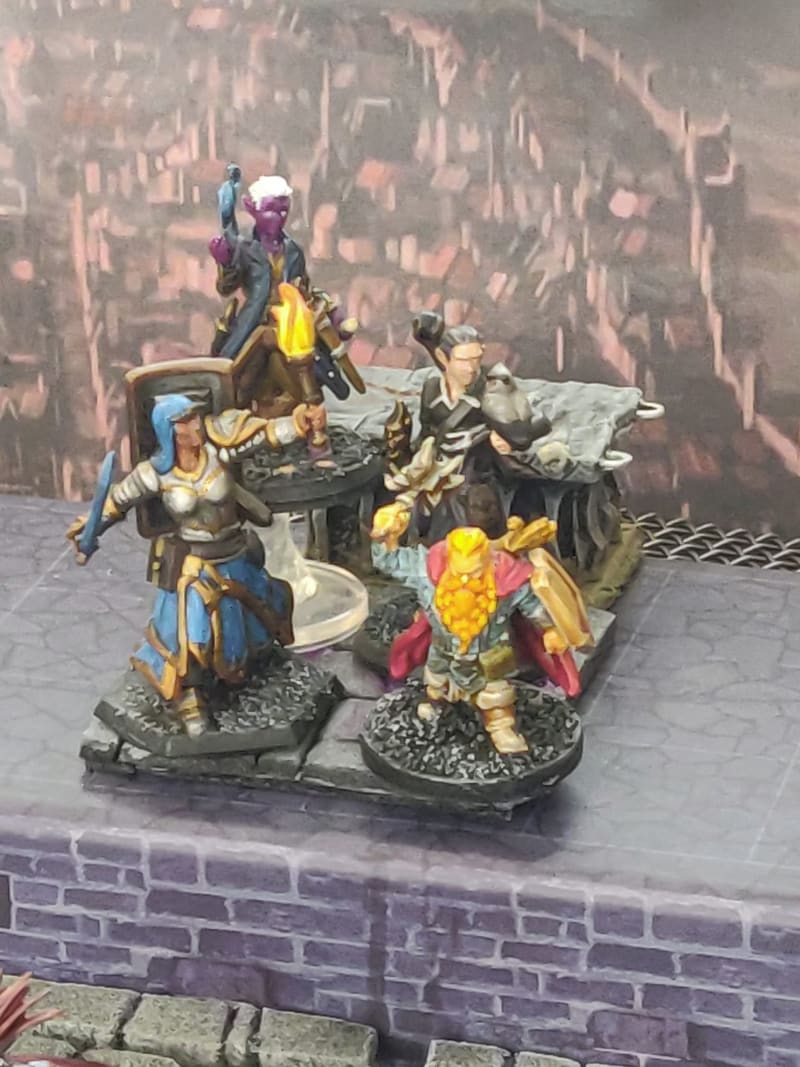
Fighting their doubles a the Kaijitsu Manor
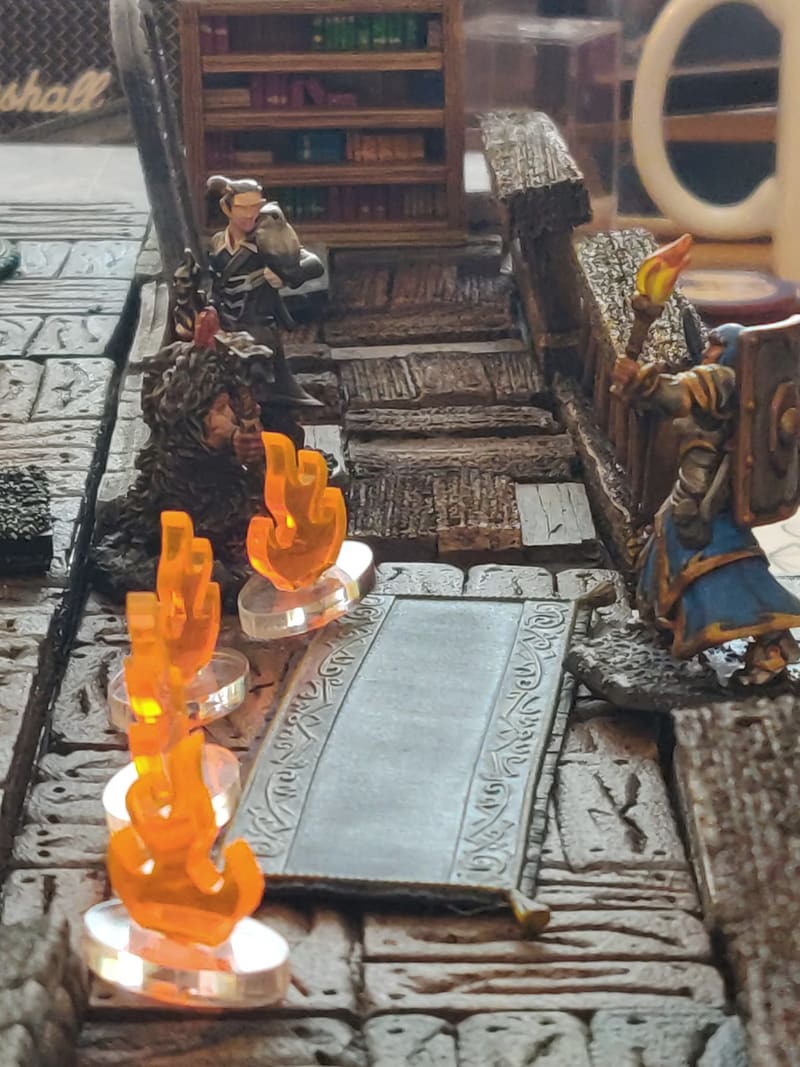
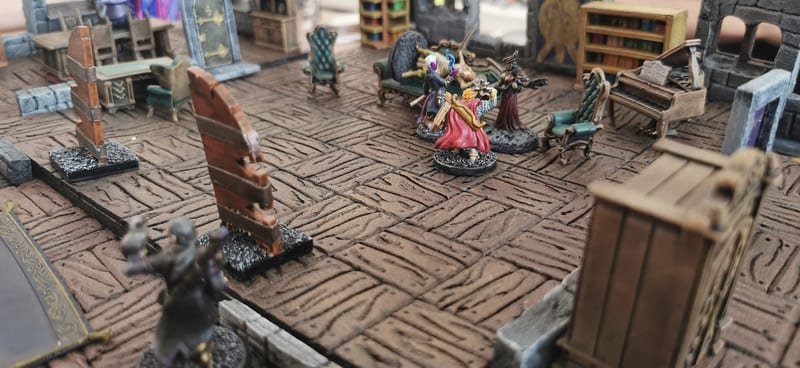
Calling their NPC friend Ameiko Kaijitsu, the PCs were surprised to have somebody else answer the magical phone call. Not sure who they were against, they went to the manor. They found their friend, agonizing on a couch, with two of their evil twins alernatively hurting and healing her.
Rolling incredibly high Initiative, they managed to focus and kill the opposing cleric in the first round, then went all-in on the other members one after another. They still had the opposing Bard take control of their own bard, which could have been disastrous, but they managed to handle the damage.
They ran from the building as the roaring fire of the various fireballs burned to ashes the whole first floor.


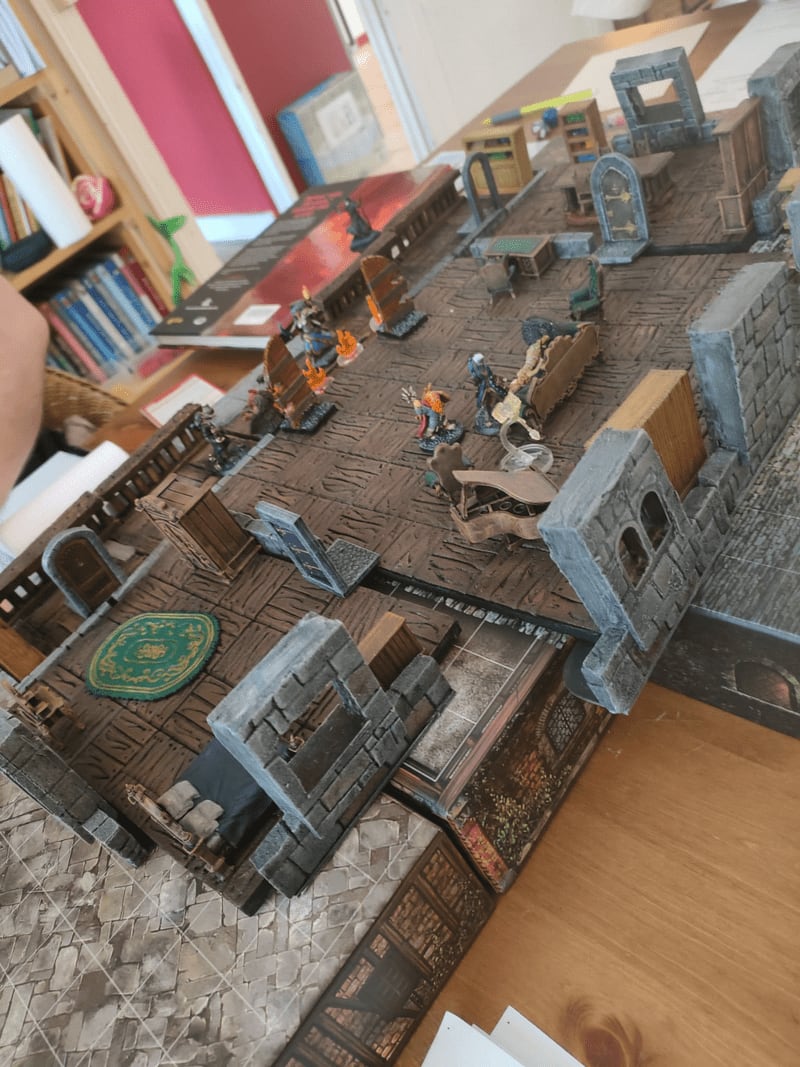


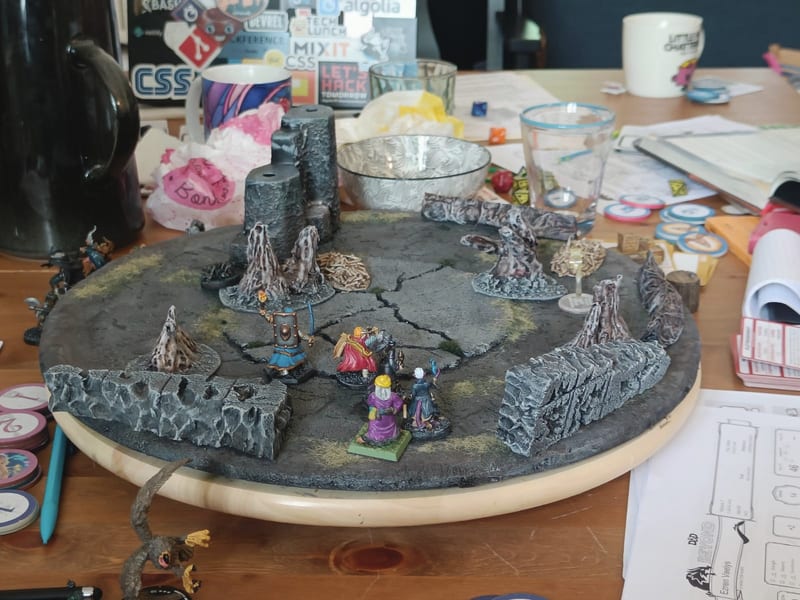
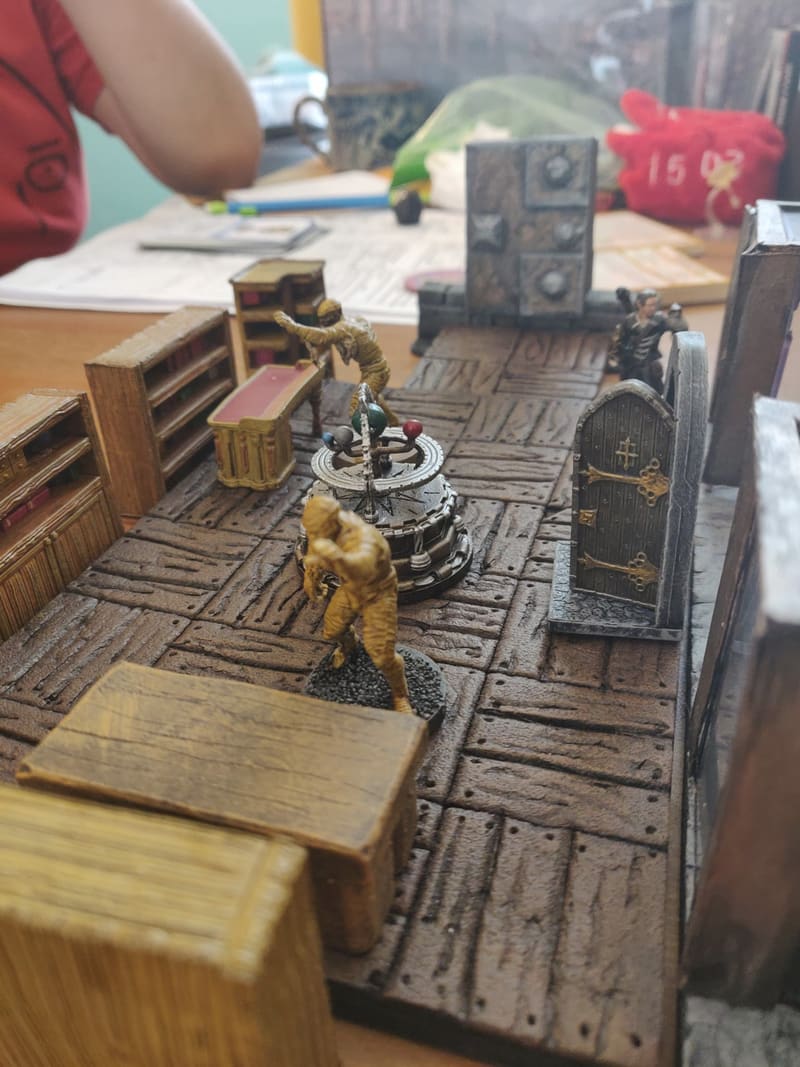
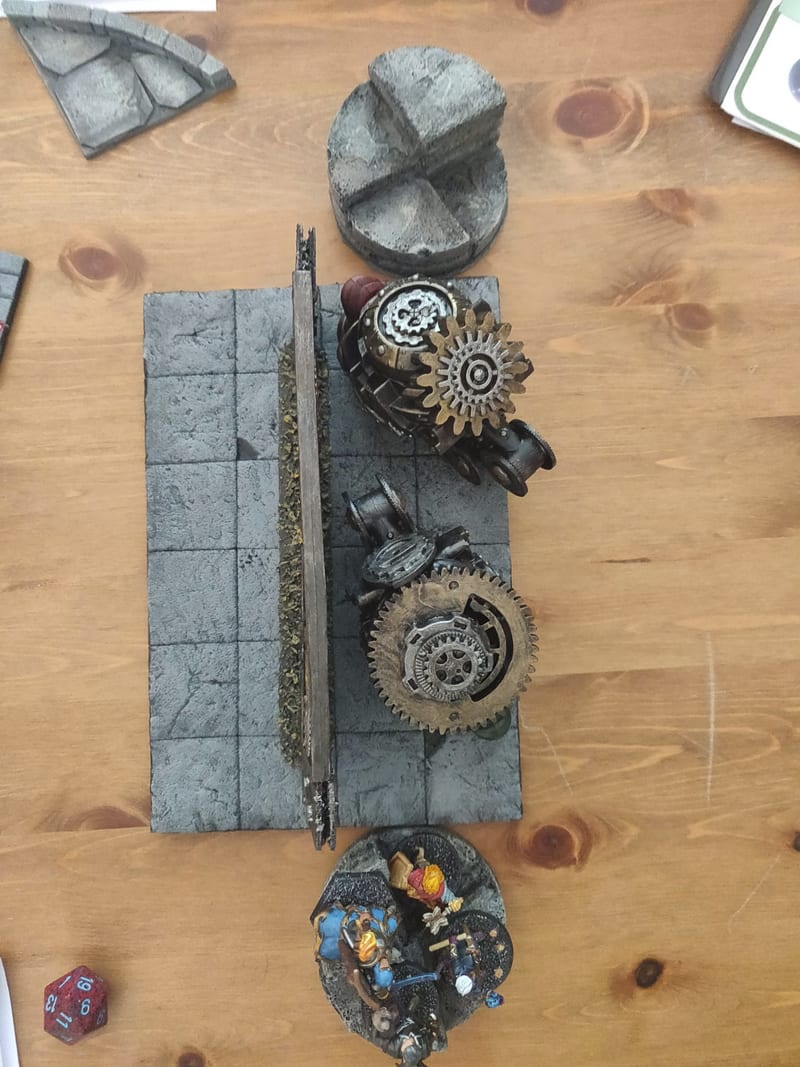
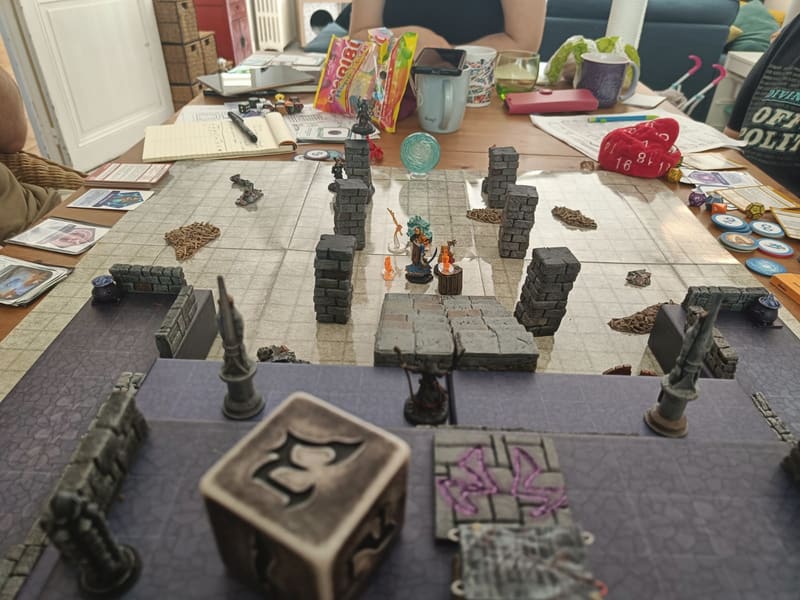
Into the Dungeon of Time
Now the PC know that the BBEG is the alternative version of their Warlock, from a dark future. They aim to his dungeon, trying to reach him. The whole dungeon is built on the idea of time paradox (this is a reskinned version of Julinda's Gauntlet, from Wyloch)
The whole dungeon somehow has to be explored twice, and actions the PCs take on their first time through will impact them again on their second time through. This was very fun to play.


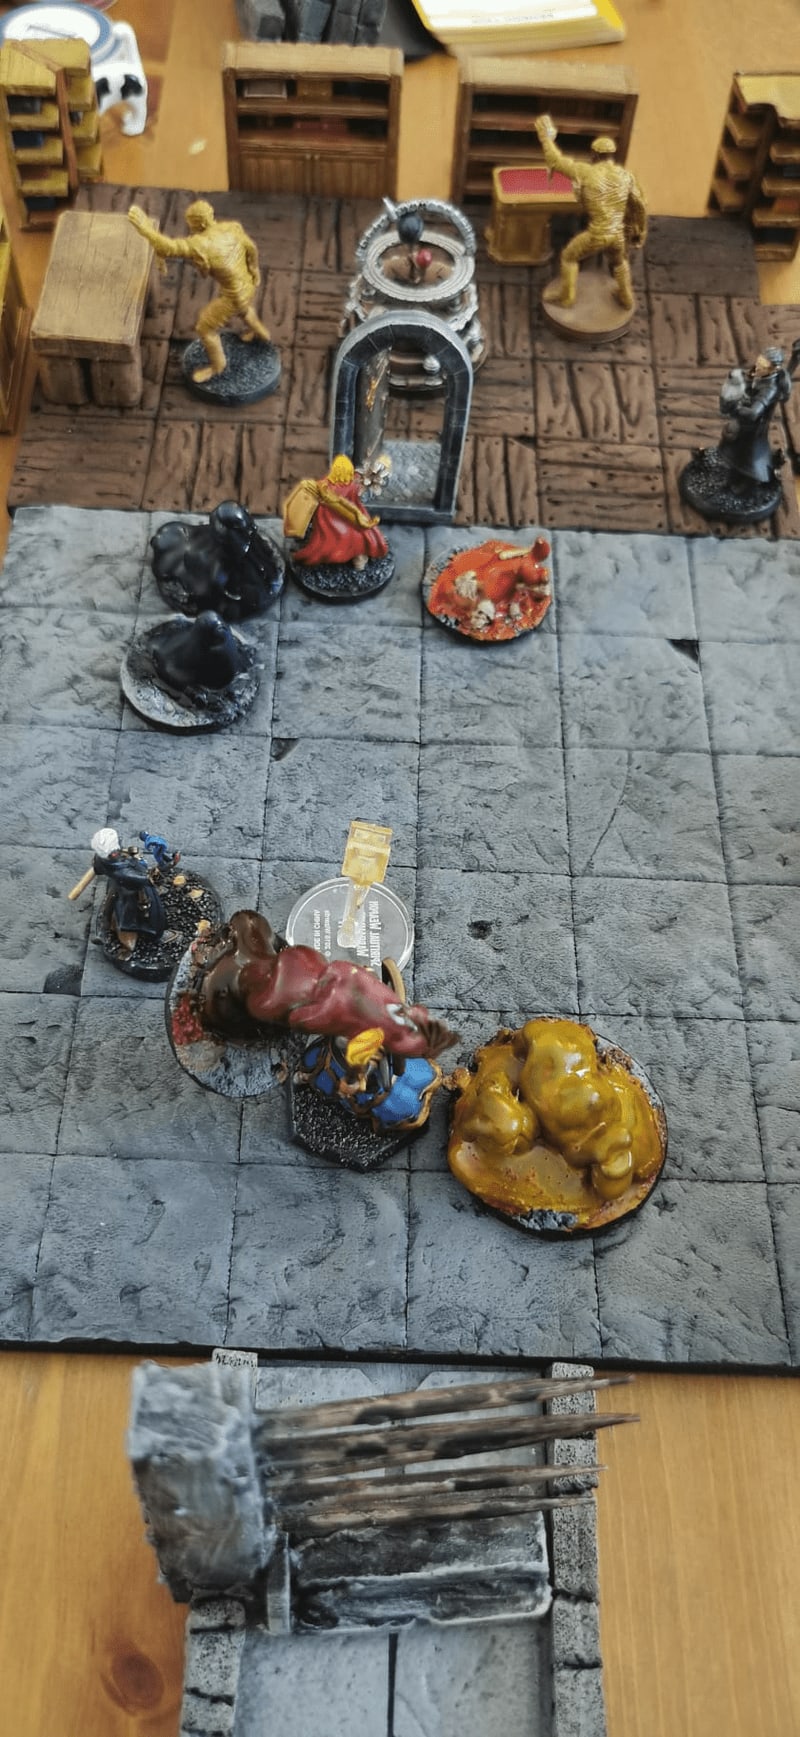


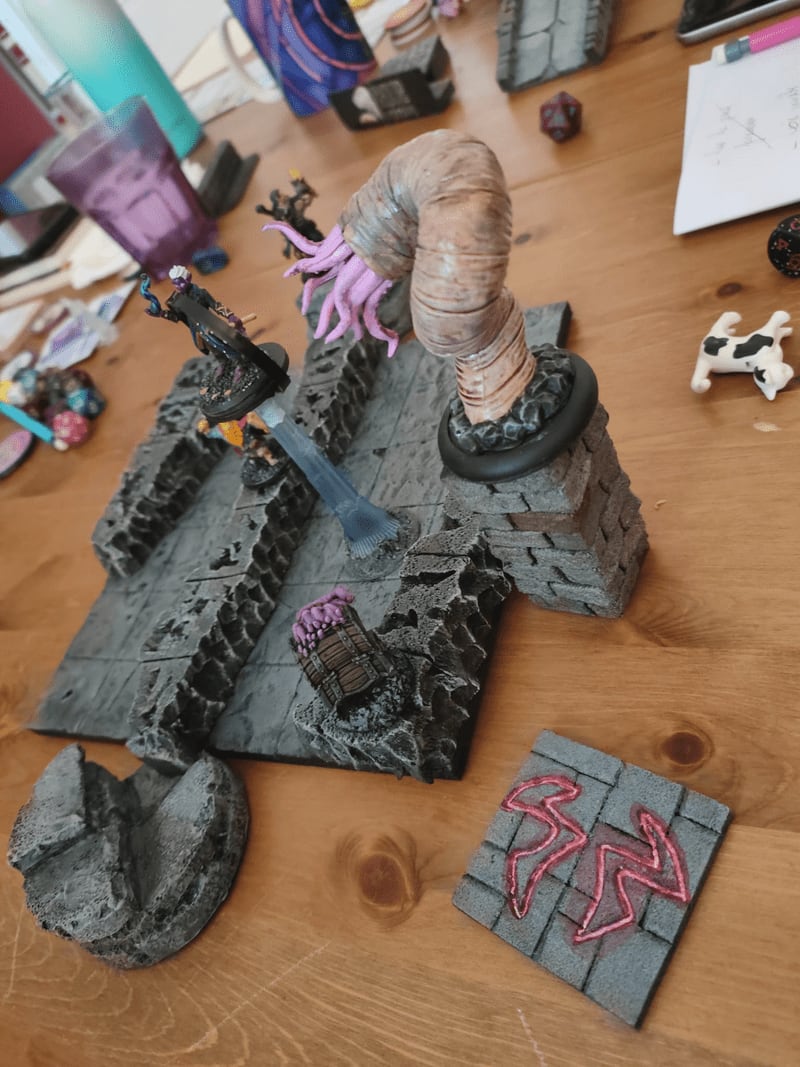


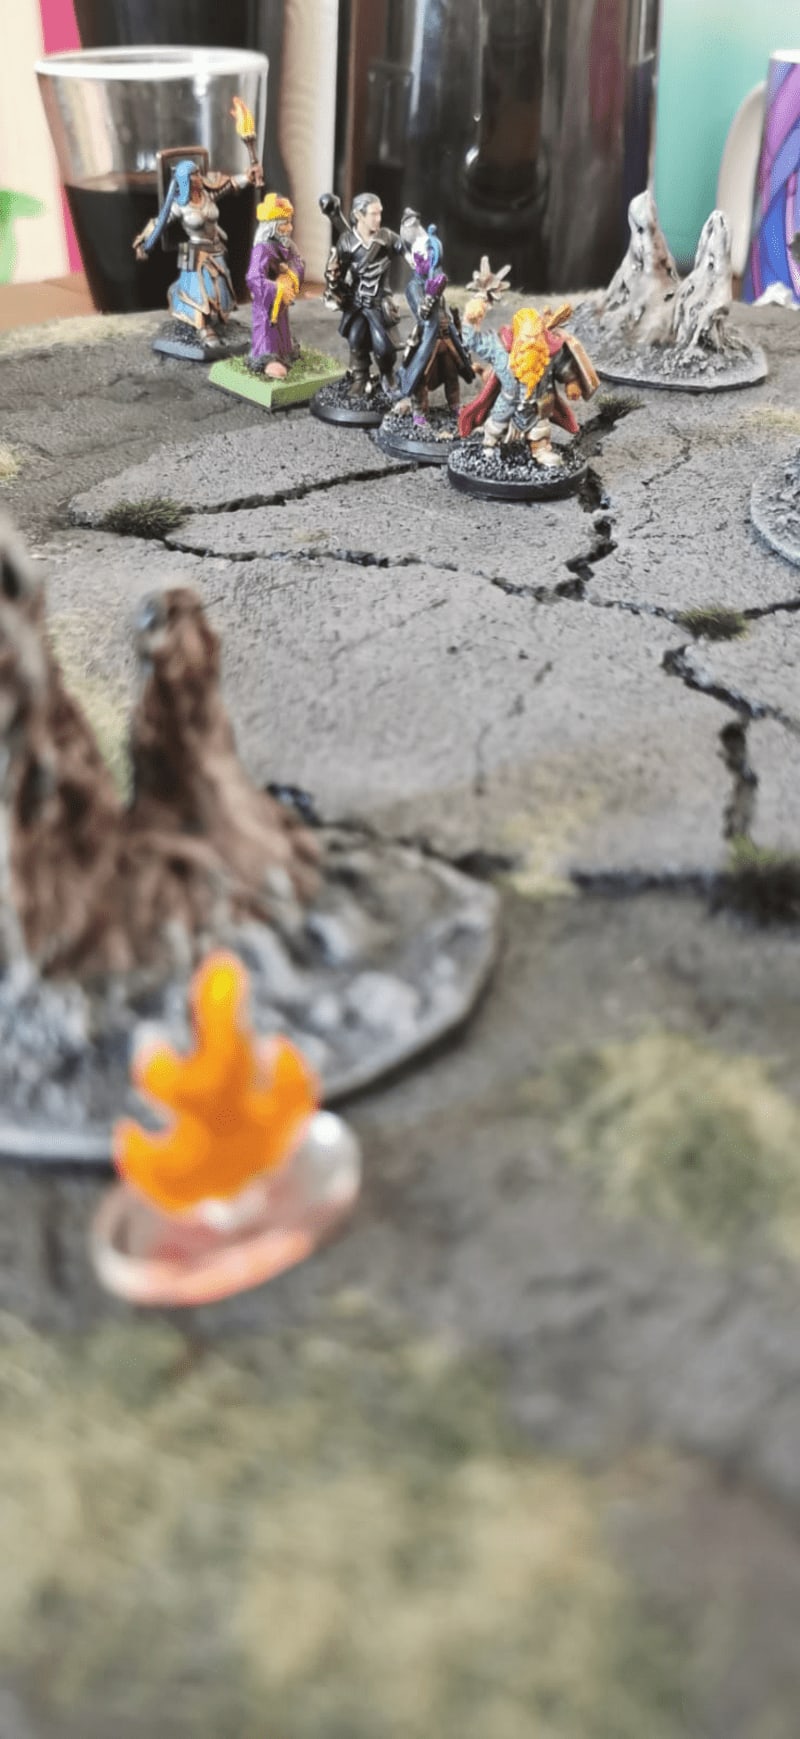
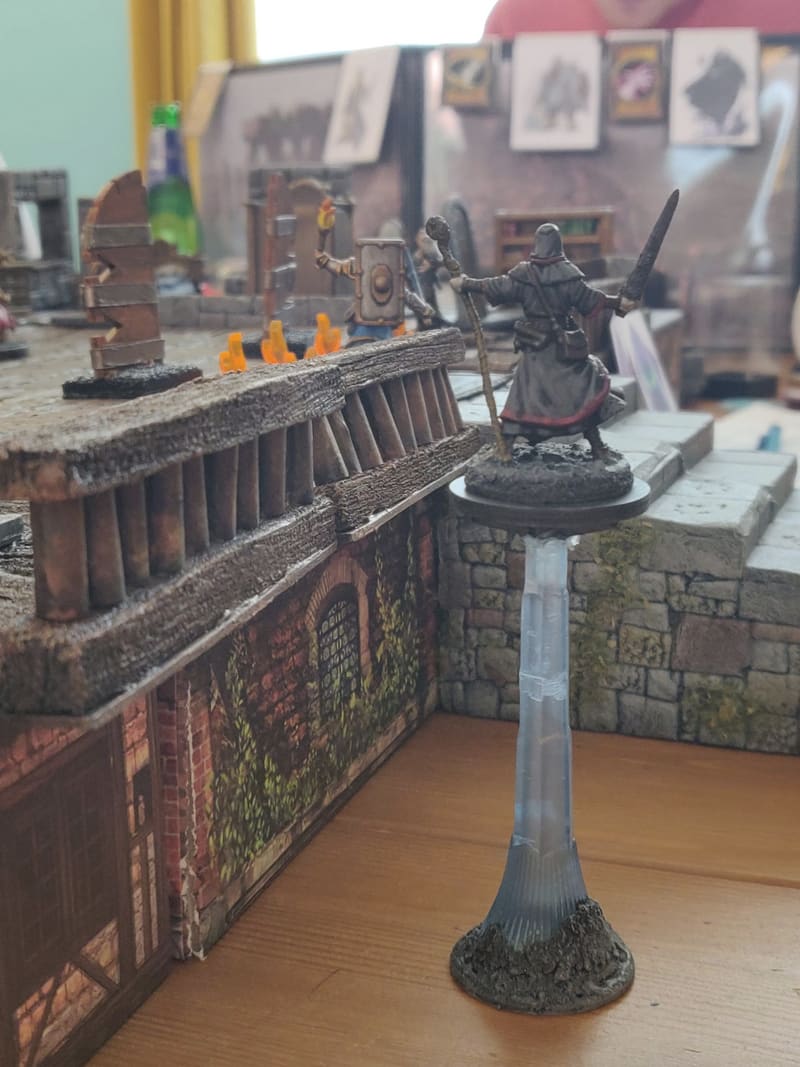
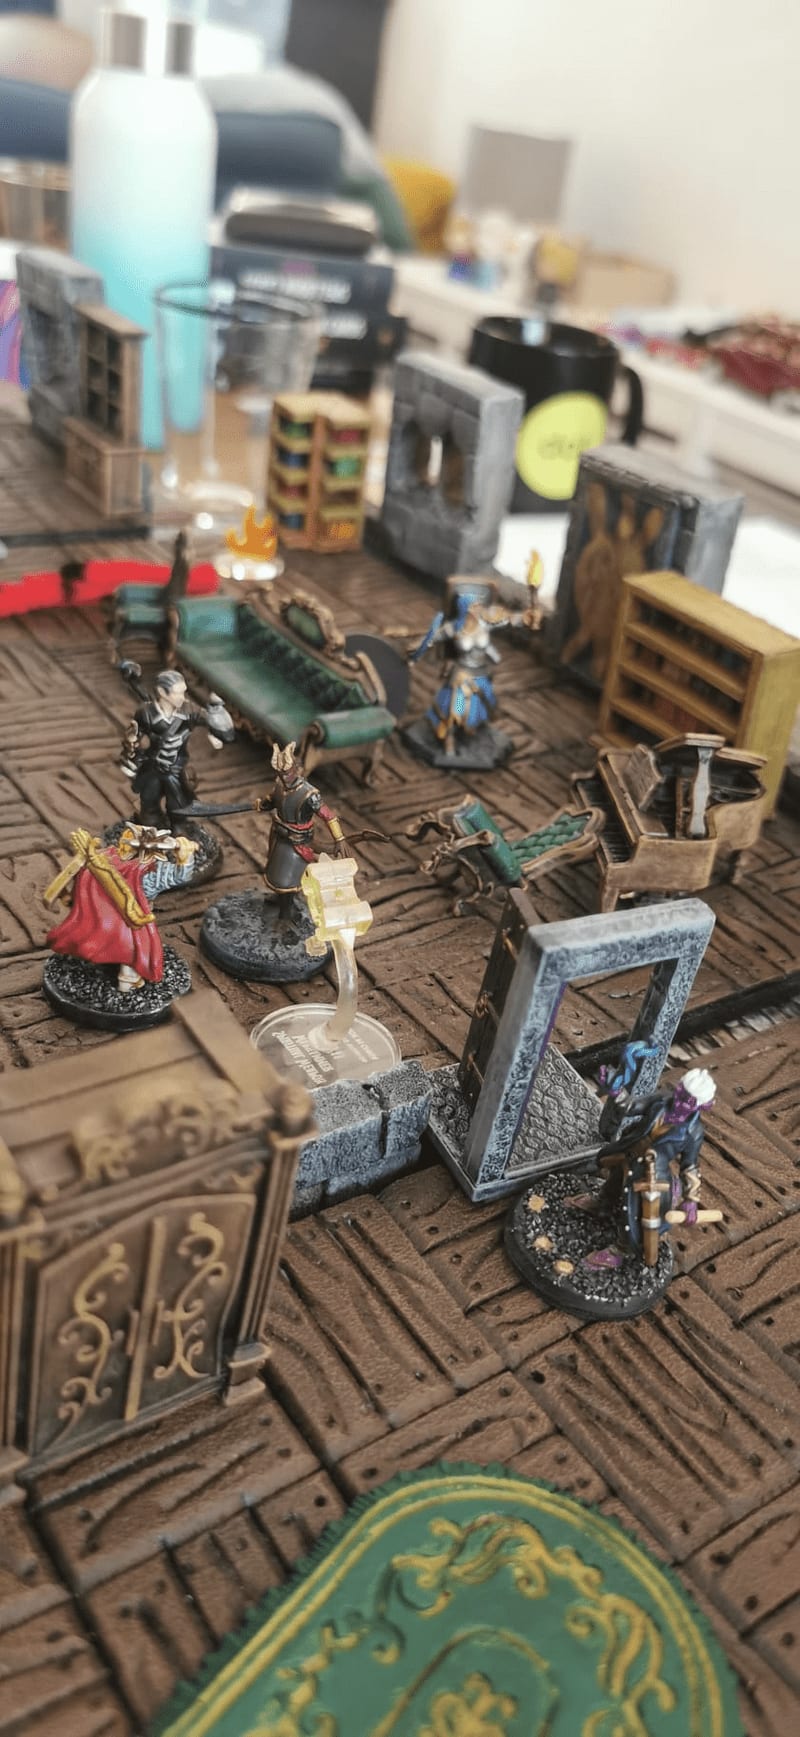
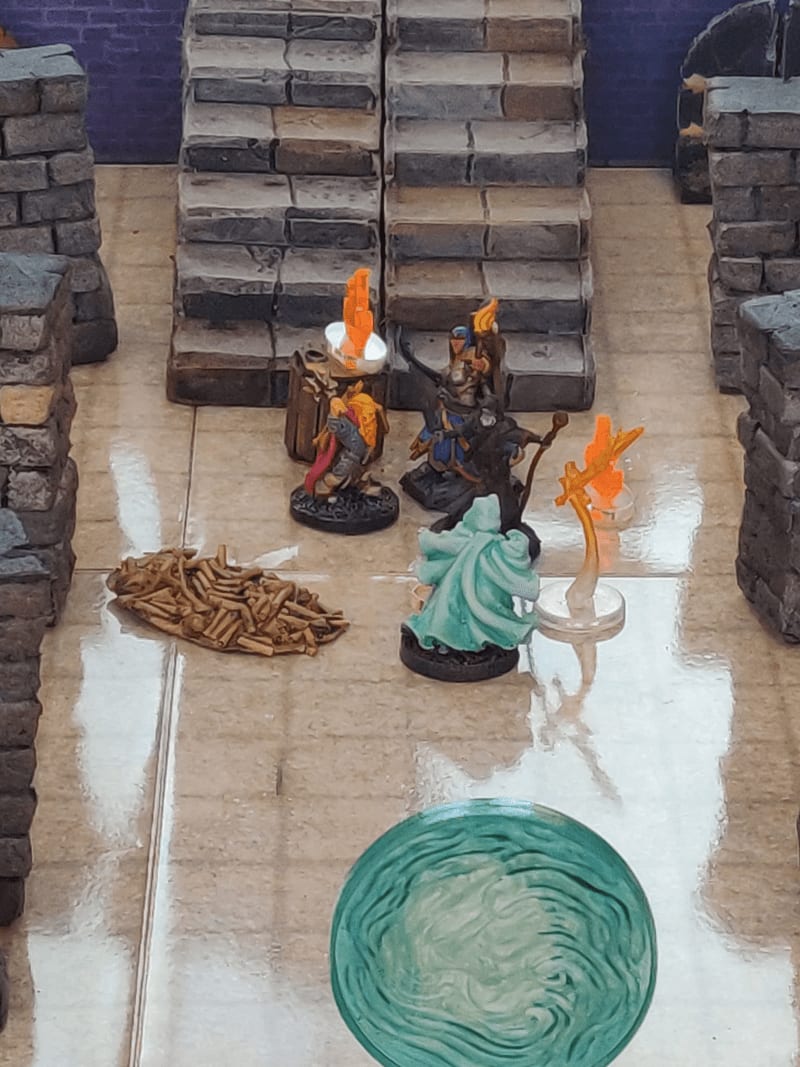
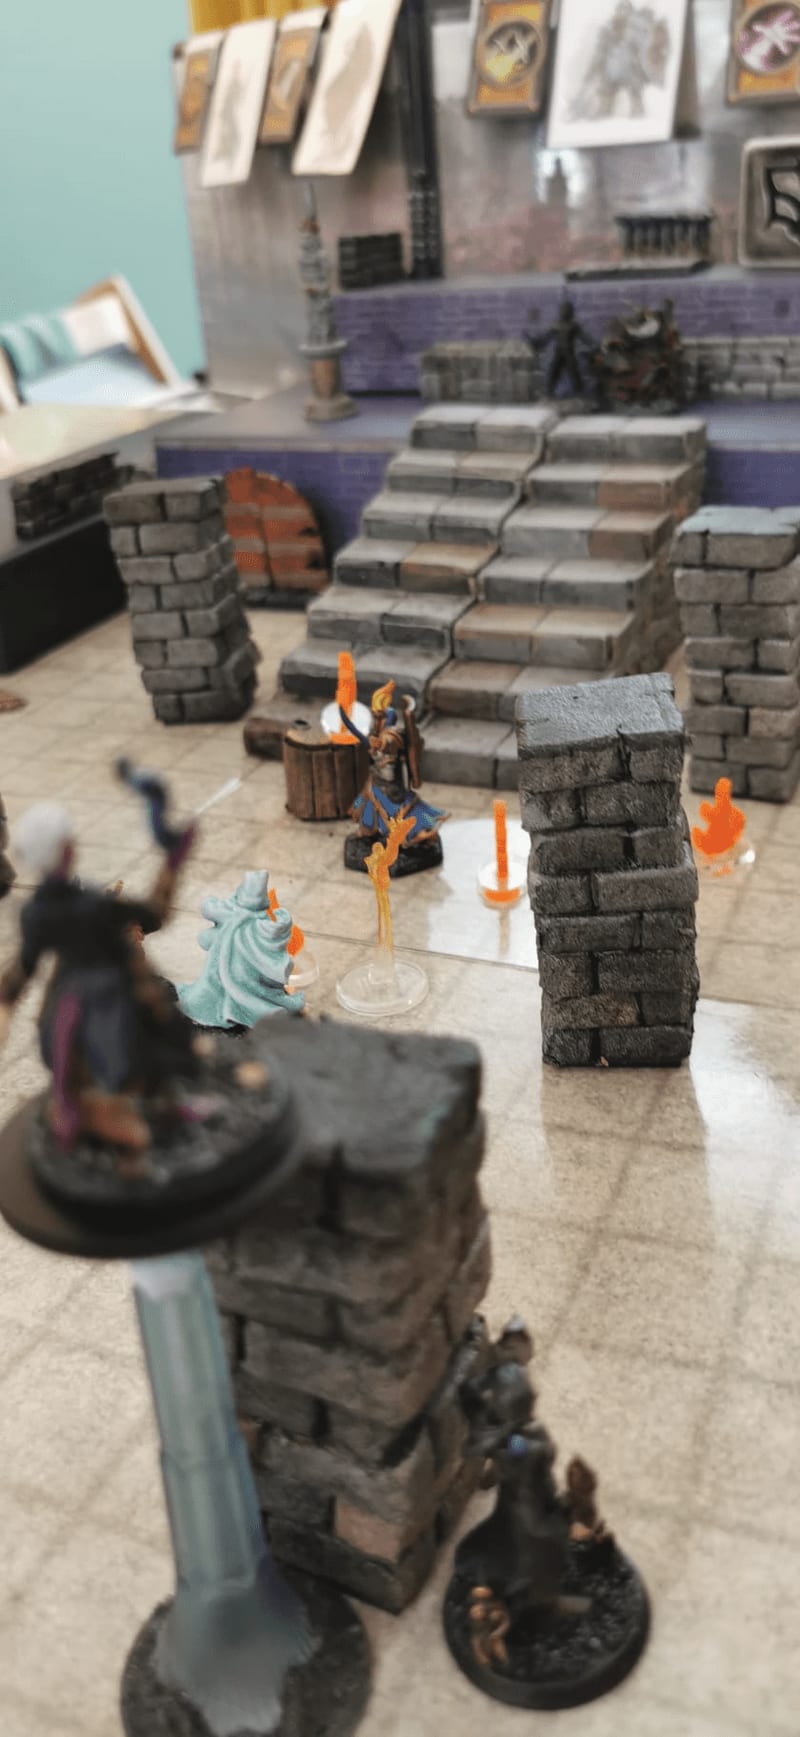
Final boss battle
Having completed the dungeon, the PCs now have to head into the final boss battle. They were against the evil twin of their Warlock, with his war machine metal golem version of their Fighter. And some animated zombies made of parts of their doubles, hunted from countless other dimensions.
As their main antagonist HP pool was reduced, he spawned alternatives versions of himself. Those couldn't cast spells, but were more on the melee fighter side. The PCs were finally victorious, on the edge of the 6th combat round, and managed to flee through the runic portal.


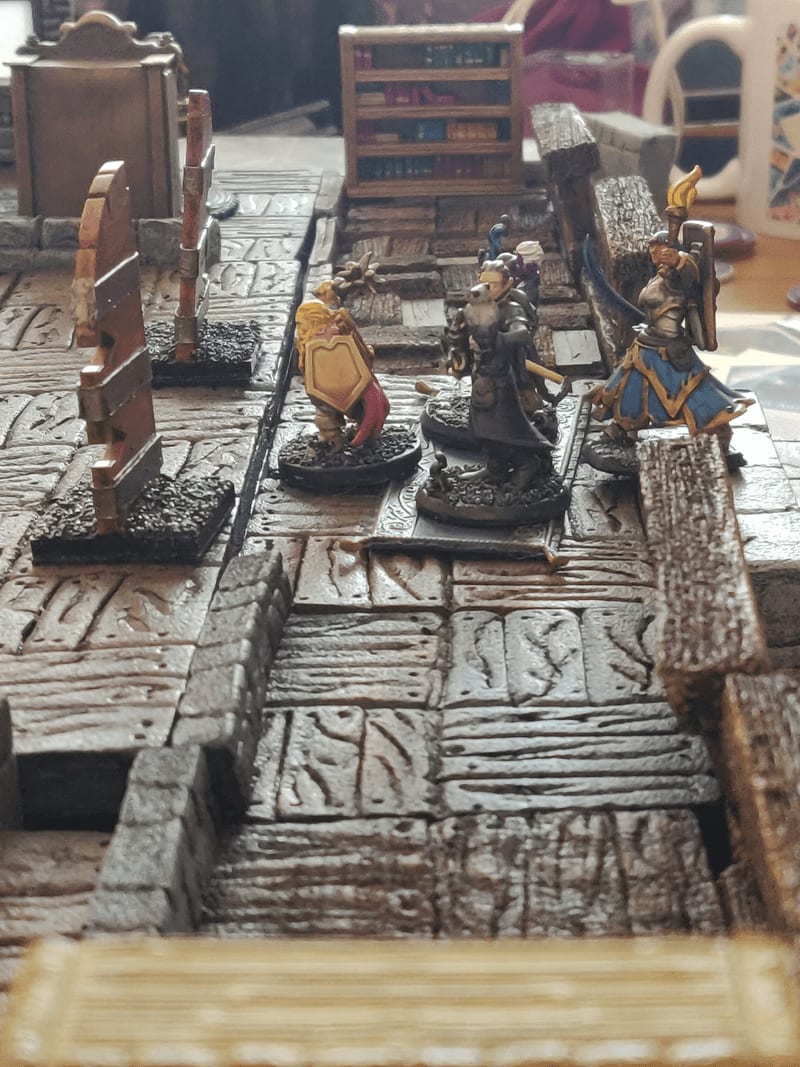
Epilogue
Unfortunately, one of our players couldn't stay the whole week, so we ended up narrating the last parts of the campaign. Our heroes had to travel to the future, when their city will be destroyed by an Githianki invasion. In the madness of the attack, they had to find their doubles and capture their soul. Each capture had them deal with the impact of removing one of them from this reality.
Kyra the Cleric was now the head priestess of the Sarenrae church and was holding a protective dome against the Cathedral, protecting innocents from the attack. Lem the Bard attracted a group of attackers inside the Opera and sacrificed himself to kill the attacking group and buy time for citizens to flee. Tordek the Fighter took advantage of his last living minutes to find his love and spent time with her before the PCs had to kill him (and his lover turned Banshee).
They then all flew back to the past, at the time of the creation of the city and understood that an Illithid spaceshift crashed there. They killed the Illithids before they could have time to mind control the whole city over the course of the following centuries.
Then, the players decided what they wanted to do with their characters, knowing that they could live a few years in the past, then teleport back to their present. They all acted into planting the right seeds in the past so their present would be better, making Magnimar a prosperous.
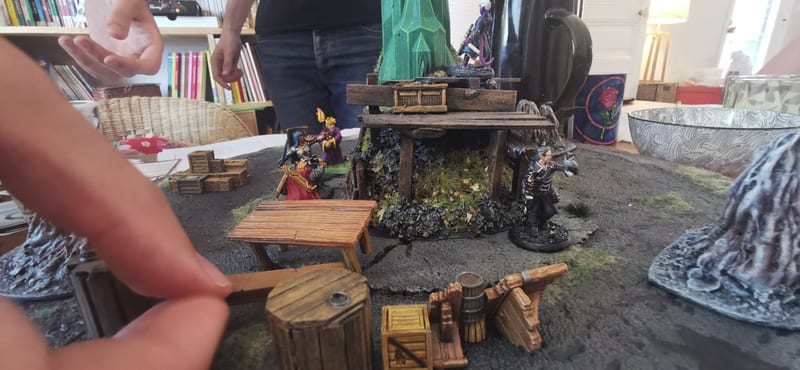
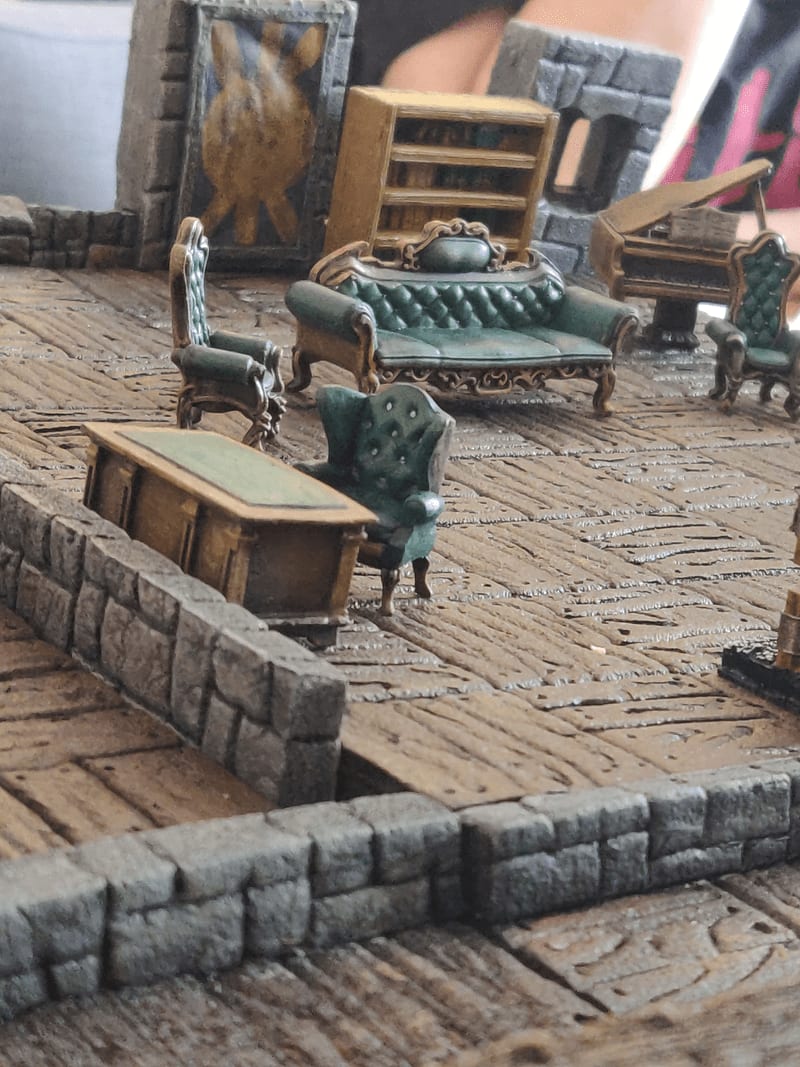
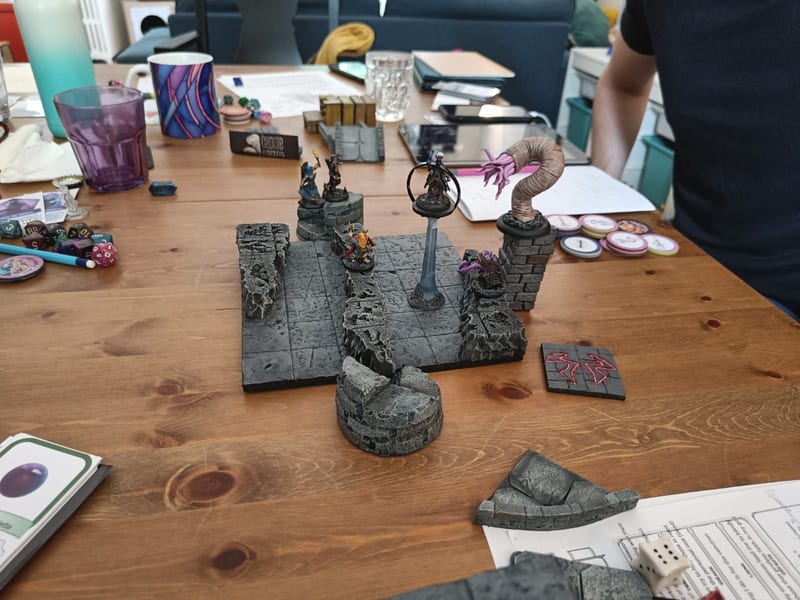
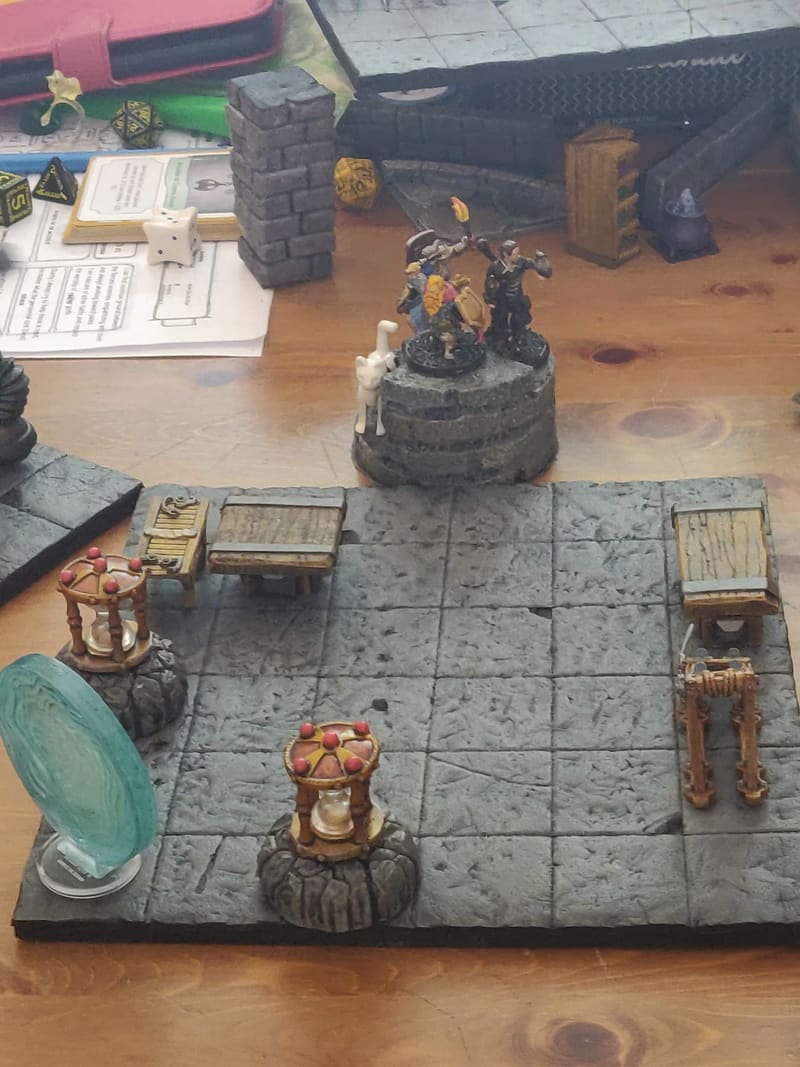
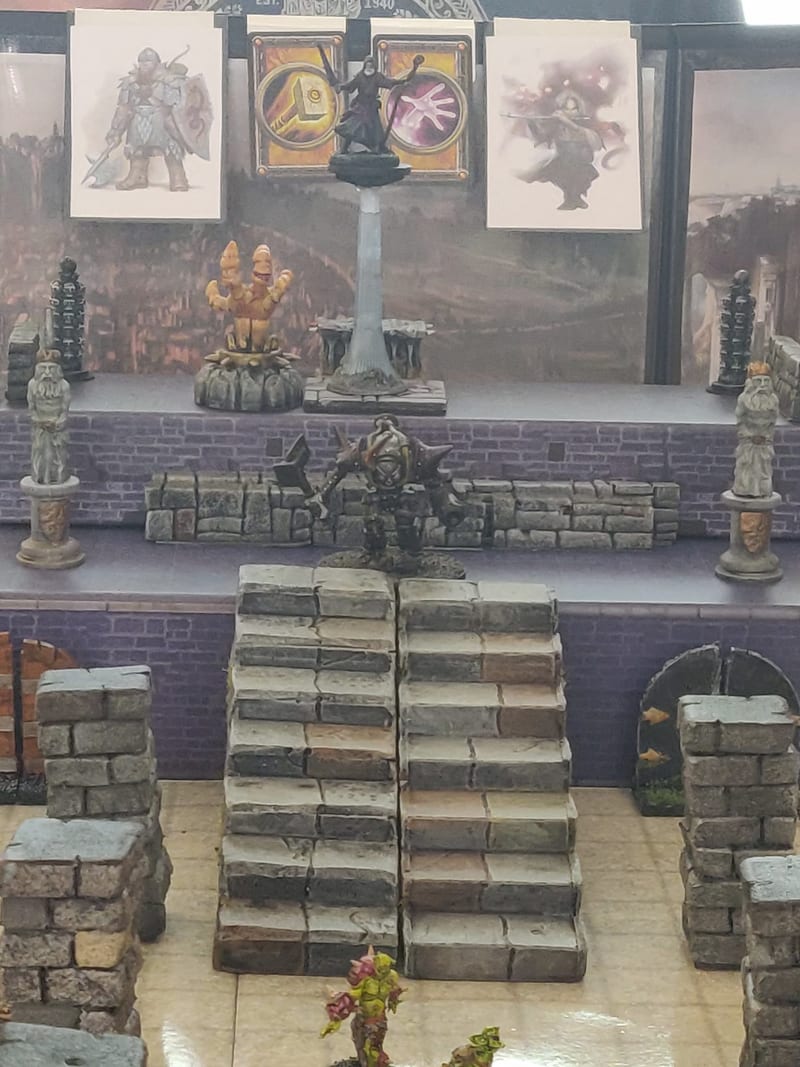
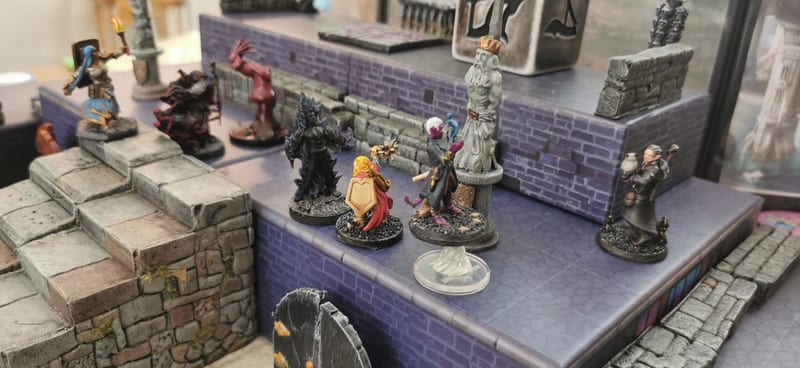
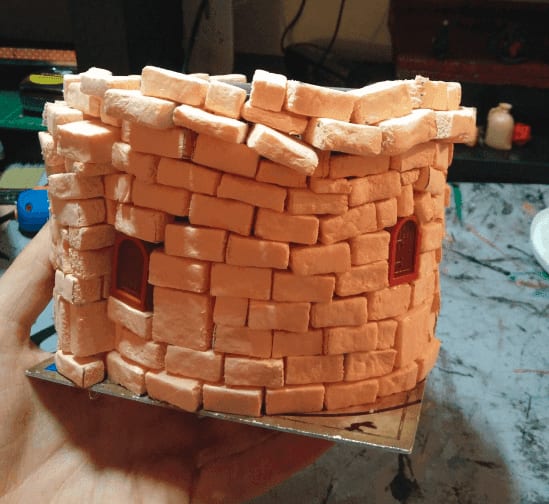
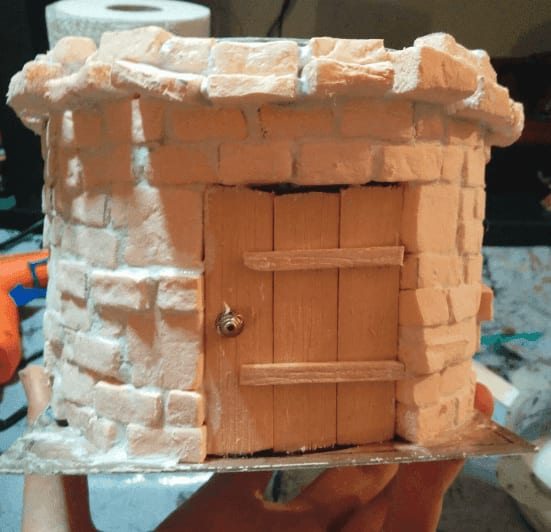
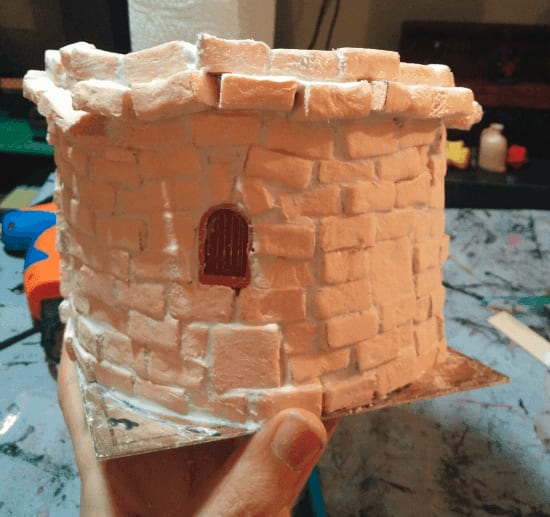
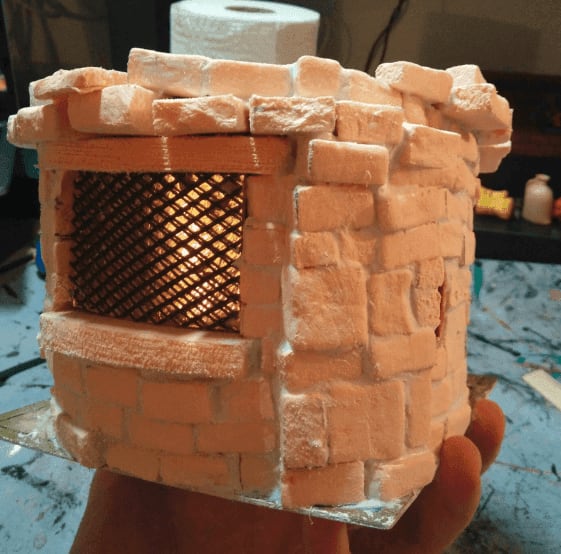
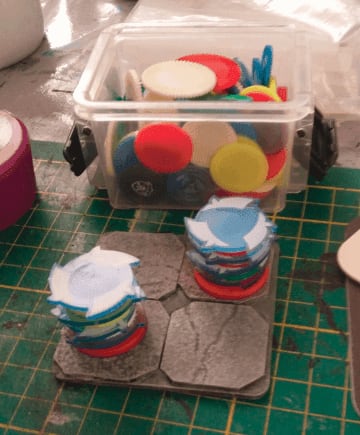
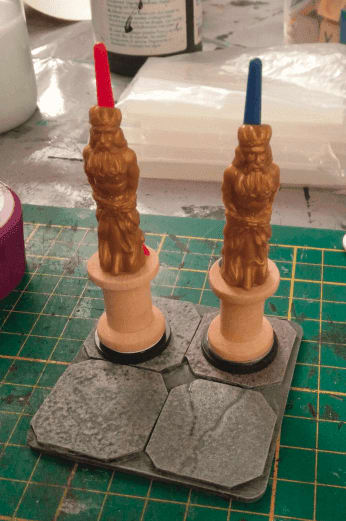
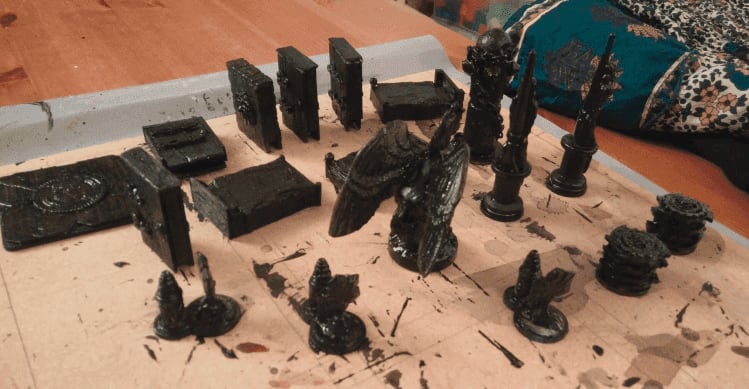
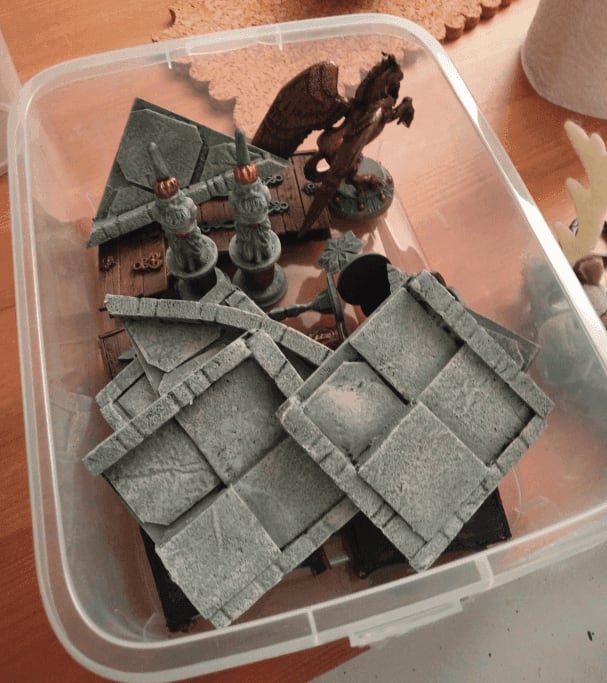
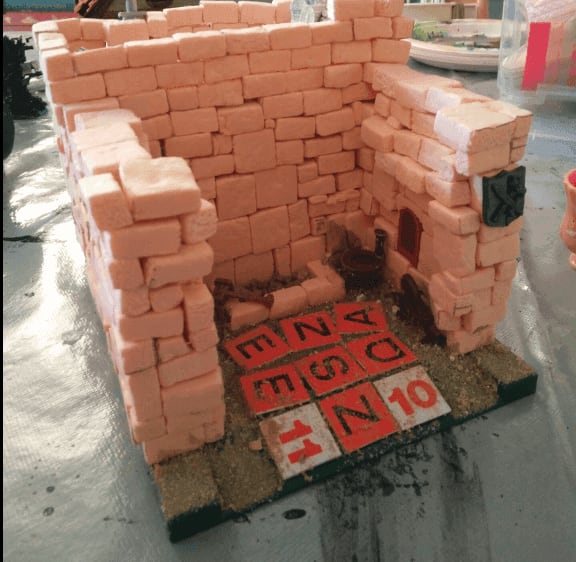
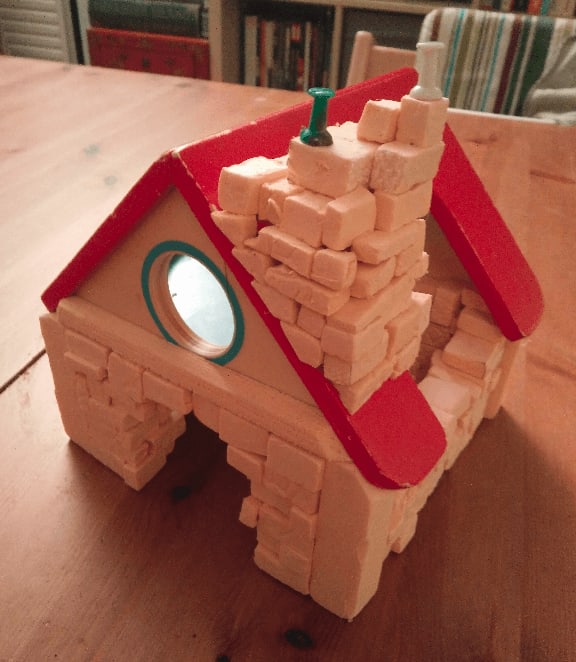
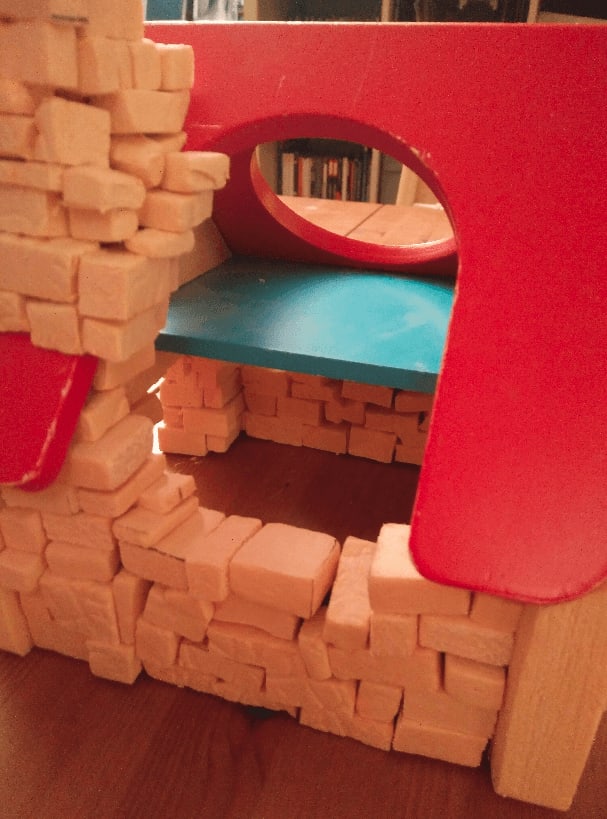
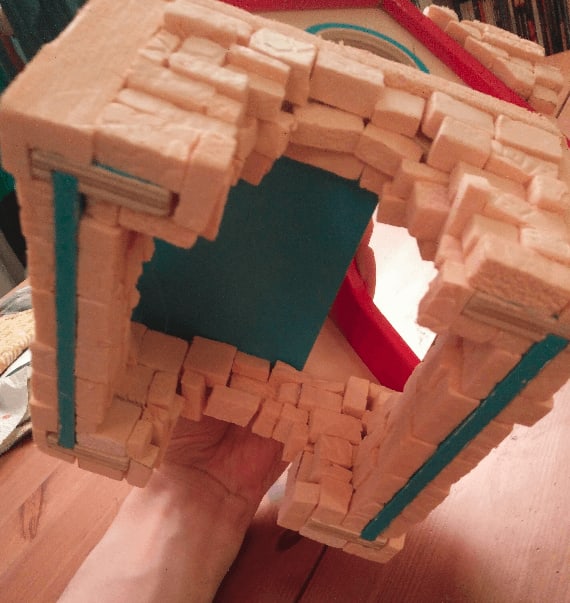
Prank
Because we actually ended the campaign one day earlier than anticipated, we took advantage of the time to stage some fake pictures and send them to the player that couldn't attend until the end:


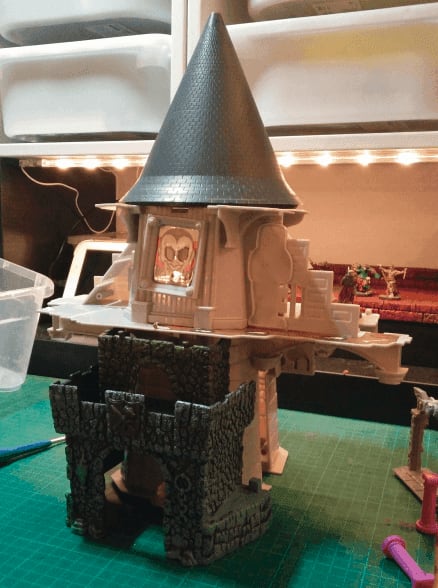
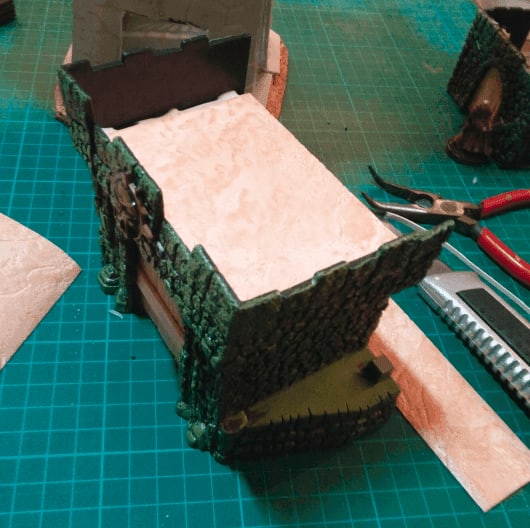
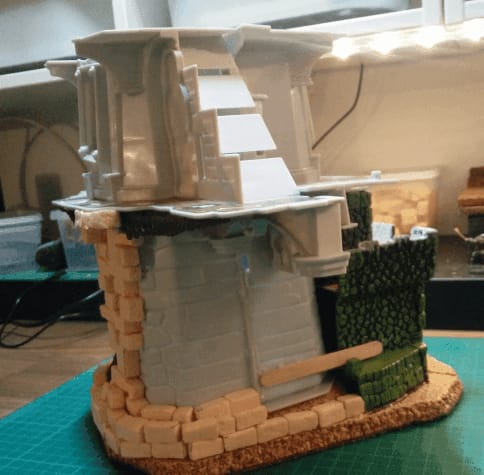
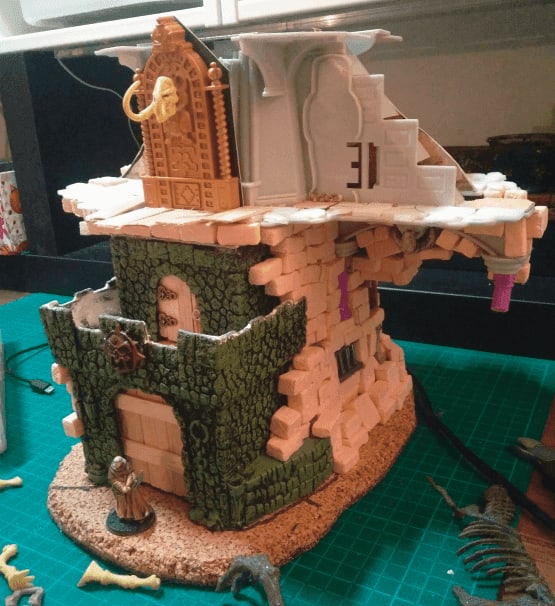
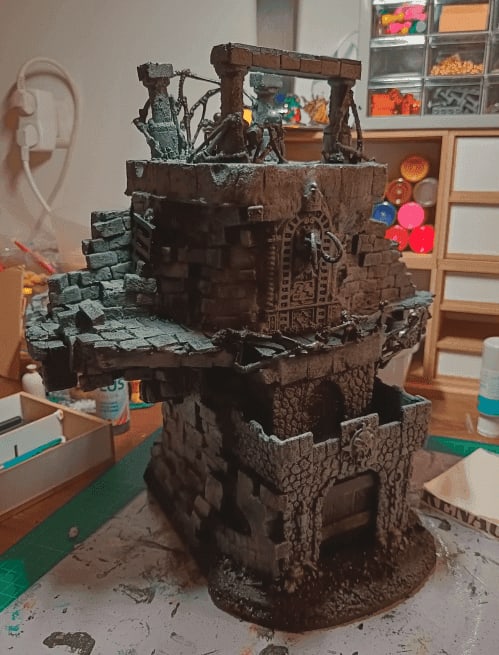
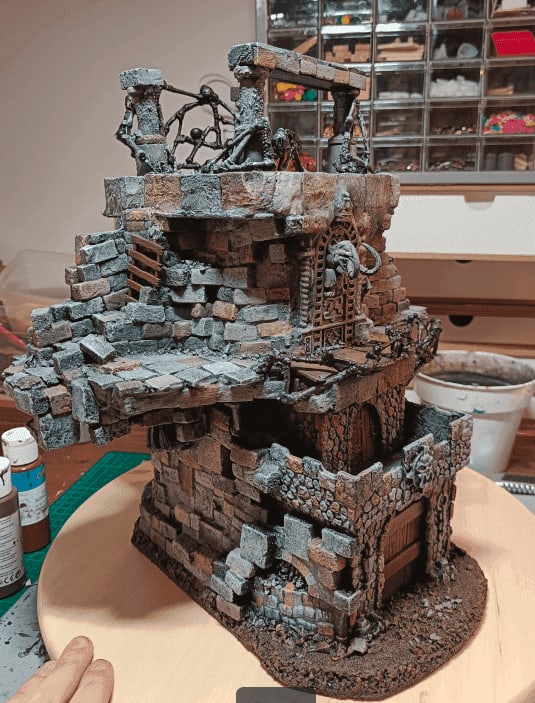
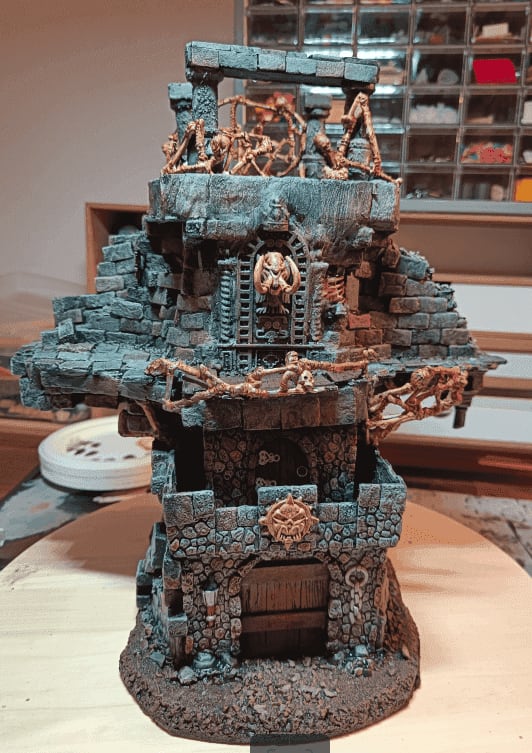
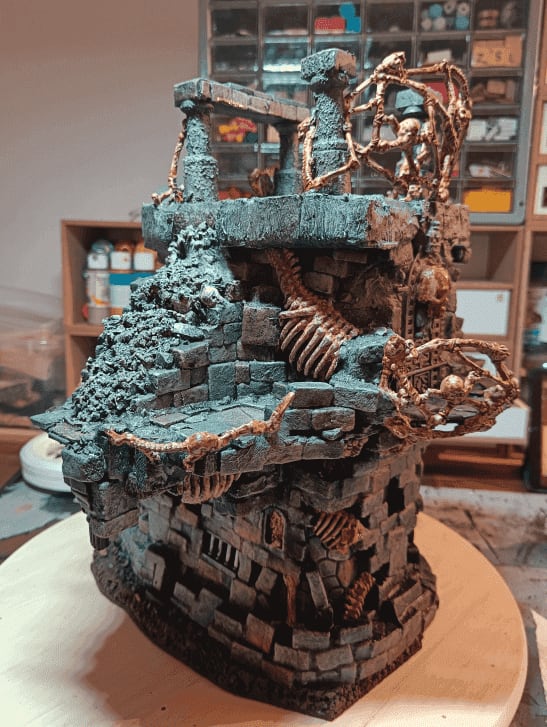
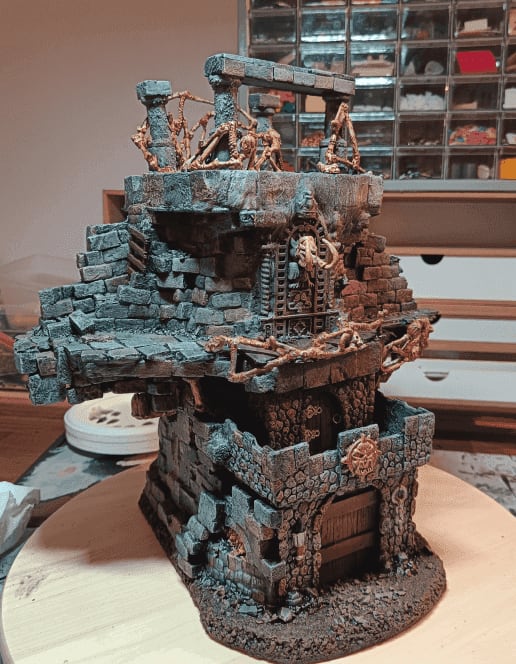
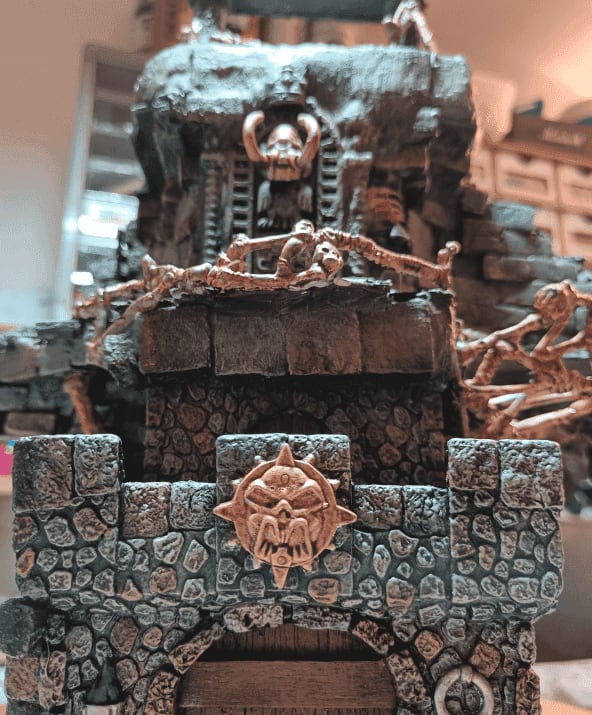
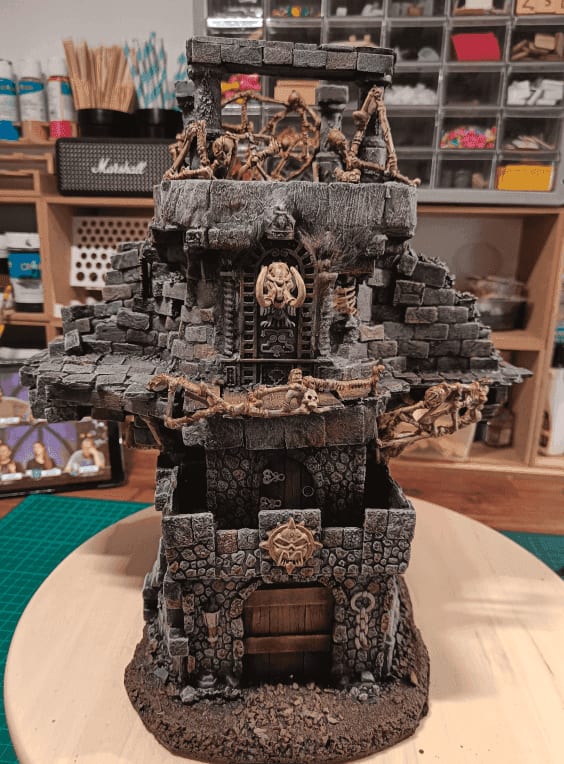
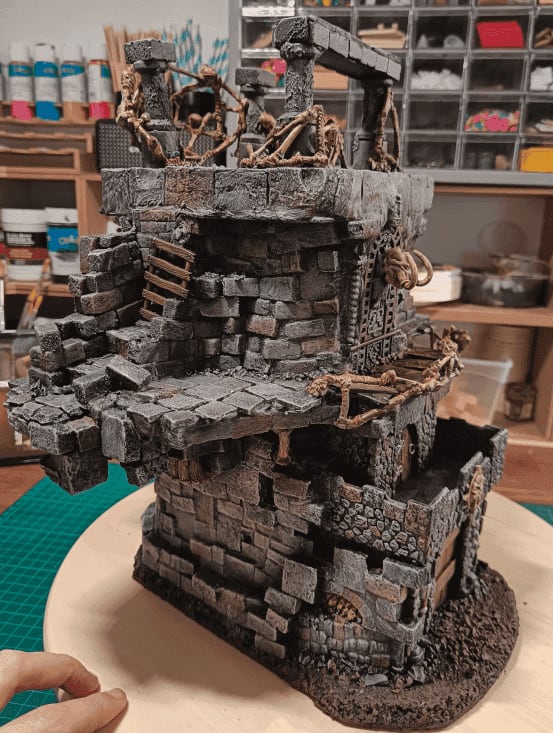
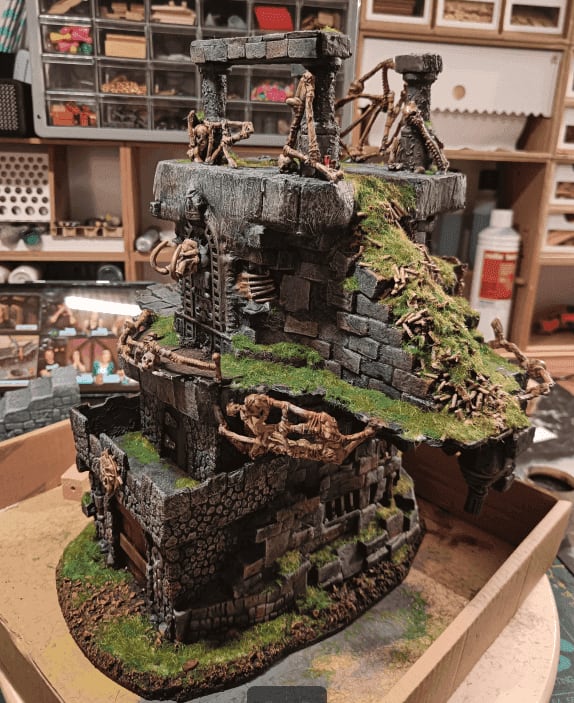
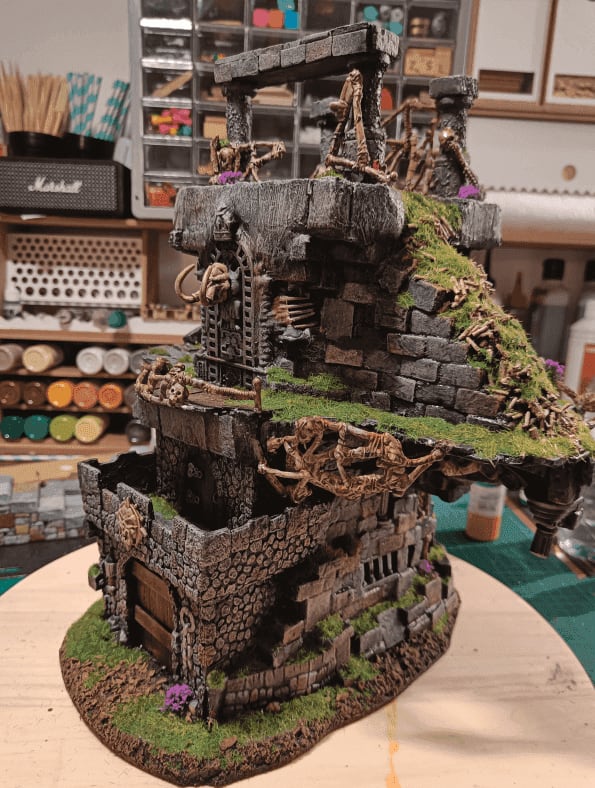
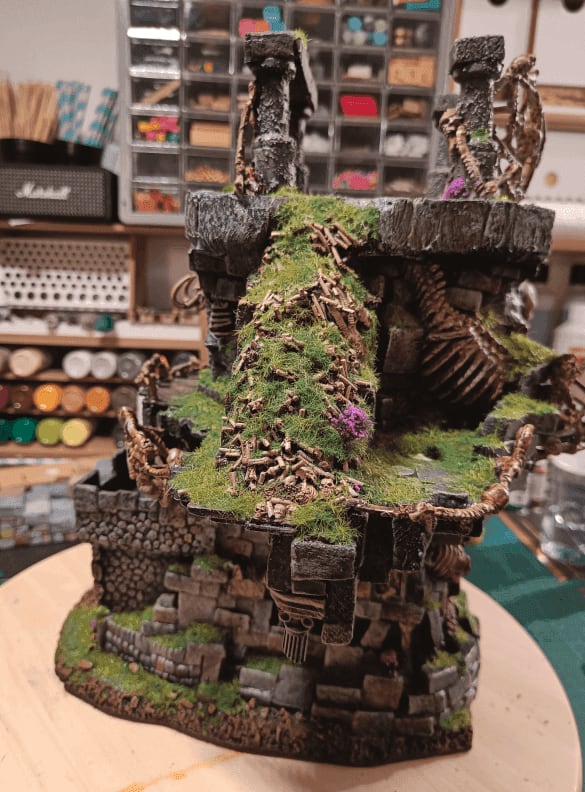
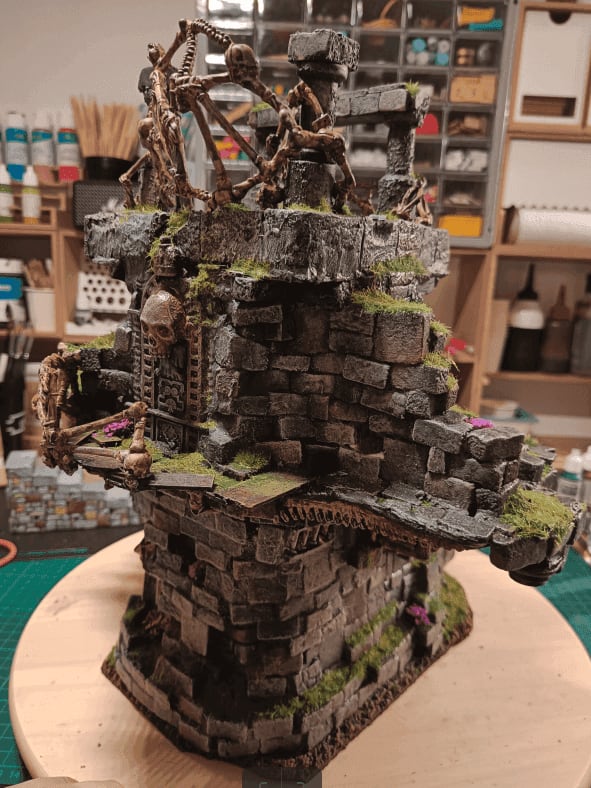
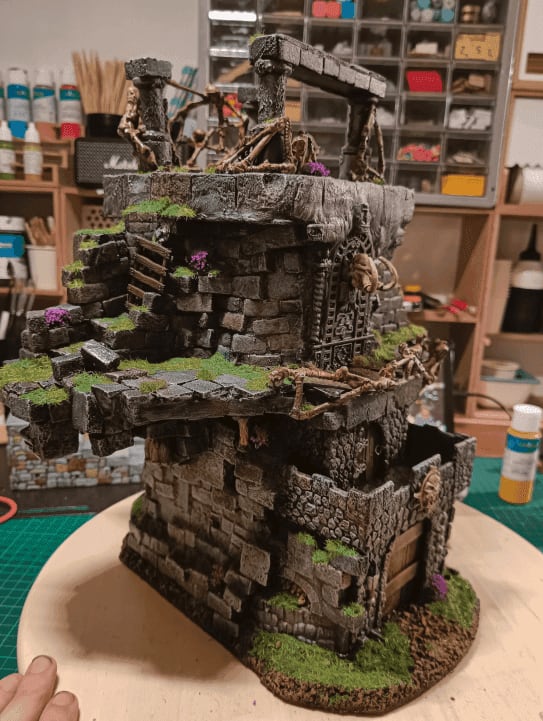
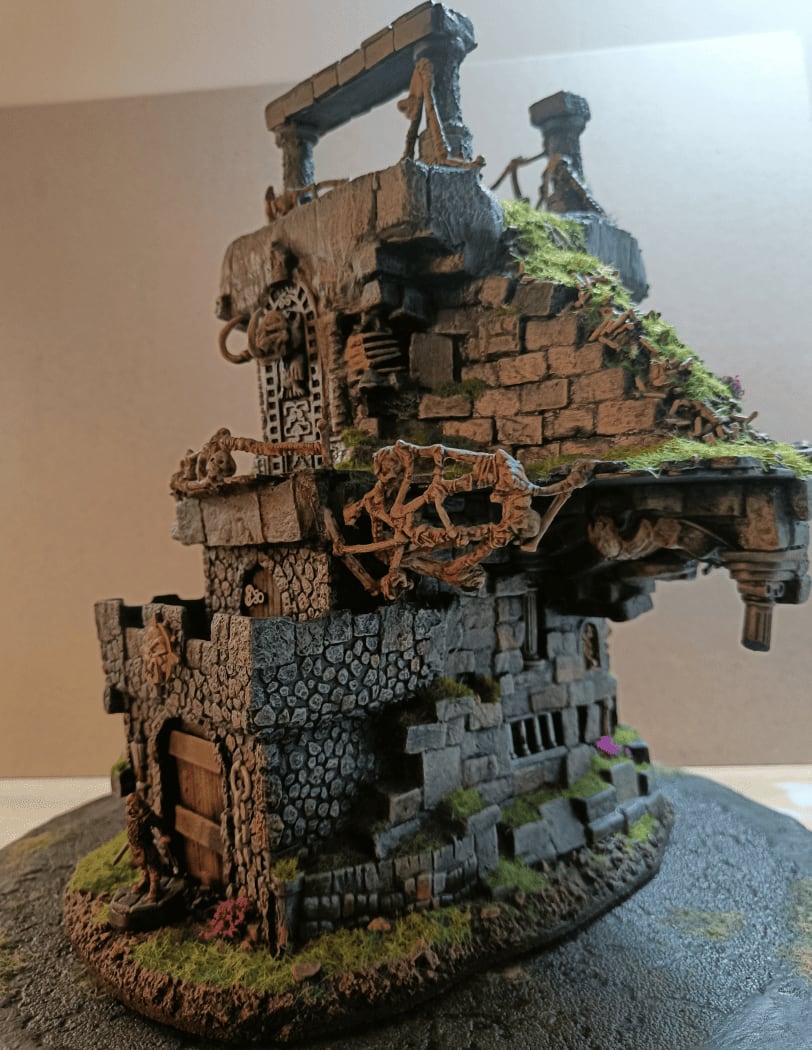
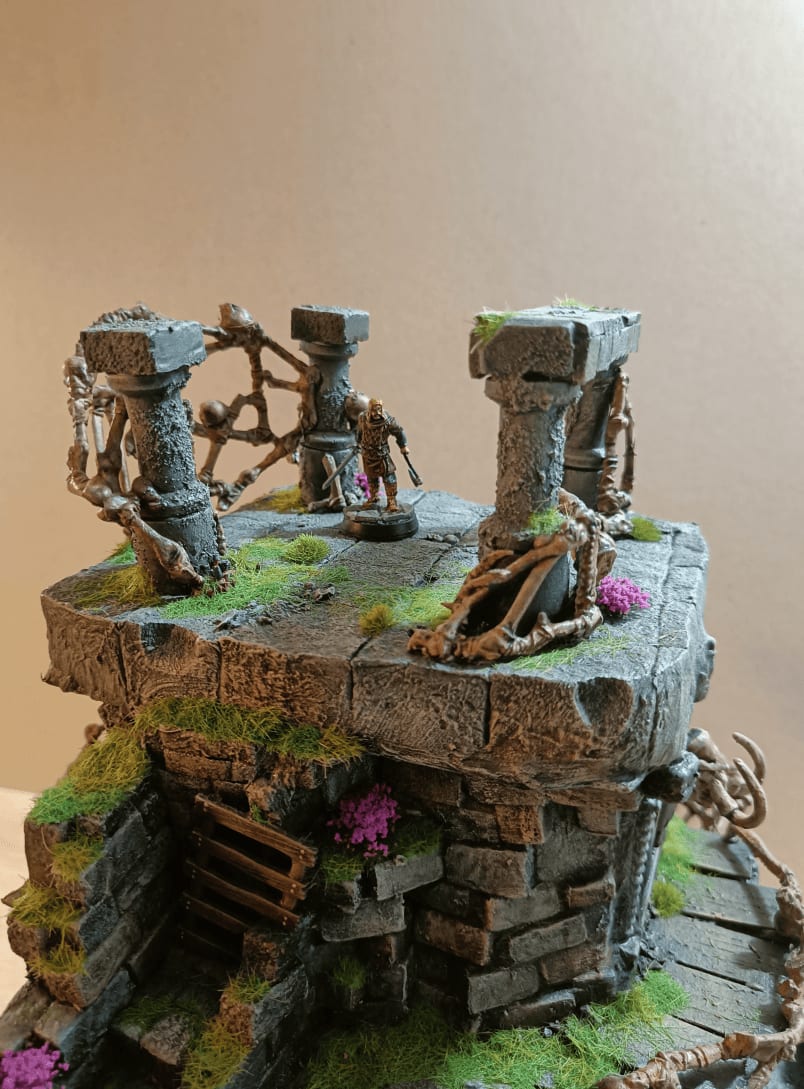
Necromancer Tower
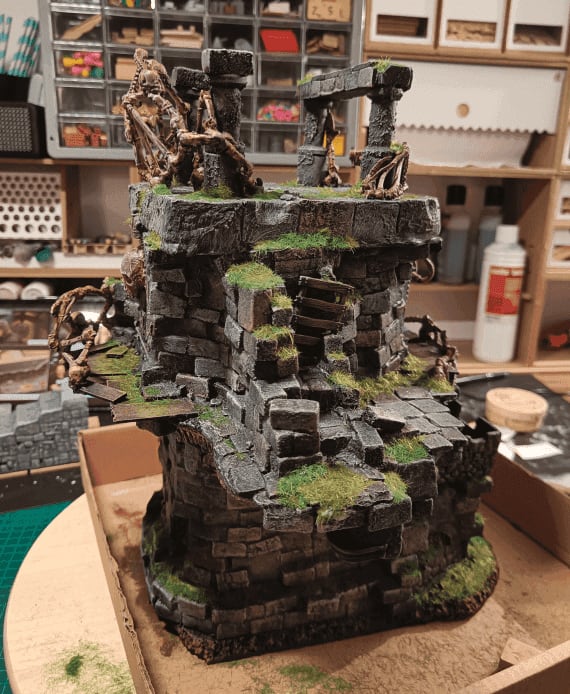
At the time of posting, this is the build I'm the most proud of. I spent a lot of time on it, but I had an idea of the theme of what I wanted to do, and went all in.
I wanted to create a necromancer tower, and I wanted it to have a strong "bone" feeling, so I went scavenging all the old toys I had bought for bones and skeleton pieces.

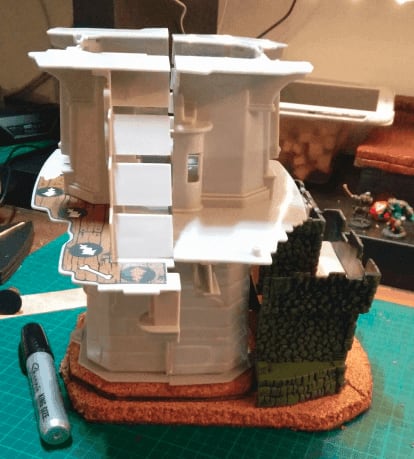
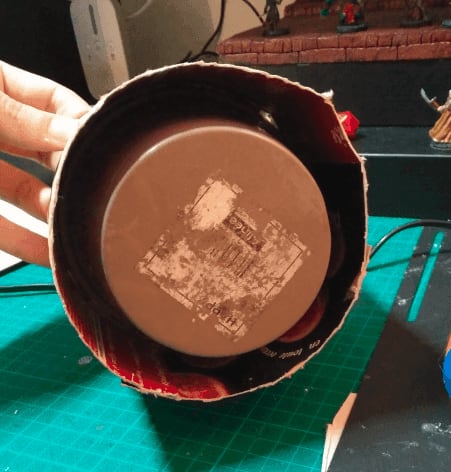
It all started when I bought two second hand board games that came with those two large plastic tower. I had already converted the first one into the Tarnopol Clock Tower, and I wasn't sure what to do with the second one.
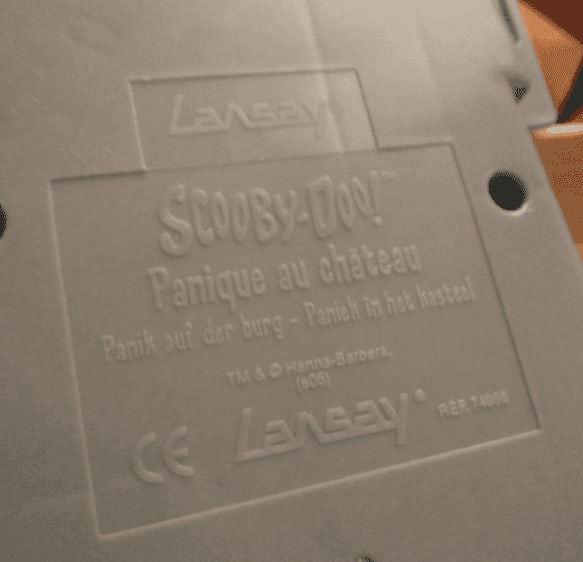
If you're looking for details on the original boardgame it's coming from, here is what is engraved on the back of the tower.
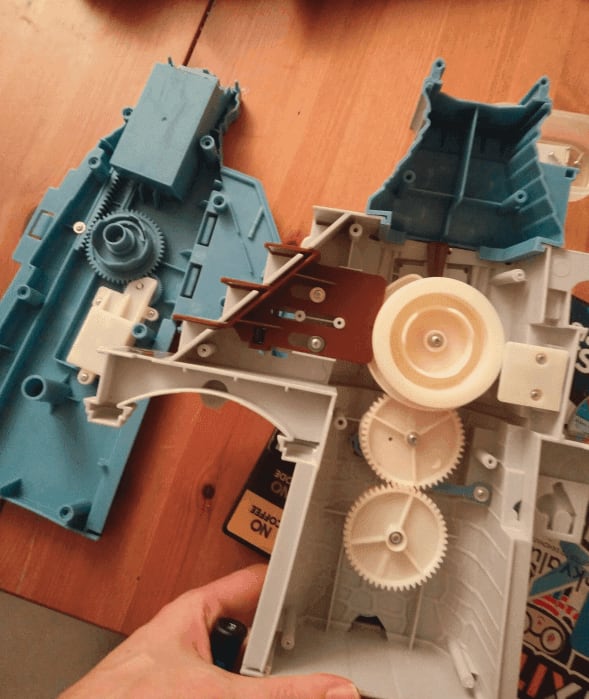
The interior was full of gears and stuff that I removed. It made the structure lighter, and more importantly, made less noise when manipulated.
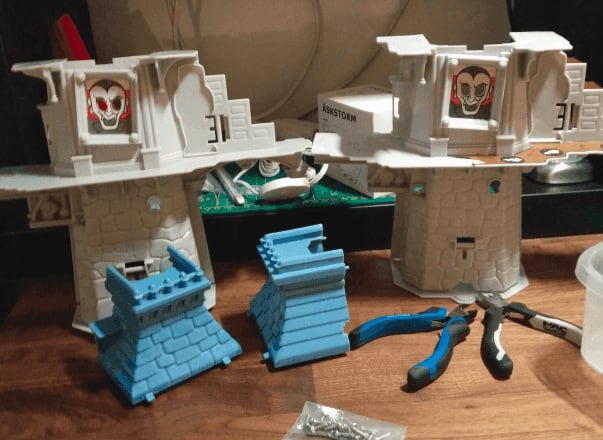
Months later, I found another exact same board game in another second hand shop and bought it as well. Now that I had two identical halves, I thought I could just glue them back to back for a more interesting structure.

This was the base shape of the final build. There was still a lot of the initial iconography to remove. As it was originally a Scoobydoo game, a lot of it is way too cartoonish for a necromancer tower.
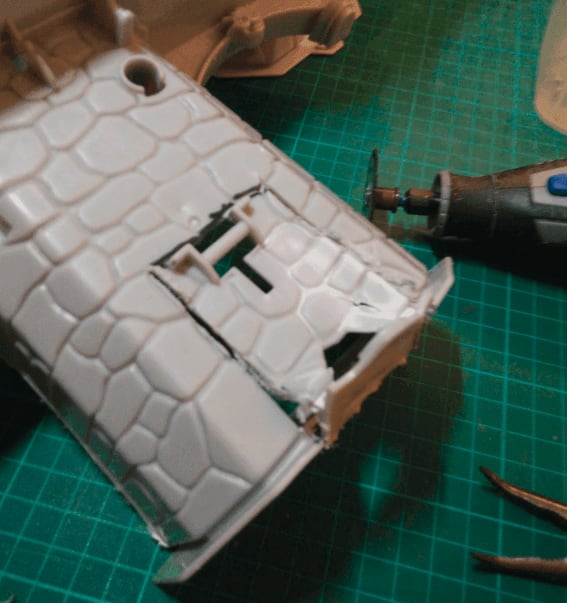
I started by cutting the frame of a door in one of the fronts. I used my newly acquired Dremmel tool (that you can see in the background). It makes cutting plastic way easier than what I used to do with manual tools. Still required to turn the tool and tower in awkward angles at time, but still a great time saver.
I then played around with other toy parts I had, seeing what would work well. I ended up not using the door frame I had just cut, putting this plastic fort in front of it instead.
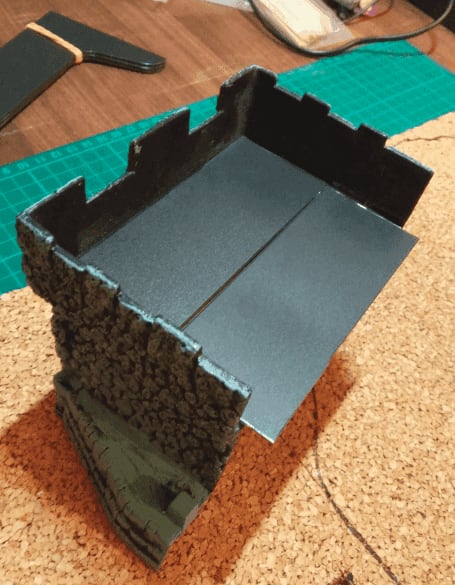
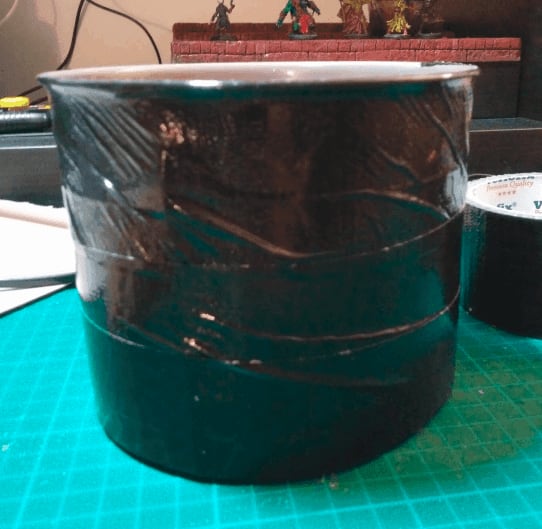
The front fort was lacking a proper roof, so I created one with black plastic sheets.
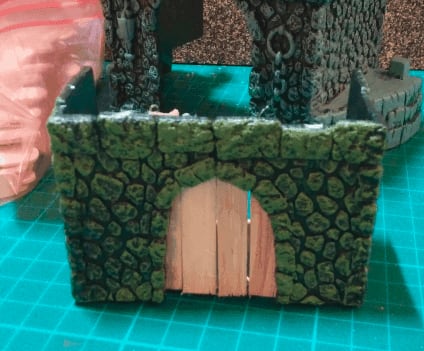
I "made" a door out of ice cream sticks for the top floor.
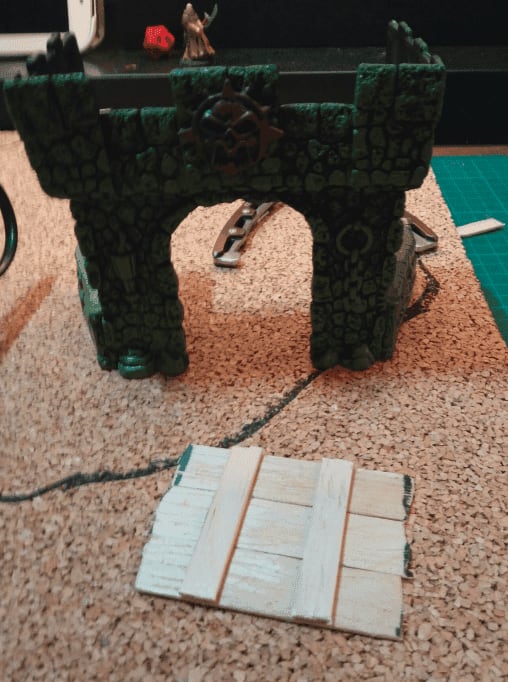
And a larger door using larger sticks for the ground floor.
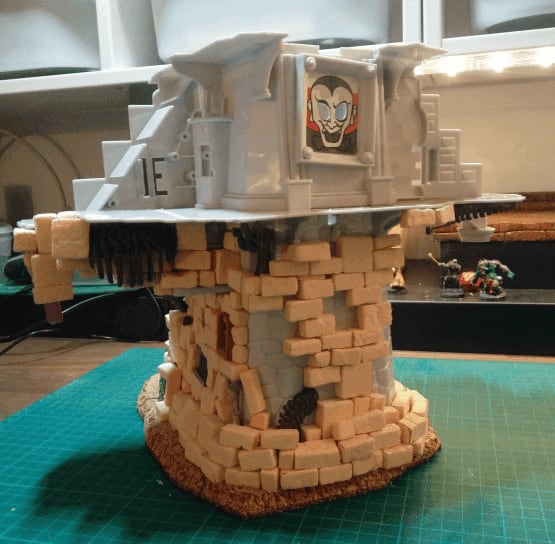
I covered the newly created floor with this 3D wallpaper I had already use when making my dungeon tiles. This gave it a stone texture.
I glued everything on thick cork boards, and this gave me a better initial rough shape.
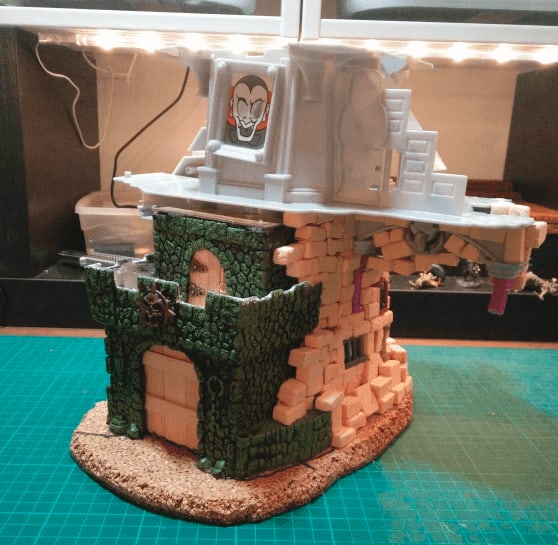
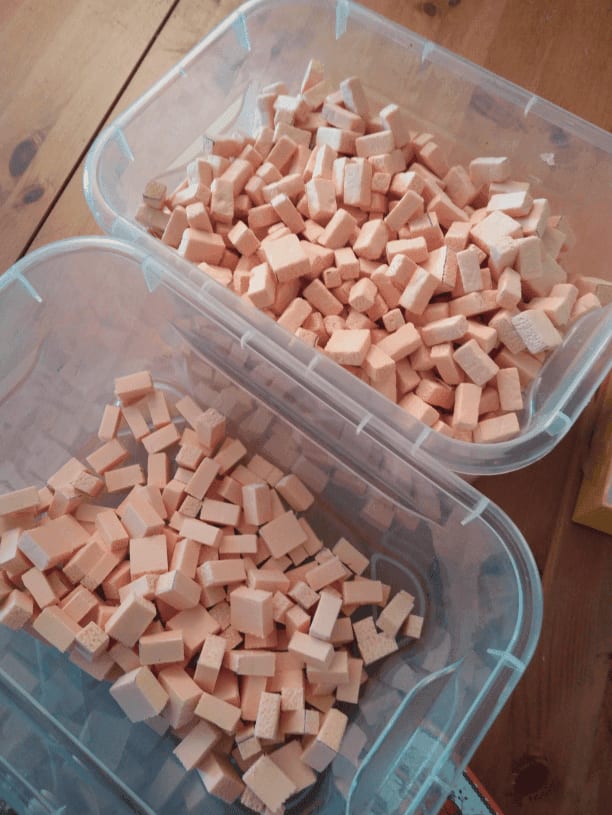
And I then started the tedious process of covering every wall with foam brick. This helped cover the holes between the various parts and hiding any cartoonish details I mentioned previously.
I started with the ground floor, incorporating some bones in between the stones. I didn't cover all the walls and let some of the initial texture see through, to make it look like it had been repaired in layers.
Here your can see I added an ice cream stick because the gap between the two structures was too wide and I couldn't glue my bricks without it. I knew it would end up covered in bricks anyway, so I didn't really care of using a more "noble" material here.
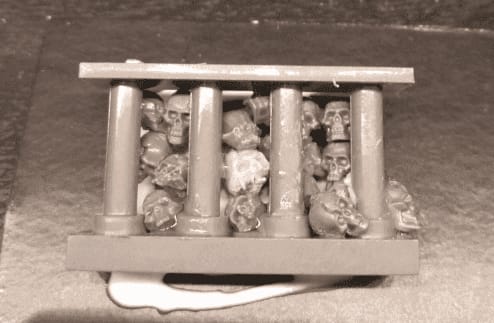
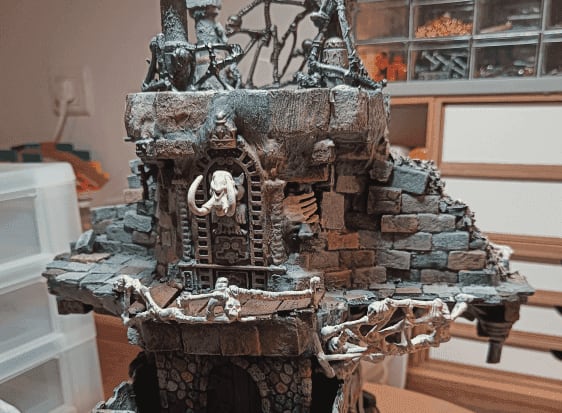
I also created some windows, with skulls showing through. The gate is coming from Lego, and the skulls are mostly coming from the Skulls set edited by Games Workshop (some other skulls are leftover from other kits).
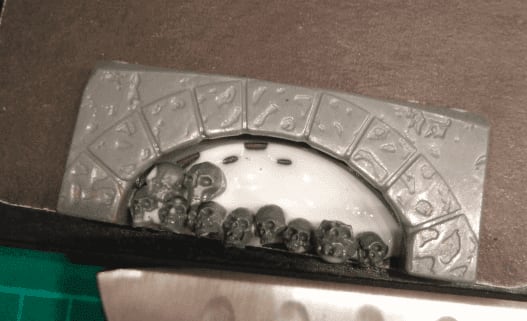
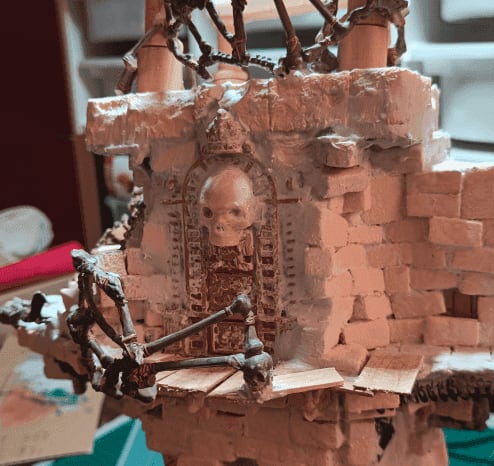
I did the same logic but with an archway coming from a Megablocks set. I glued the archway to black cardboard, then filled the bottom with wood glue and added skulls one by one.
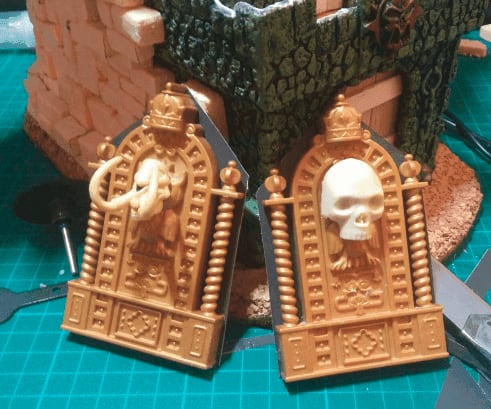
I frankensteined some wall decoration by gluing plastic skulls to some Playmobil pieces. I glued the whole thing to black cardboard, and will use that to hide the weird Vampire frames of the original toy.
This is what it looks like at that stage, with lots of plastic bones lying around on my desk. I also added a door handle and hinges to the door at some point (all made from jewelry stuff).
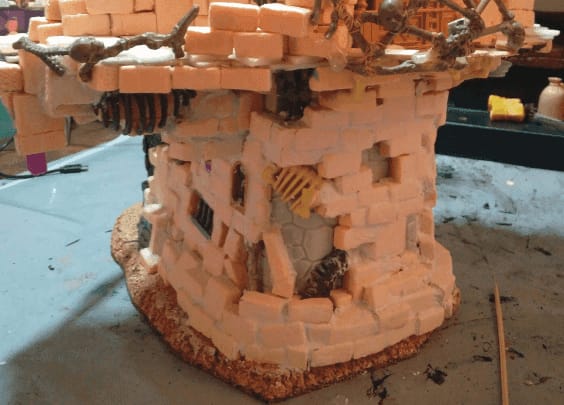
I then started the second floor, adding more and more bricks and bones on the wall, as well as some tiles on the floor. I used a mix of my 3D wallpaper and foam tiles for that.
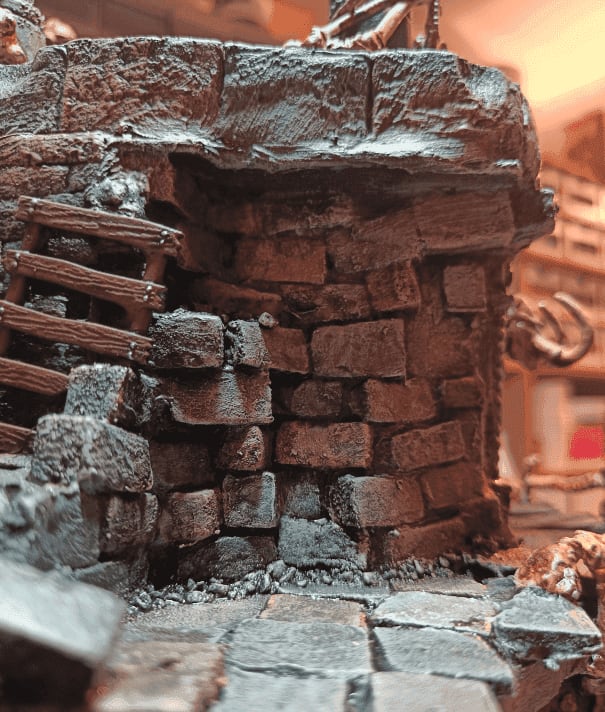
As each side of the base shape is a mirror of the other, I tried to break the effect by building some kind of collapsed wall on one side, and a stair/ladder on the other.
I also started adding bones as railing. They are coming from a Pirate of the Caribbean toy and I just had to cut them to the required shape and glue them.
I then applied spackle (some kind of filler used in construction) between all the bricks from the ground floor. I did that by applying it roughly where I needed it, spreading it as much as I could. Then I used a wet brush to push it in the gaps, and a dry tissue paper to clean the brick surface. The goal is to make sure it fills all the gaps, but not hide the brick faces, so each individual brick is still visible.
It is a very long process, and you have to do it in batches. I covered about 25% of the ground surface, then spread, then use my brush, and then remove the excess, and then had to let it dry before moving to the next 25%.
Finally, after several long evenings doing so, I had all the bricks sealed. It is long, but is definitely worth doing and the final result looks much more like one build rather than a pile of foam bricks. It also makes everything more durable, and heavier (so less likely to fall during play).
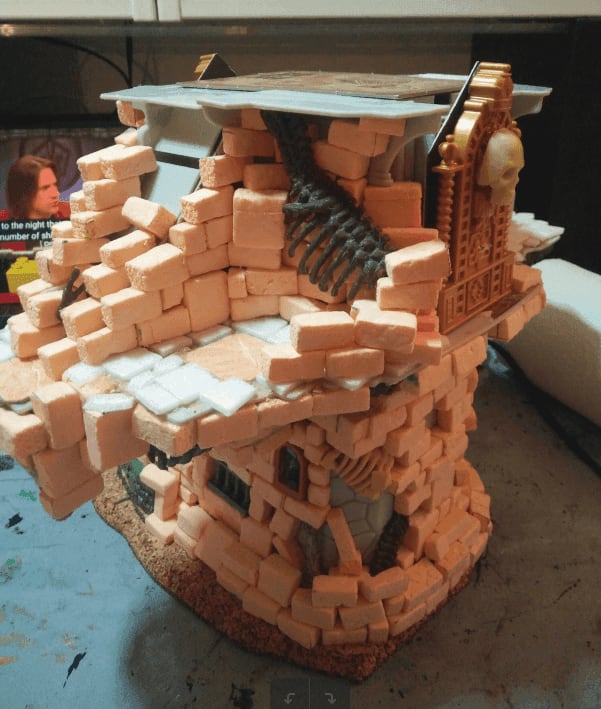
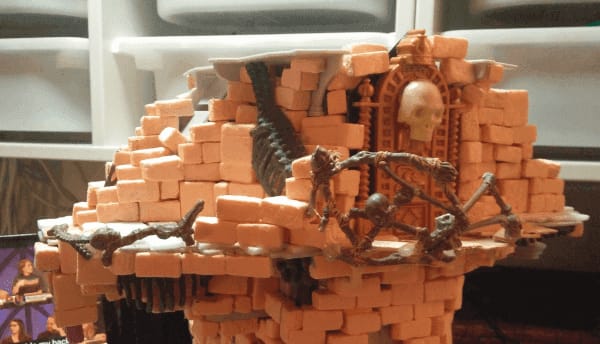
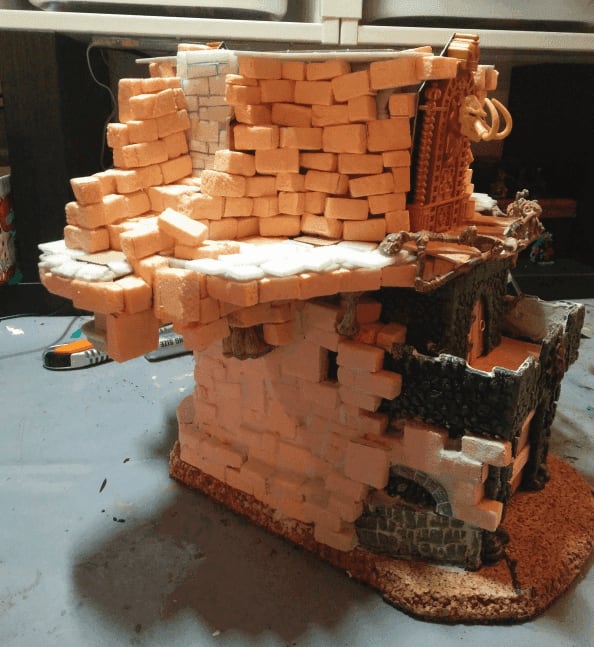
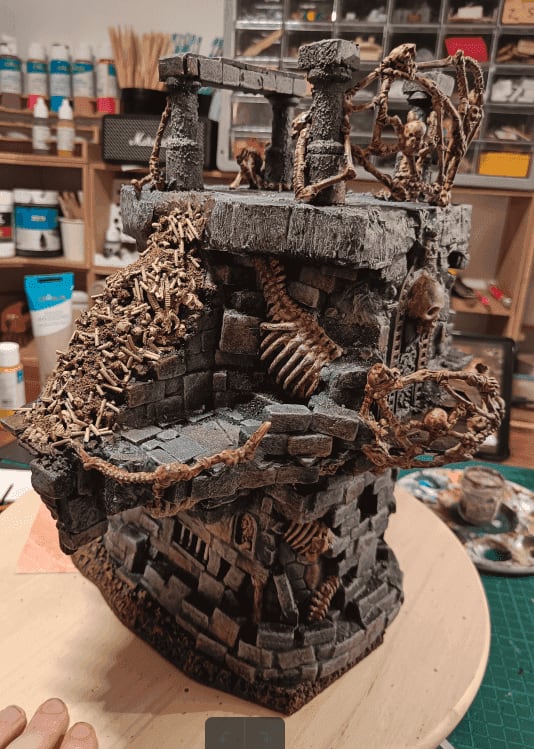
Above you can see my trying to figure out what to put on top of the tower.
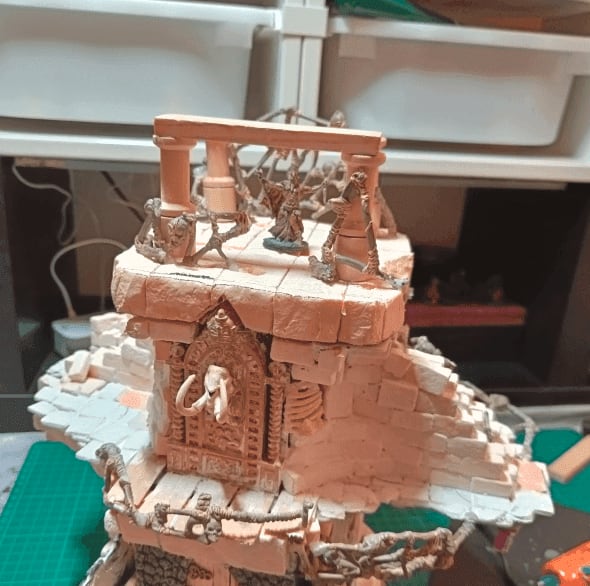
Finally, I decided to put this kind of top altar, where the BBEG would be performing an evil ritual.

The floor itself is a foam board, and the pillars are made of wire spools and Kapla parts. More bones are added to unify the look.
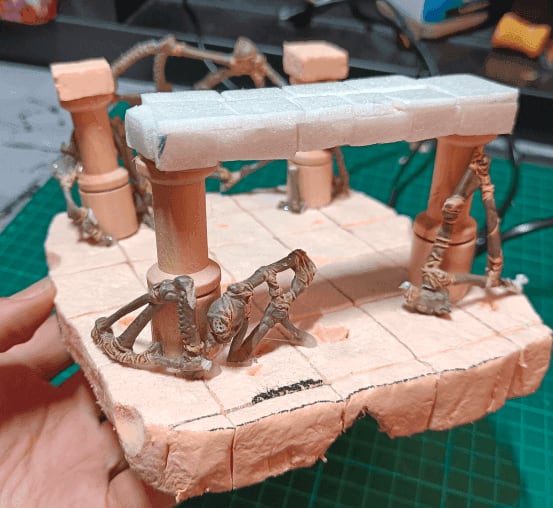
I didn't glue the top part initially, to be able to more easily work on it. I covered the Kapla part with foam tiles, and toped the other columns with more foam bricks.
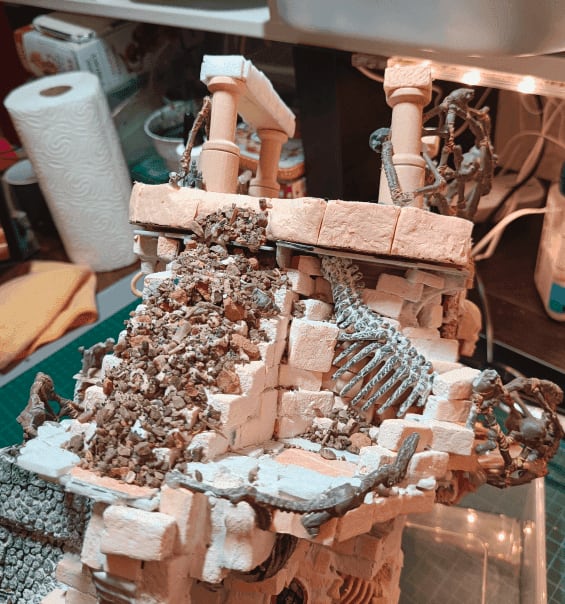
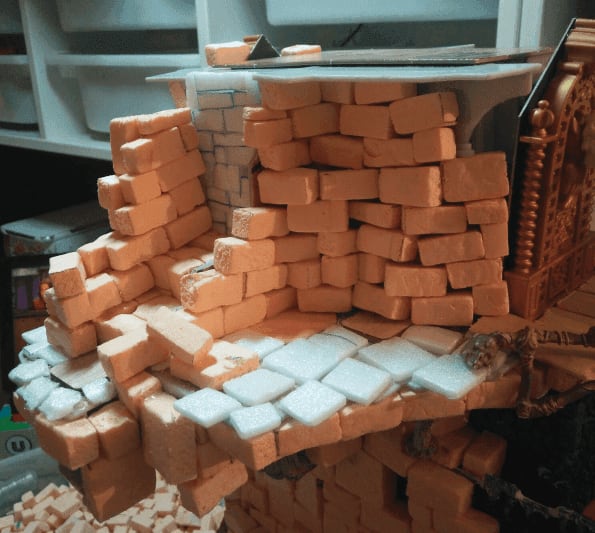
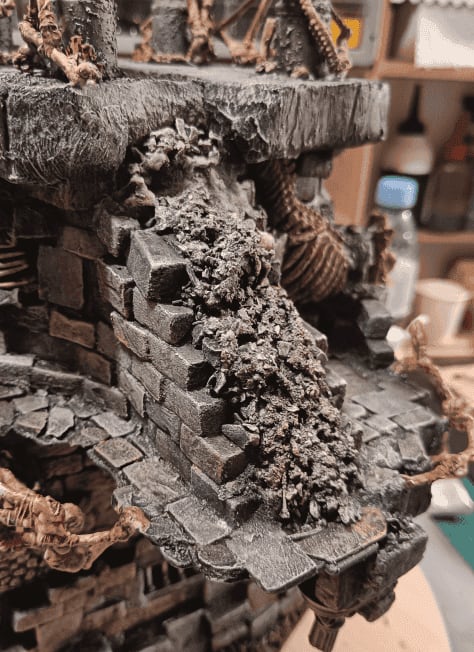
I then glued it on top, and started working on the crumbled wall I had been leaving untouched until now. I added a lot of wood glue, and sprinkled varying sizes of sand and small stones.

I then added more spackle to better tie together the bain tower structure and the top level I had just glued. The transition between the two could have been done better (not sure how though), but it's still much better than leaving the visible gap that was there before.
I also decided to add more spackle around the Playmobil decoration, to better embed them in the wall. They were looking out of place otherwise.

I added a second layer of sand and glue on the crumbled wall (as well as some around it), to emphasize the effect of it being broken.
And the painting phase could begin. Covering this whole build in black modpodge took some time, though.

Some areas actually required several coats.
And then, the very satisfying first gray overbrush was applied.
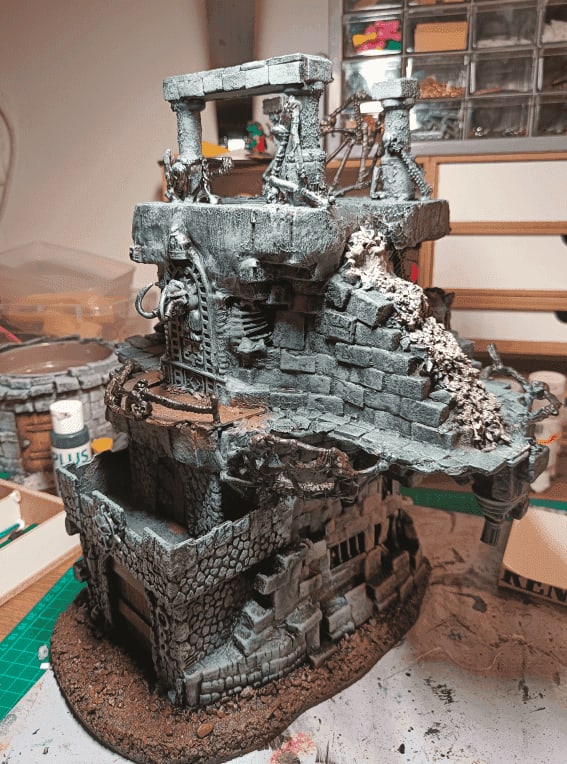
More layers, going lighter and lighter, but also starting paint on the wood.
I love this phase of any build. This is when your heap of plastic and foam starts to look like stone and wood.
Picking individual stones in a variety of earthy colors, to break the gray monotony.
I find this really helps better convey the volumes.
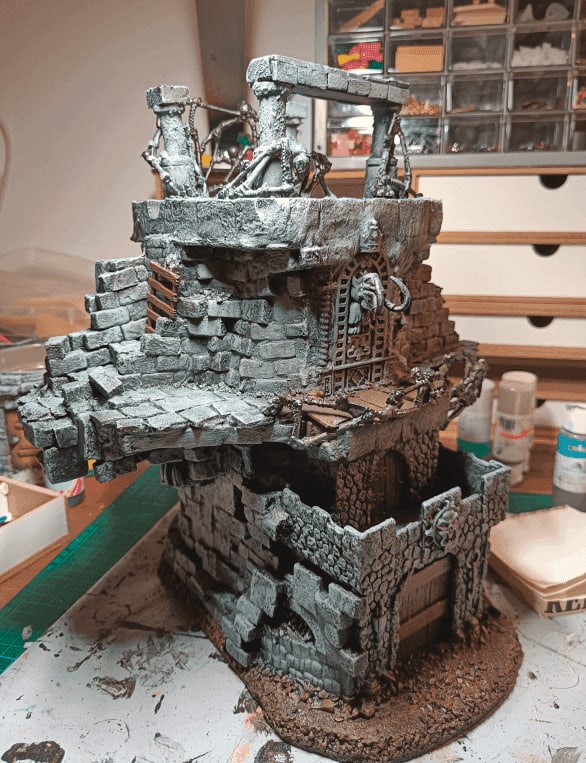
Also started working on the bones. First layer of cream color.
Picking up the rope joints in brown.
It's also a long process, as some bones where in hard to reach places.
I then added a brown wash on the bones, to darken and shade them.
This brought the whole piece to live (pun intended).
I actually found it was a bit too dark, so I drybrushed the bones back with the initial cream color.
And I also admired my work.
This one was more to actually test my new phone camera modes.
I added a black wash on the stone to tone all the varying colors down and make it more uniform.
The contrast between the bones and the stones is nice, and not too violent, I like it.

View from behind.
I wasn't really happy with my crumbled wall, to be honest. I thought it was looking too bland. So I decided to redo it, better.
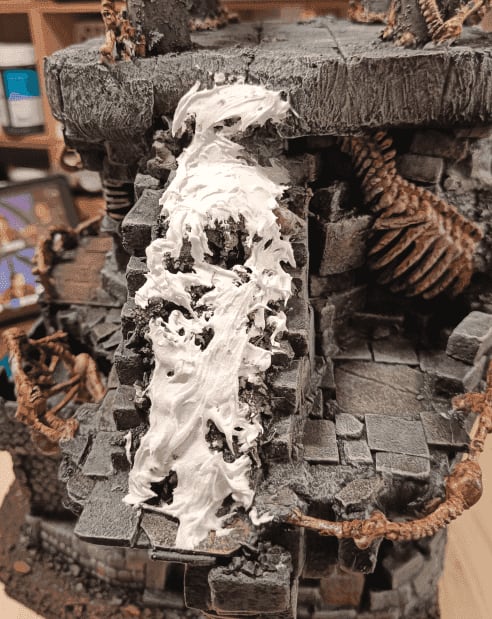
I started by spreading some texture paste on it. It was a bit scary adding back more base materials on an almost finished project like this.
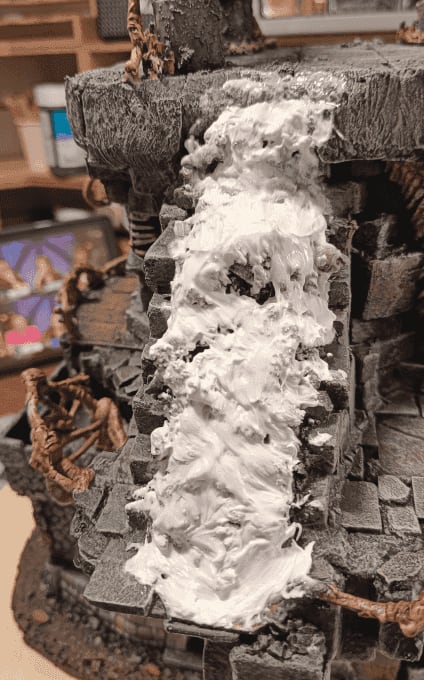
Using a wet brush I spread it even further.
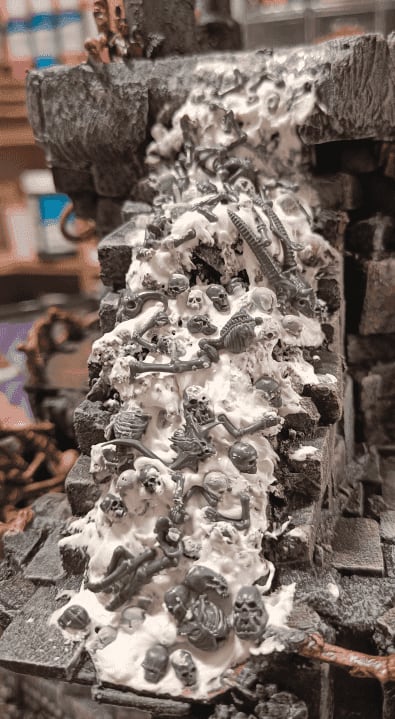
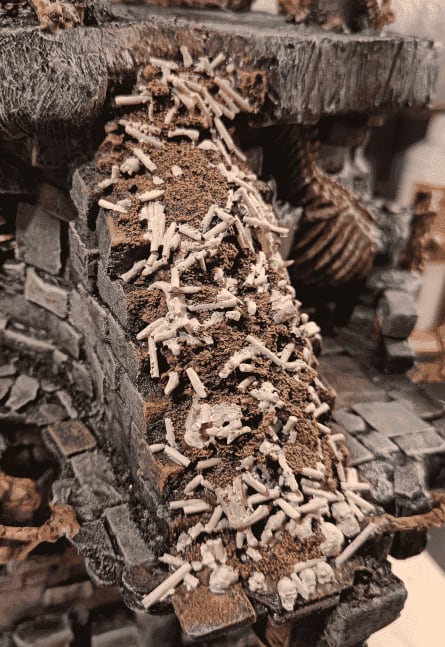
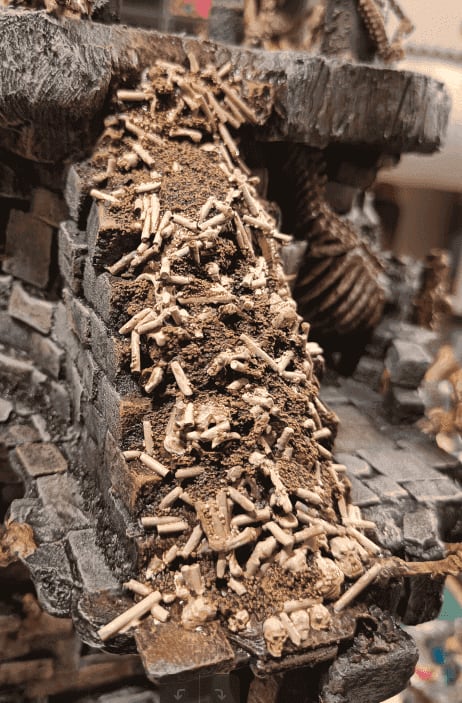
I then "sprinkled" lots of skulls and bone pieces. I really sprinkled it initially, to see what would stick and how. I then used pliers to put individual heads back in the right angle.
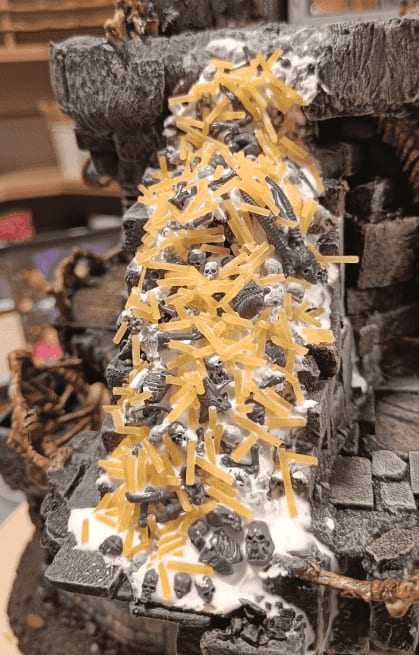
I then sprinkled spaghettis (that I had initially cut in small pieces to simulate bones). I soaked everything in a 50/50 mix of wood glue and water.
I ended up adding fine sand on top, to sit in the gaps where no spaghetti bone were set.
Once dried, I covered it back with black mod podge.
Made an initial overbrush of brown, to make it look like the inside of the wall was made of soil.
Then an lighter drybrush to bring the details.

And one more.
Then picking individual bones in cream color.
Applying a brown wash, individually on each of them.
This makes it much more in line with the whole bone thing theme.
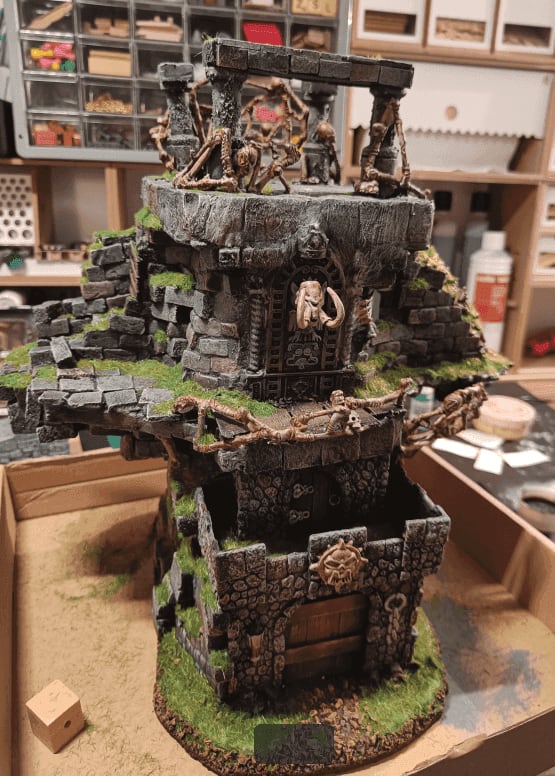
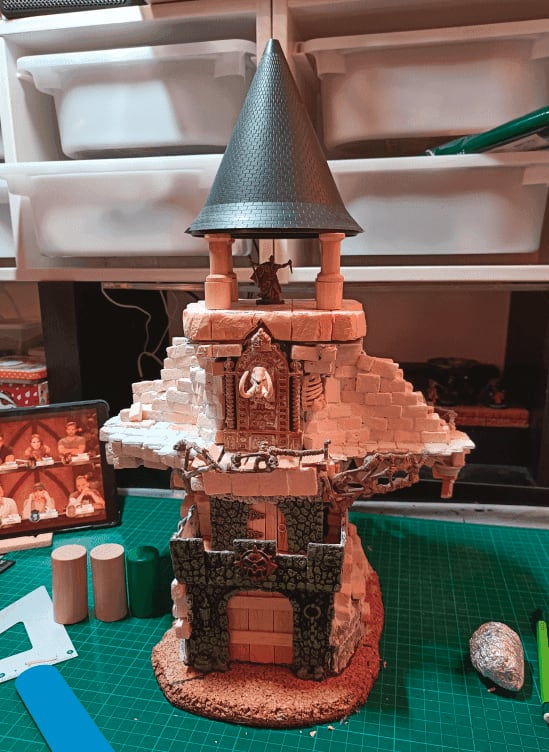
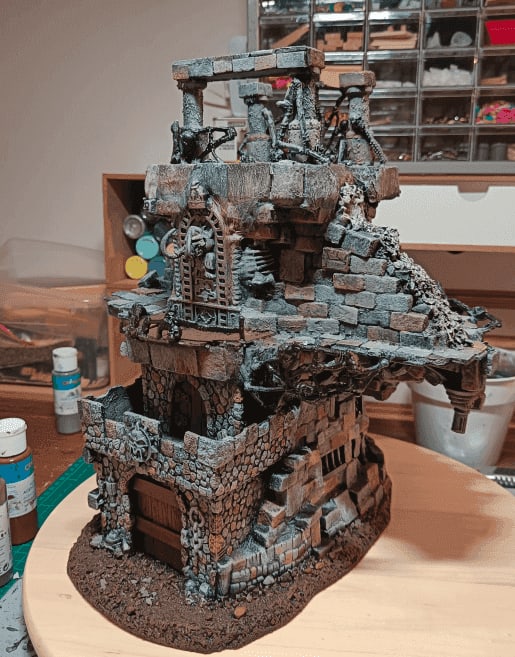
Then it's time to add the flocking. I also love this phase. Adding greenery tricks our brain into thinking the piece is much more alive than it is.
I added flocking wherever there was a flat area that could have seen grass grow, especially on the broken wall.
Every flat stone was fair game. I added flocking in several phases. Starting with the darker green, and then sprinkling lighter green on top of it.
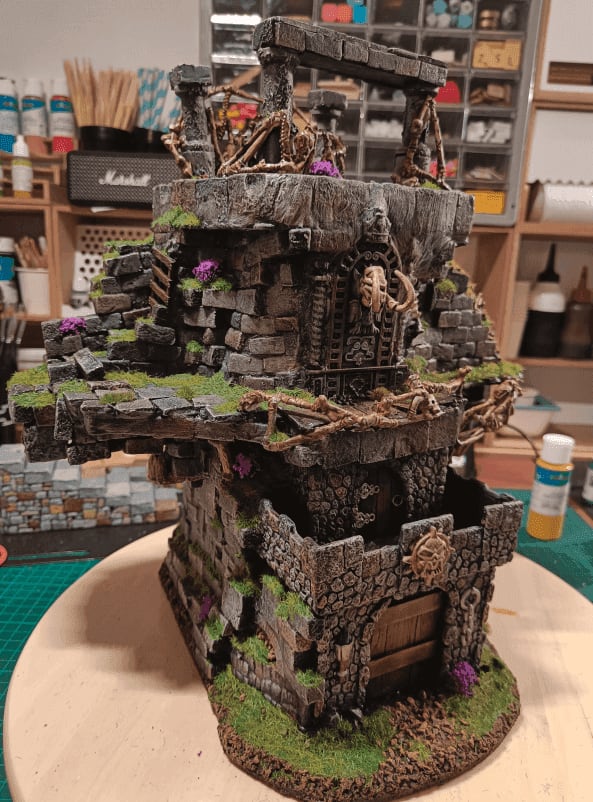
I then sealed it with matte varnish, and only after added purple flowers. I picked purple because it's the color usually associated with Necromancy magic, and I like the contrast of the bones with the pretty flowers.
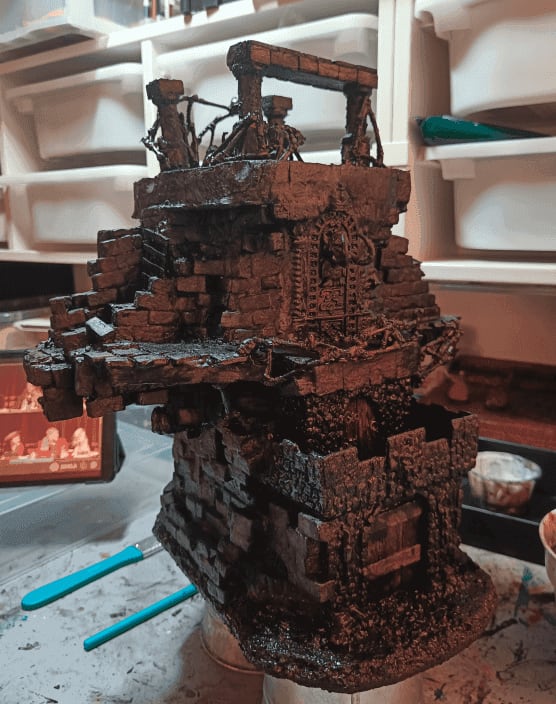
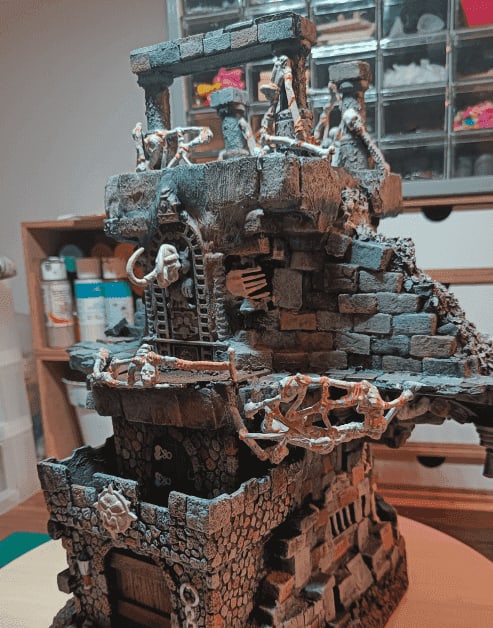
And now some glamour shot of the build on different angles.
Hope you liked the detailed build process. I learned a lot by doing this one. The most important lesson for me was to pick a theme and stick to it. I went all into the whole Necromancer and bone thing and built everything around it.
I used a almost all my spare skulls and bone things, but I figured that if I weren't going to use them to build a Necromancer tower, then I would never use them. So I learned that crafting material are meant to be used, not hoarded. Hopefully I will build even better stuff in the future, but there's no point in keeping build materials for later; just build with what you have right now.

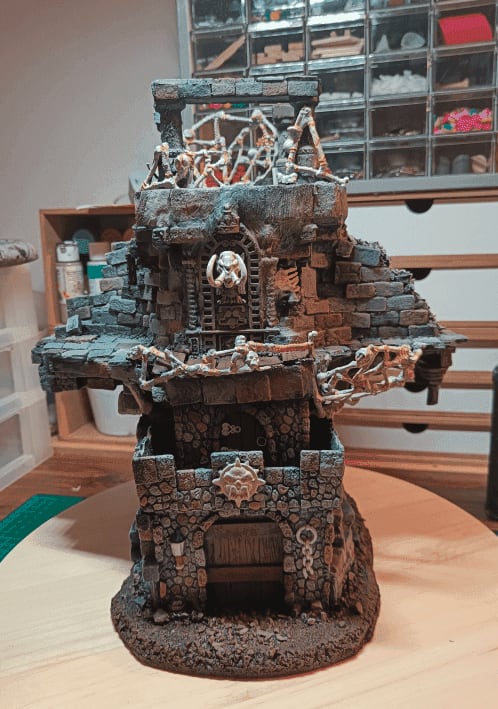
Some beauty shots, taken years later.


Flower pot house
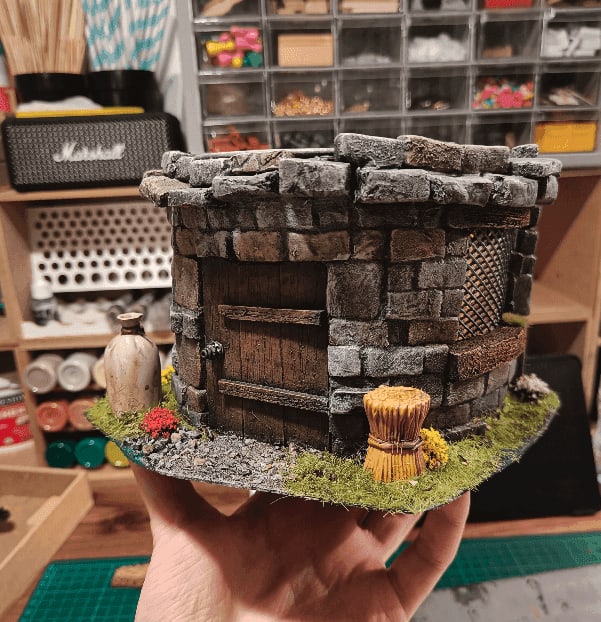
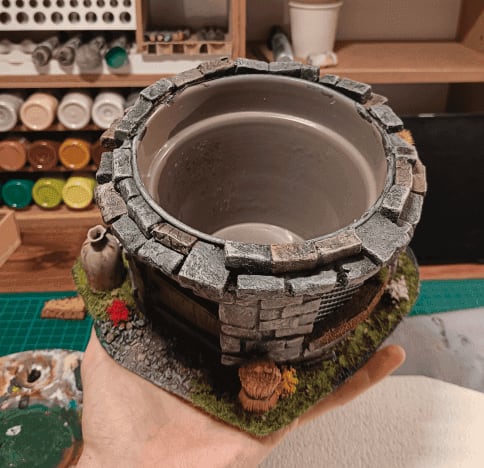
I pimped an old metal flower pot into a nice little house.
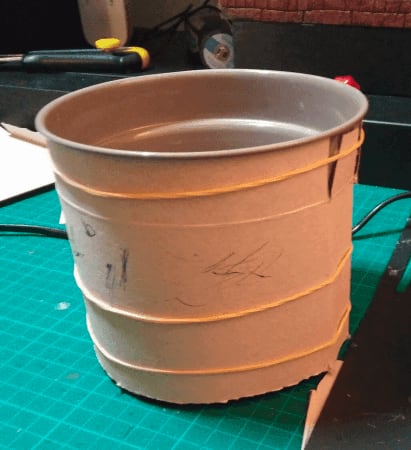
I started by gluing some cardboard around the flower pot, because it wasn't all straight from top to bottom.
As you can see, the top is larger than the base, so the cardboard helps in getting straight(er) walls.
I then covered the cardboard with hardened black tape, to add an additional layer of stiffness, but also to protect the cardboard. I'm going to use a lot of glue, paint and water and I didn't want my "walls" to disintegrate.
I then glued it on a piece of cardboard, and glued foam bricks all around it. The door is made of ice cream sticks, and the handle is a small jewelry bead.
For the window I used golden paper and plastic mesh.
I also added some small Lego windows.
I then added some filling paste in the space between the bricks.
I did it by adding the paste on roughly 20% of the wall, then spreading it as much as I could over the holes. Using a wet brush, I would spread it even further, to cover any gap. Finally, I would use paper towels to wipe the excess off, so the paste only stays in the gaps, and does not cover the brick faces.
Doing it all over the house is long, but it looks so much better once painted compared to just glued bricks. It also makes the piece slightly heavier, which is always good, as to not accidentally knock if off.
First layer of gray overbrush. I used Playmobil toys to spice up the front porch.

Second, lighter, layer and door.
More layers and the floor.
Painting individual stones with diluted paint of various earthy colors for variation.
Doing it all around.
Final black wash on top, and adding some flocking and flowers.
View from behind.
Dungeon Dressing
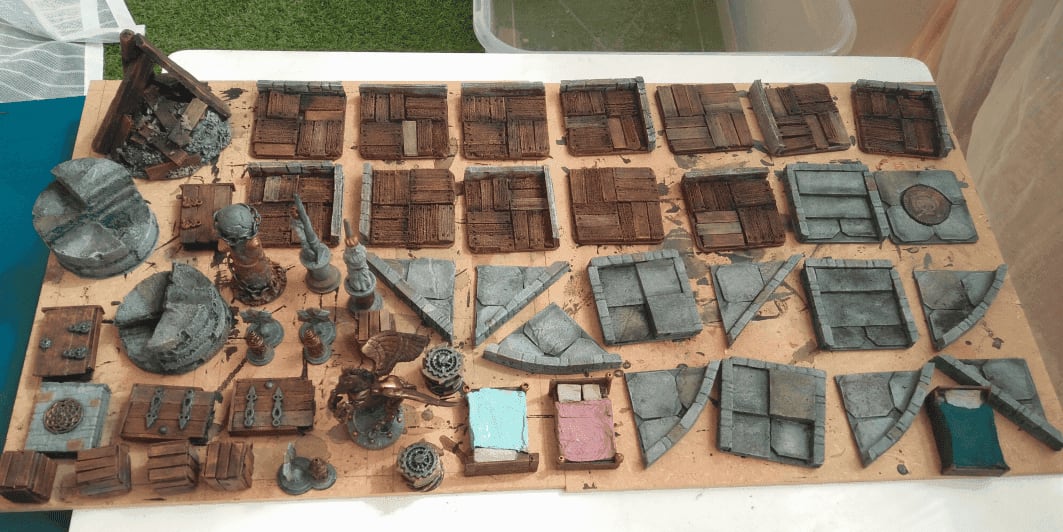
To go with my dungeon tiles, I made a bunch of dungeon dressing pieces. I mostly picked bits of stuff lying around in my bits box, and painted them.
I didn't have a clear idea of what I wanted to build, nor which scenario I would use them, but I wanted generic enough dressing that could be used to improvise a dungeon.
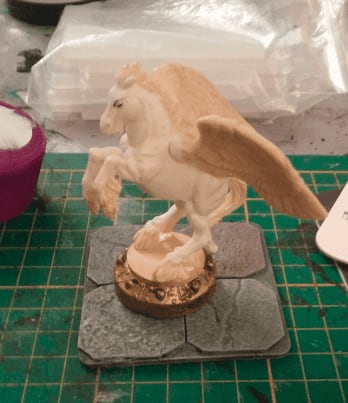
I started with a pegasus plastic toy, glued on a round token to act as a pedestal.
I then glued various tokens I had. I'm not sure which board game they are coming from (I got them in a bag in a garage sale), but I thought they could make a nice trap.
Those were figureheads of two ships I got in another toy. I glued them on a sewing spool to act as a column.

And those are... I'm not sure. I picked another weirdly shaped token as a base, and added some indian/runic beads as well as stuff coming from a Frozen board game. I imagined that once painted they could act as some elaborate tombstone.
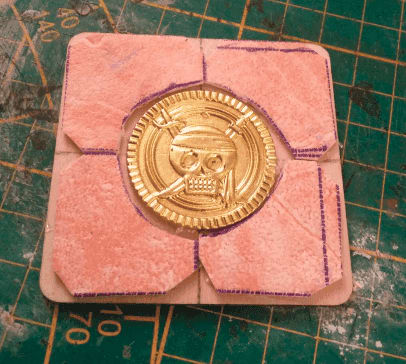
And a pirate gold piece to act as a trap.
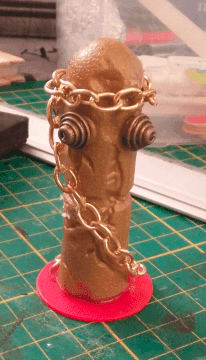
This, I'm not even sure what it was initially. I think it was supposed to be a broken cannon, that I glued vertically. I added more beads to give it an omninous shape and a chain because why not. This is so weird that I expect my players to wonder what the hell this is.
Traditional coat of black before painting for real.
Those dressing pieces gave me a nice respite from painting all those gray tiles.
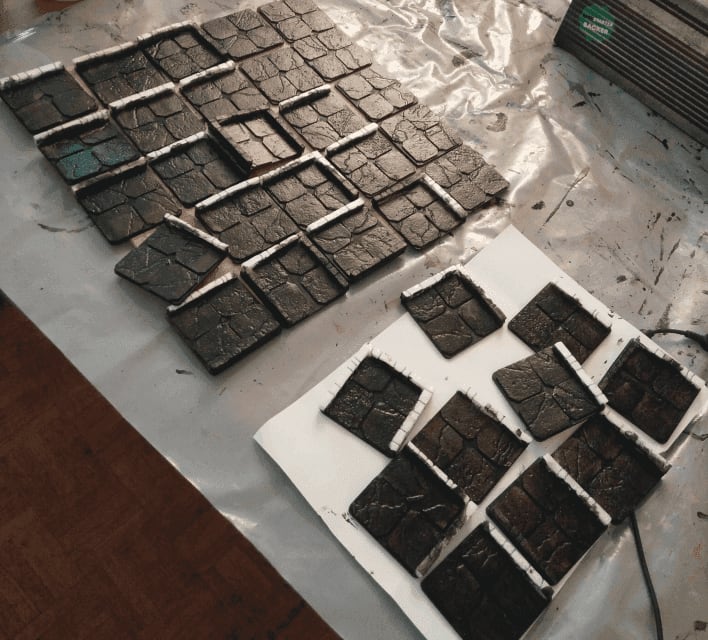
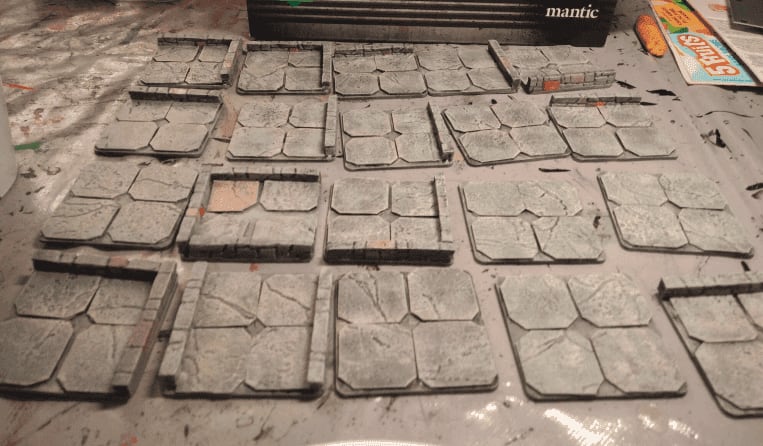
Wyloch-style dungeon tiles

I made some dungeon tiles, inspired by Wyloch. I used completely different materials though, but kept the same overall idea.
First, I'm really bad at cutting stuff in a straight line. Wyloch seems to be able to cut cardboard with very high precision and have all his tiles of the exact same dimensions. I can't do that.
I also don't own a proxxon like Black Magic Craft, so I can't cut foam either.
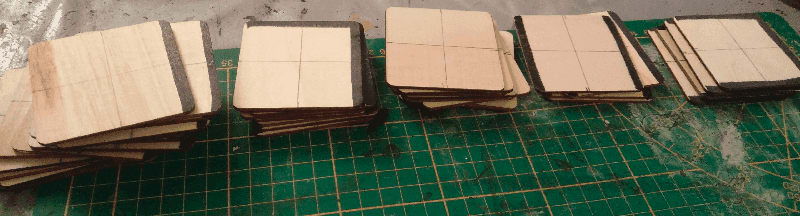
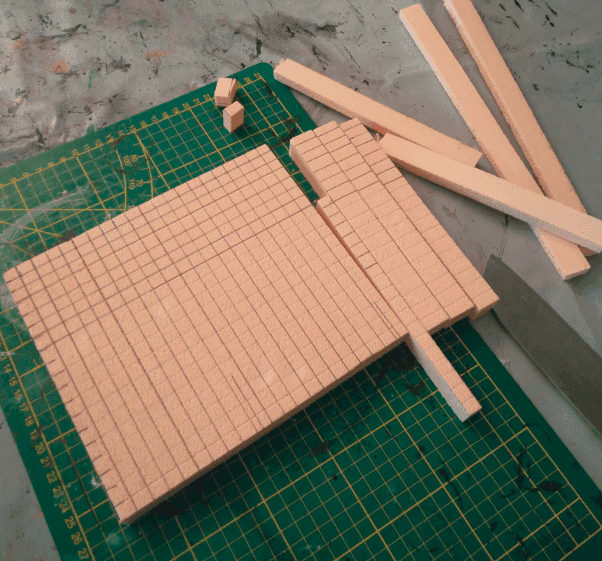
That's why I ordered a bunch of cheap square wooden tiles online. That way I'm sure they all have the exact same dimensions, and I don't need to bother cutting them at the right size.
I draw on the sides with a black sharpie where the walls would go.
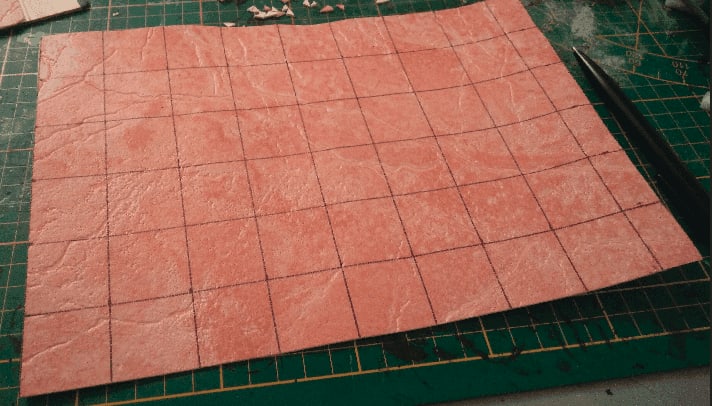
I then cut individual squares in a sheet of textured wallpaper. This one I found in a second hand shop, and it has a nice stone texture.
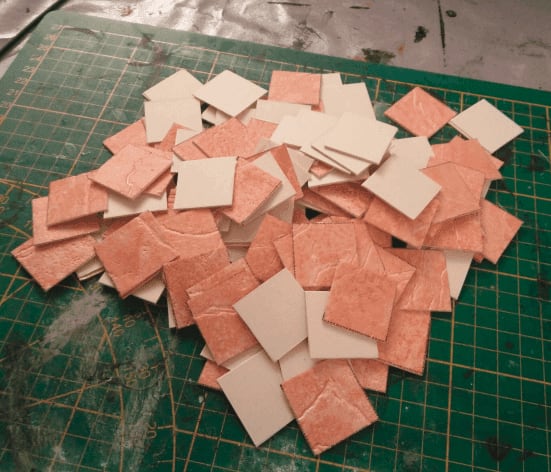
I cut this into lots of squares.
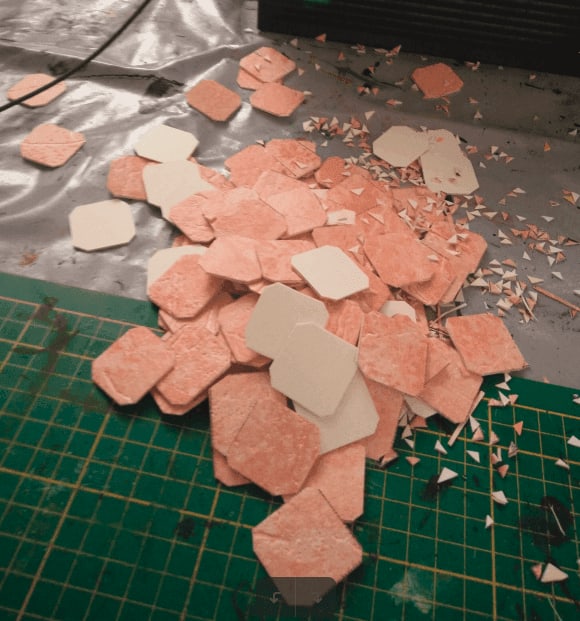
I then cut the corners of each square, to better visually mark them, and create a mess on my table.
I then glue them to the base tiles. I had to cut some squares so they don't overlap with where the wall will go, but because it's wallpaper, it's pretty easy to cut.
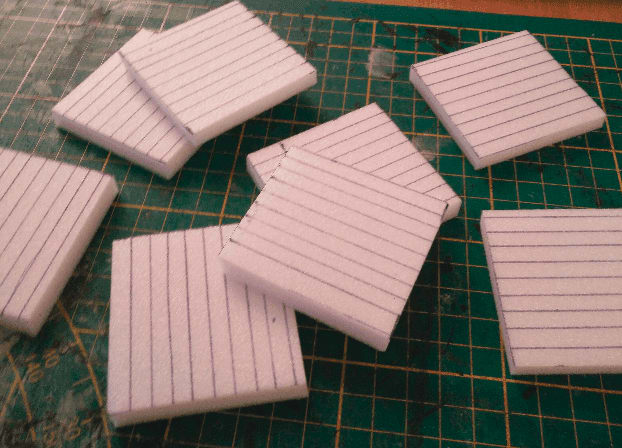
I also started working on the walls. As previously mentioned, I'm really bad at cutting at exact dimensions, so I'm using my foam board thickness as my wall thickness, making sure I have a consistent thickness for all my tiles.
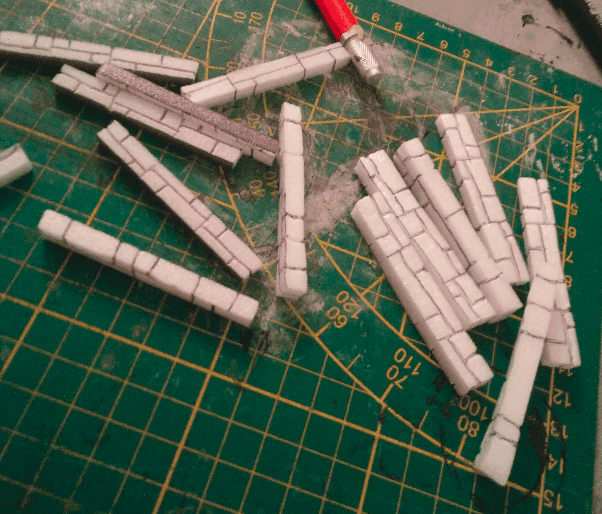
I then texture them to look like stone. The foam I use seem to have a different texture on its top/bottom than on its side, resulting on the final wall texture not looking uniform.
Honestly, for a bunch of dungeon tiles as I'm making, it's good enough.
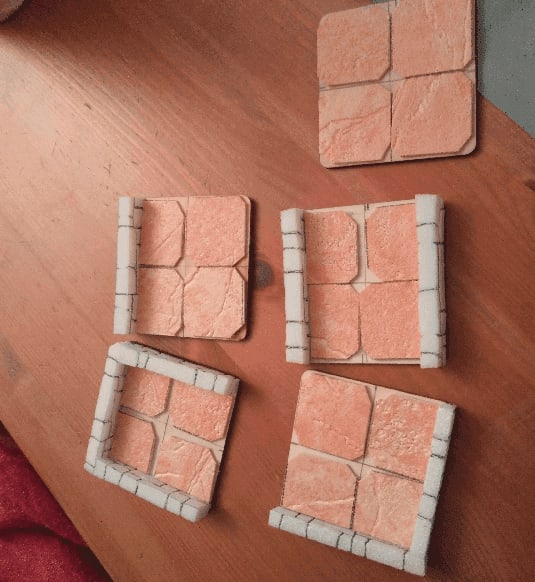
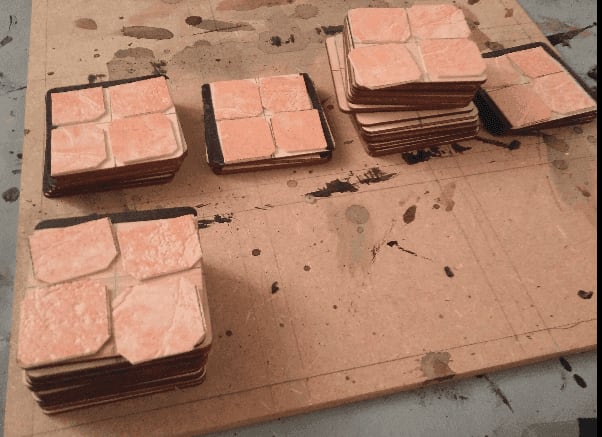
Some examples of the various tiles configurations.
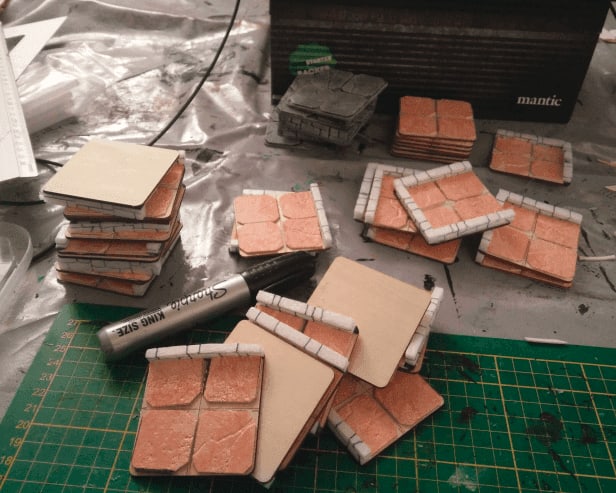
And here we go, making more and more.
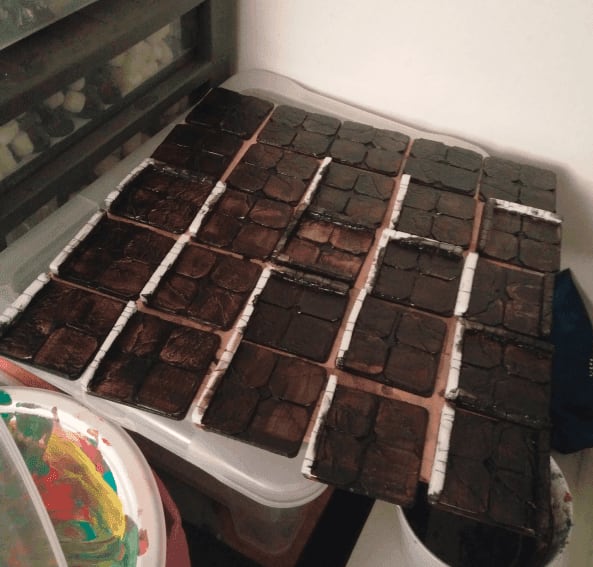
Then, covering them with black mod podge (here you can see corner pieces I made also). The wallpaper actually absorbs paint much more than I anticipated , so I had to do several layers.
I also need to paint the floor and walls in two passes, otherwise I couldn't actually hold the pieces in my hand.
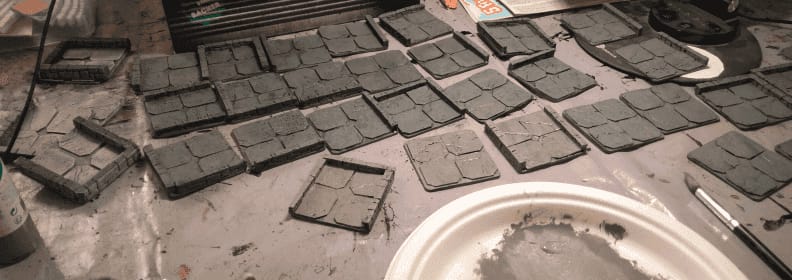
Initial gray overbrush.
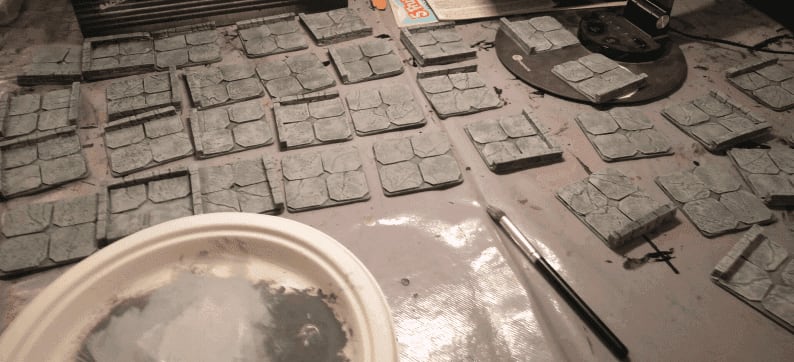
First light grey drybrush.
I set another even lighter grey drybrush on the square sides.
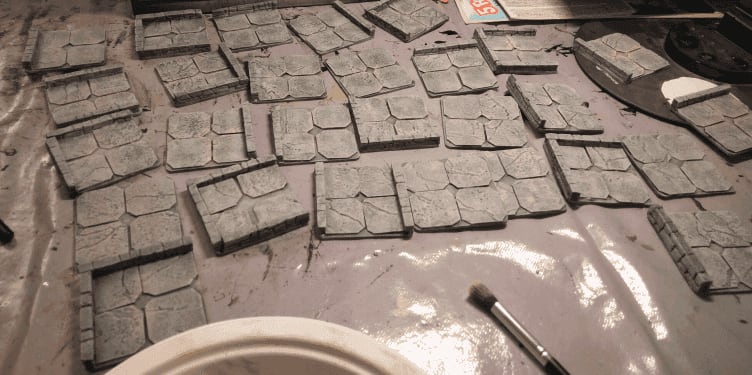
Coloring some squares and wall bricks in red.
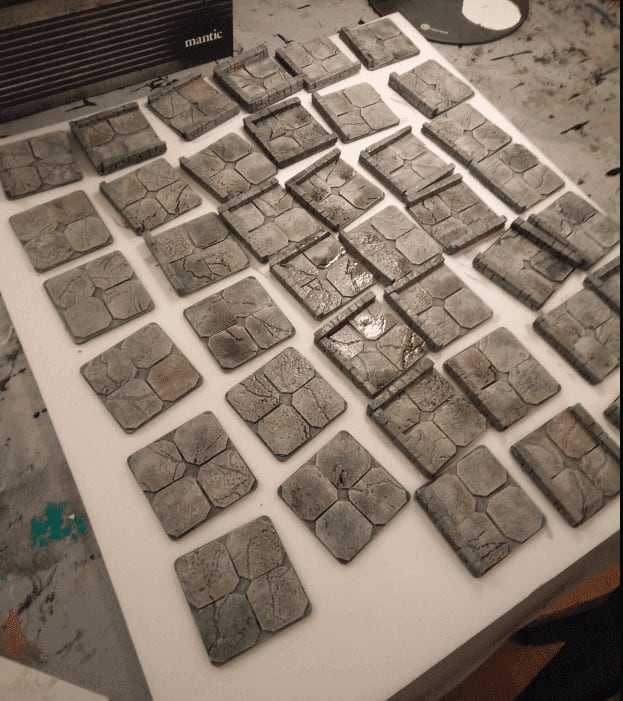
And applying a black wash on all of them, to enhance the stone effect.
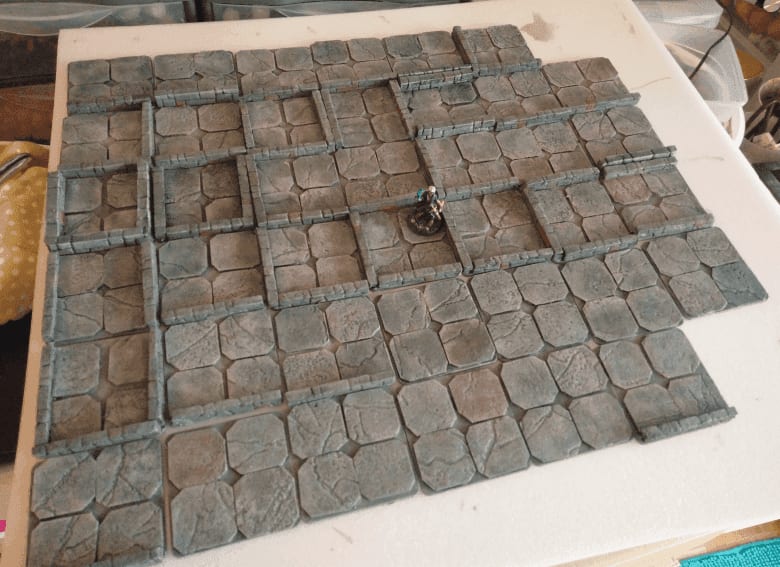
And that's it; a way to generate lots of various dungeons.
Crates
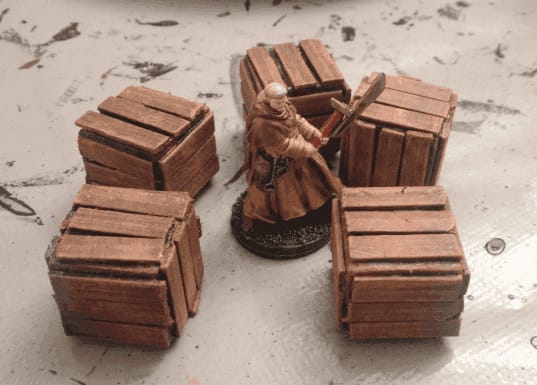
This is a quick post on how I made some crates for scatter terrain. They don't look perfect, but just good enough to add some cover to an encounter.
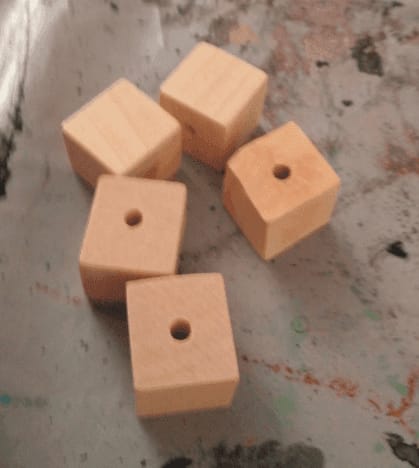
I started with some squared beads I found in a craft shop.
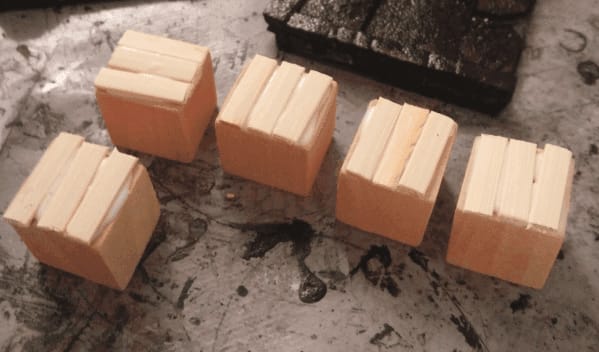
I glued short bamboo sticks on the sides.
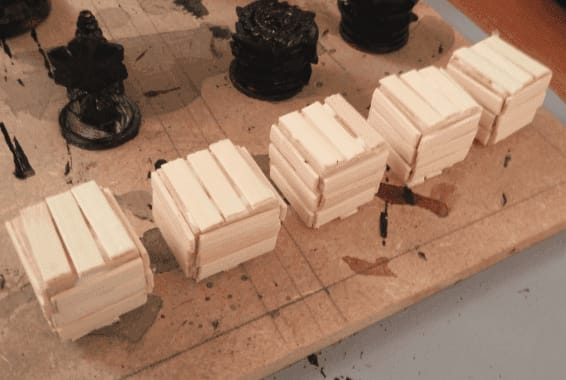
Covering all the sides took a while, as I had to wait for the glue to dry on one side before doing the next one, so I span it on several evenings while working on other projects.
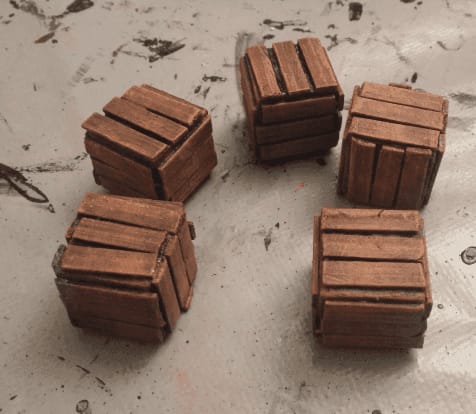
It's then a first layer of black paint, overbrush of dark brown and two dry brushes of lighter browns.
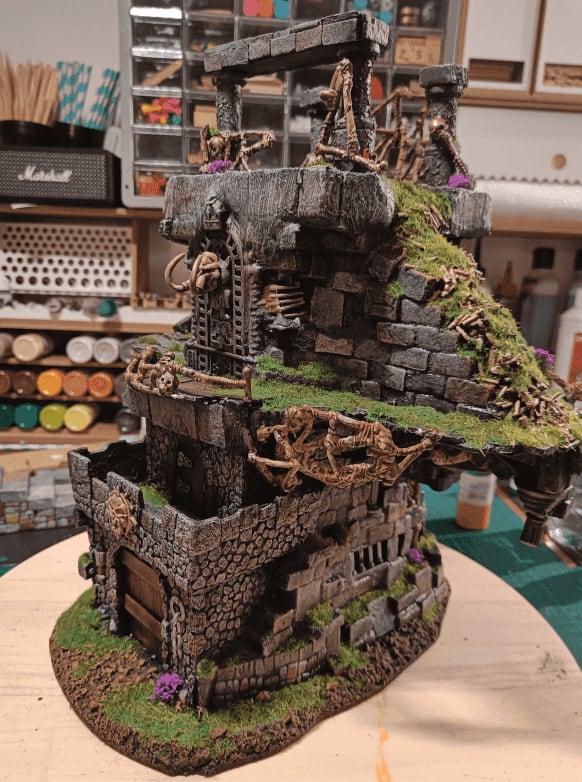
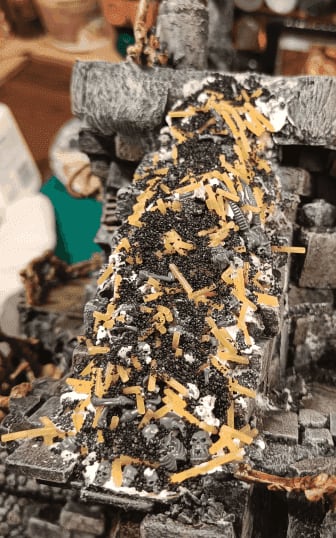
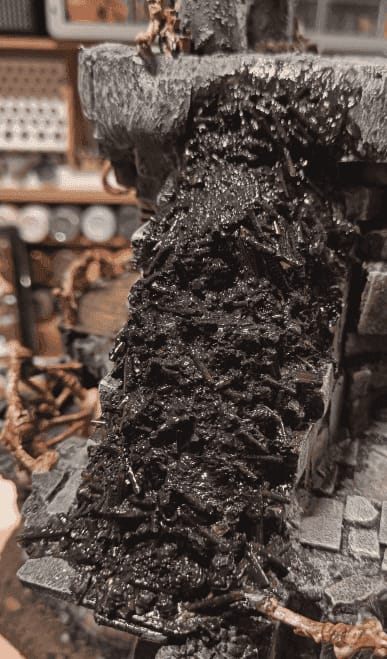
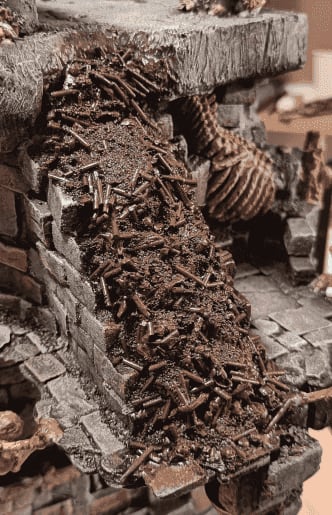
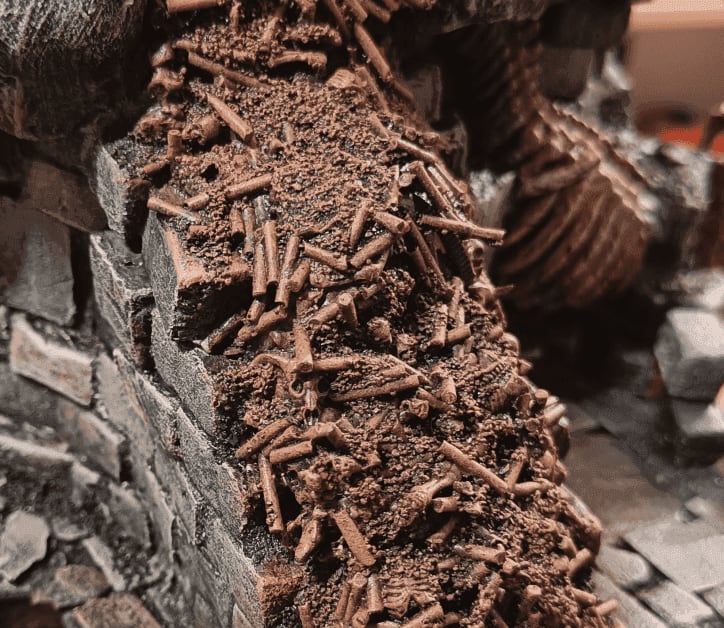
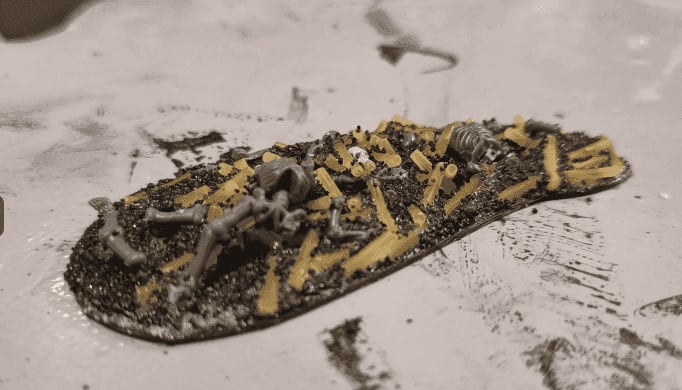
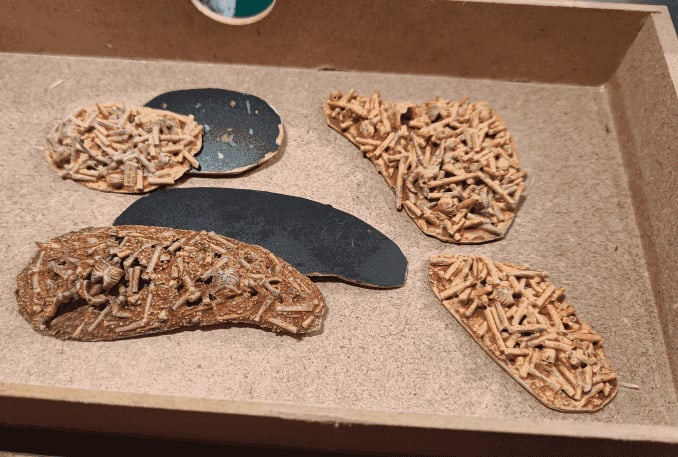
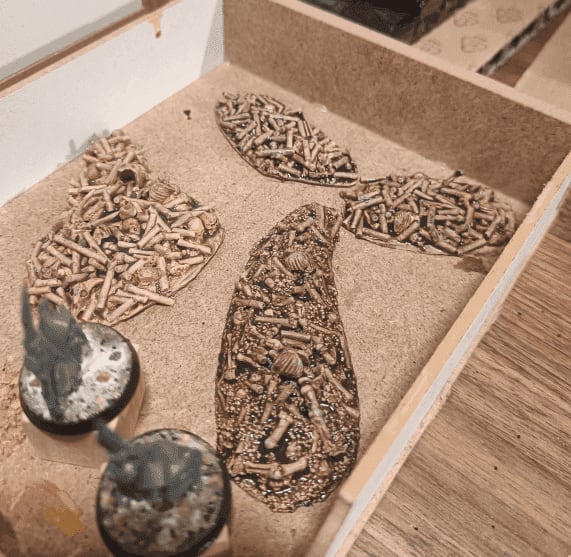
Bone piles
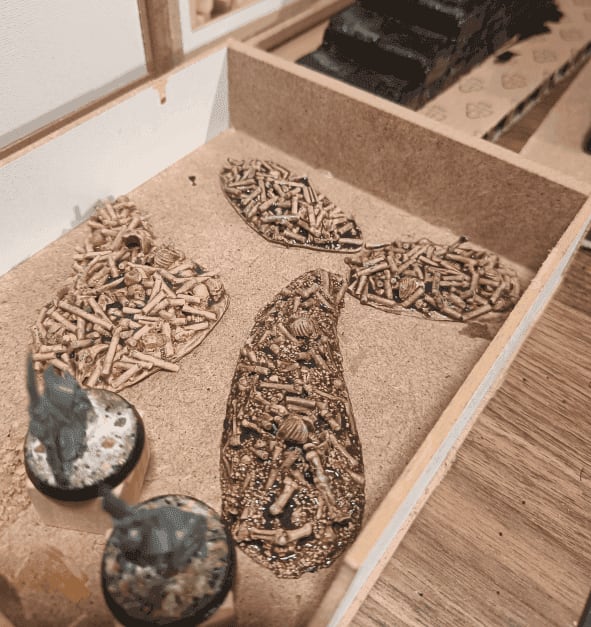
Those are some scatter bone pile terrains. Made mostly from plastic skull and skeleton leftovers, as well as spaghettis.
I cut the basic shape in some plastic, added some Vallejo stone texture on top and sprinkled various bits of plastic skeleton, skulls, spaghettis and fine sand.
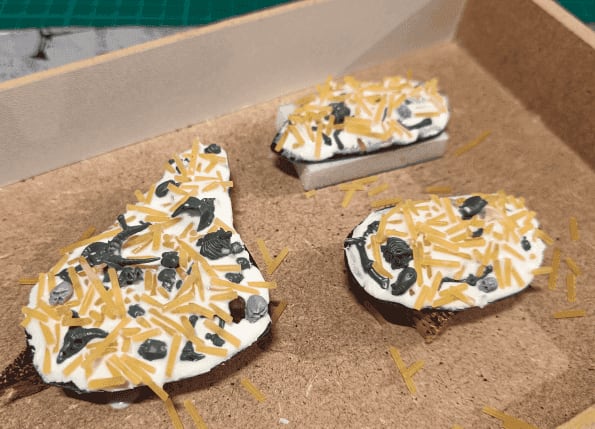
I made several of them, and soaked them in wood glue heavily diluted in water (50/50 mix). This will help all the sand and pieces to really stick together.

I started with a base of bony/cream color.

I wanted to use this project as an opportunity to test oil painting, so I added some burnt sienna on top.
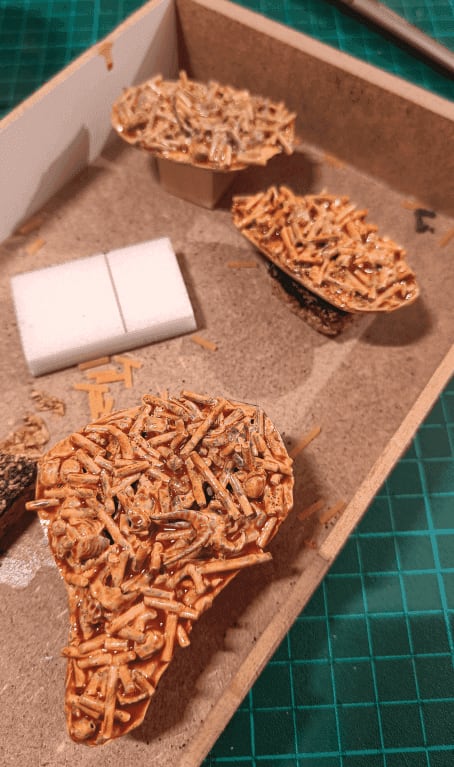
I thought the result were not dark enough, so I added a second diluted layer.
I think that at that point I forgot that I wanted to use oil paints and I started drybrushing them out of habit.
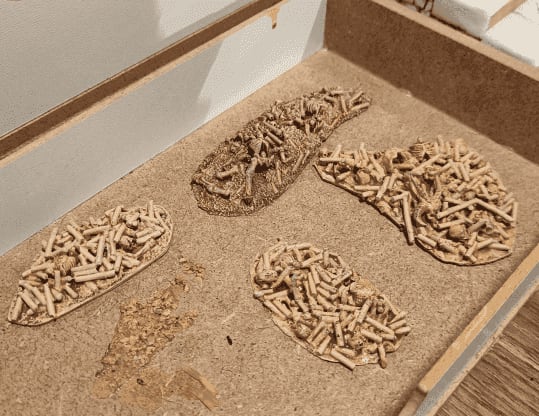
This doesn't look so bad, so I kept going.
I then added the traditional wash on them. I wasn't sure where to go next, so I left it at this.
If I had to do it again, I would keep adding the fine sand, but I would first dry brush in various tones of brown the whole piece, and then pick individual bones with cream paint and brown wash.
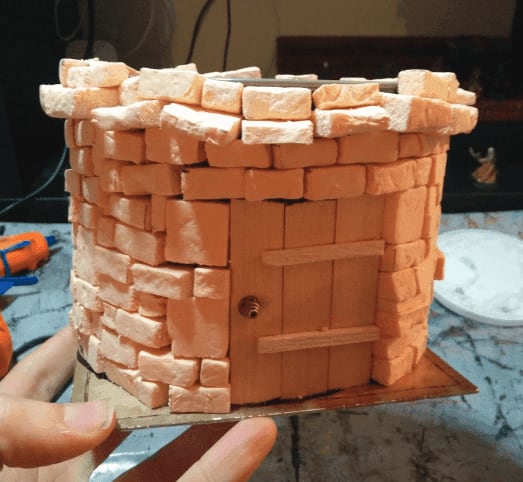
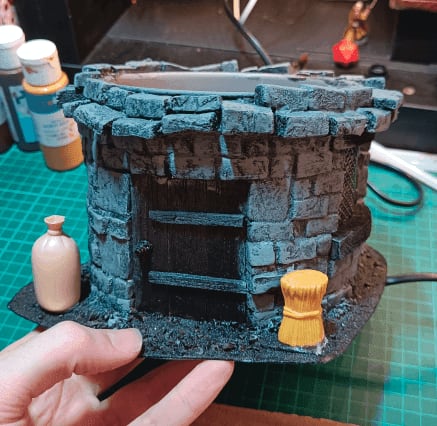
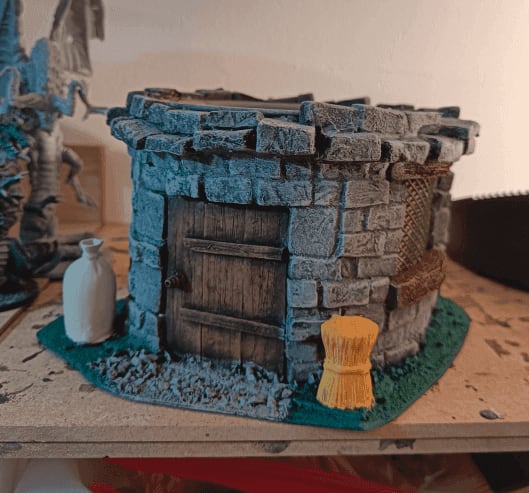
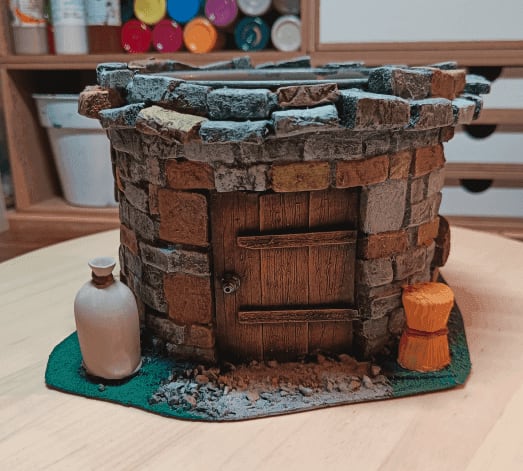
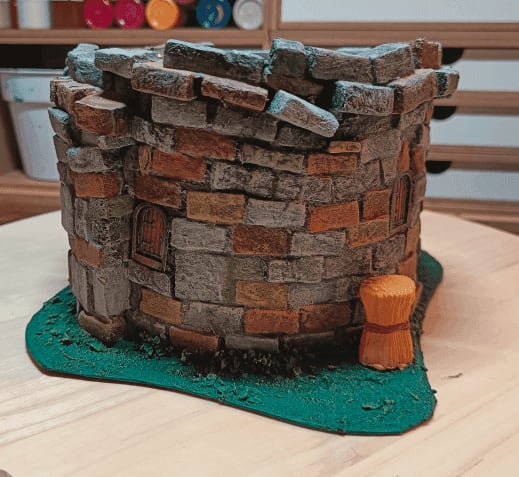
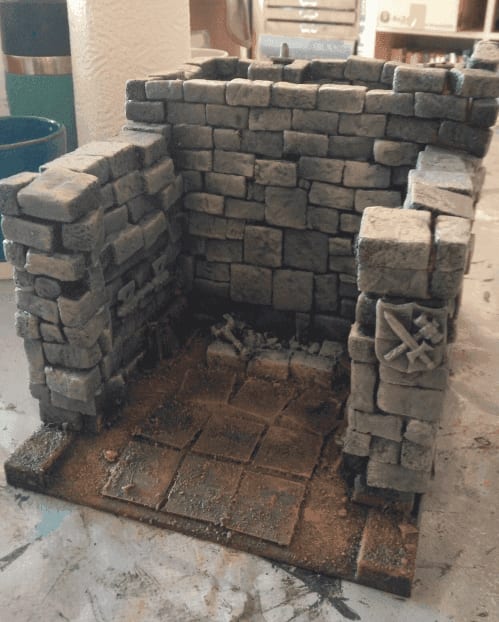
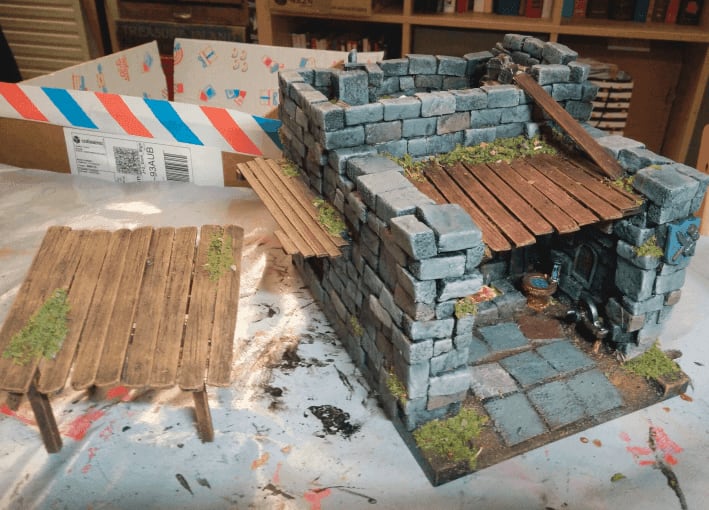
Blacksmith forge
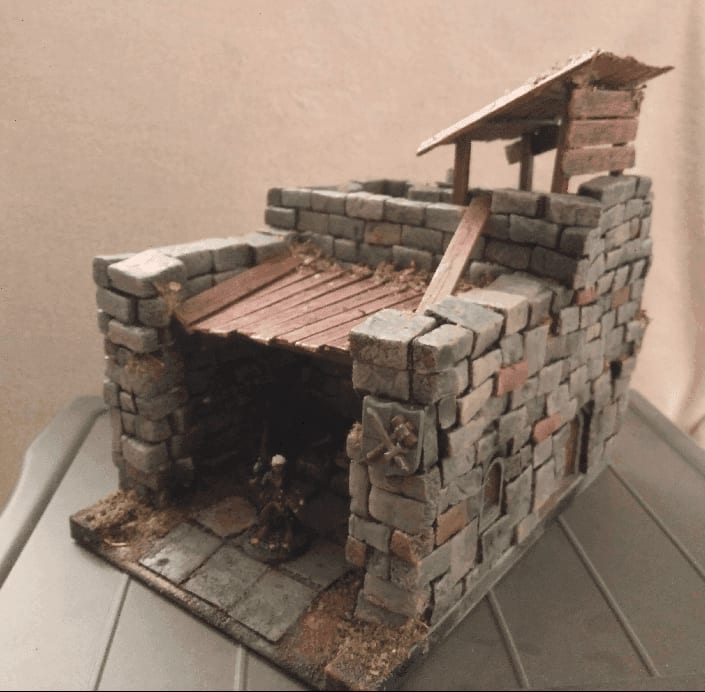
I made a blacksmith forge out of the structure of a toy. Honestly, I could have made it without the structure underneath and it might have actually turned just as good, but I like the constraint that using a pre-made structure adds.
This is the original toy I found in a second hand shop.
The plastic was very brittle, so I started by removing all the walls and unscrewing it. I would then glue it back together, but I didn't want any small part to break as I was working on it.
It was also a bit too deep, so I added a fake back wall with a foam board. I thought it could also act as some kind of house for the blacksmith.
I started working on cutting foam in bricks.
Which gave me a fair amount. I textured them by throwing them in a box with some real stones and shaking it until the stone texture was embedded in the foam bricks.
And then, it's just a matter of gluing the bricks one by one on all the walls. I do it with a glue gun, applying glue on the back of each brick and gluing them to the walls.
I added some windows and doors from Lego pieces and miniature leftovers I had.
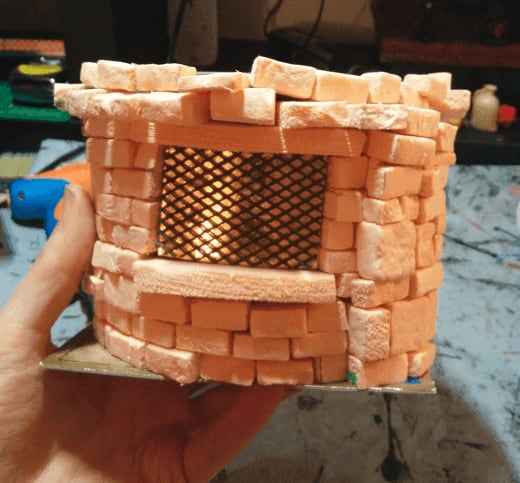
I decorated the forge area with some more toys and miniature stuff.

Upstairs I engraved the floor with some tiles pattern, and built a shack out of some balsa wood and popsicle sticks.
To make the side slightly more interesting I ever get to play a skirmish game with this terrain, I added a small wooded part.
After a first overbrush of the base colors.
View from the other side.

Painting stones in various colors for variety, using highly diluted paint, and adding a glow effect on the embers.
Added ramshackle wooden planks as some kind of ceiling. Not sure it makes sense that a forge ceiling would be made of wood but hey.
The top shack is not glued, for easier storage and also because it can be used in other contexts.
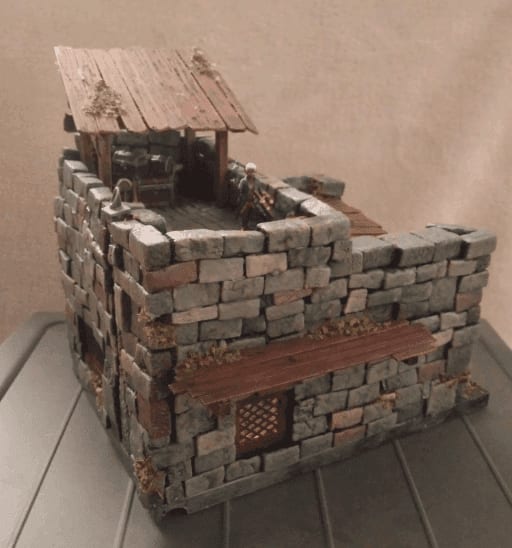
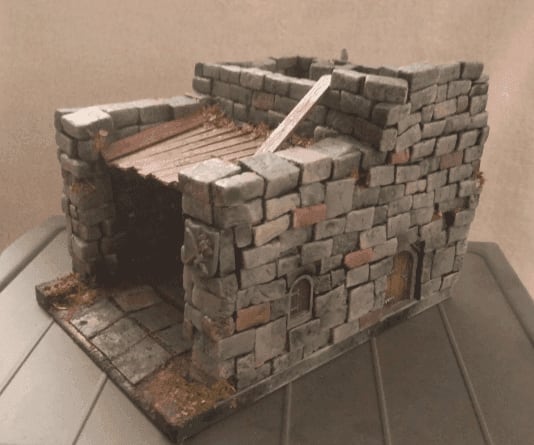
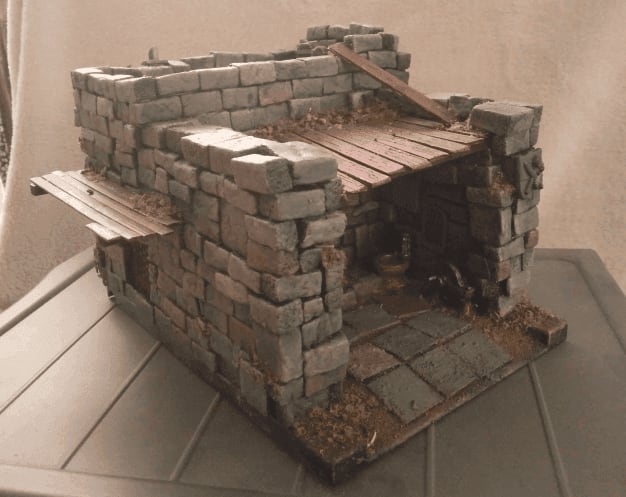
Final glamour shots from various angles.
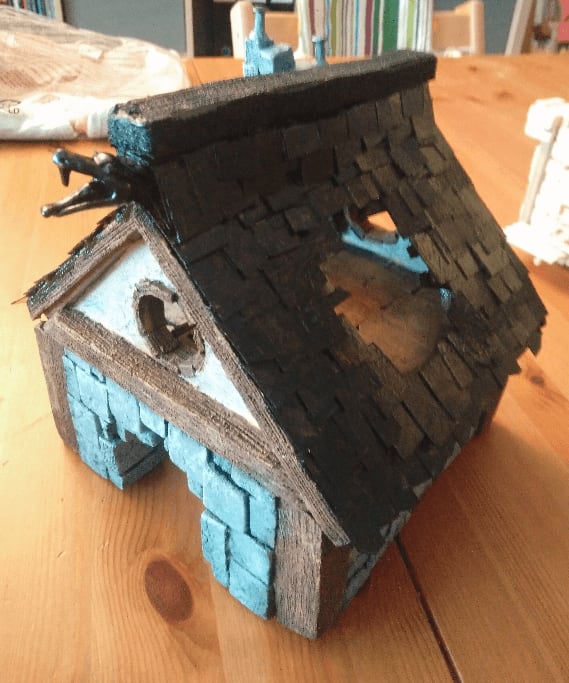
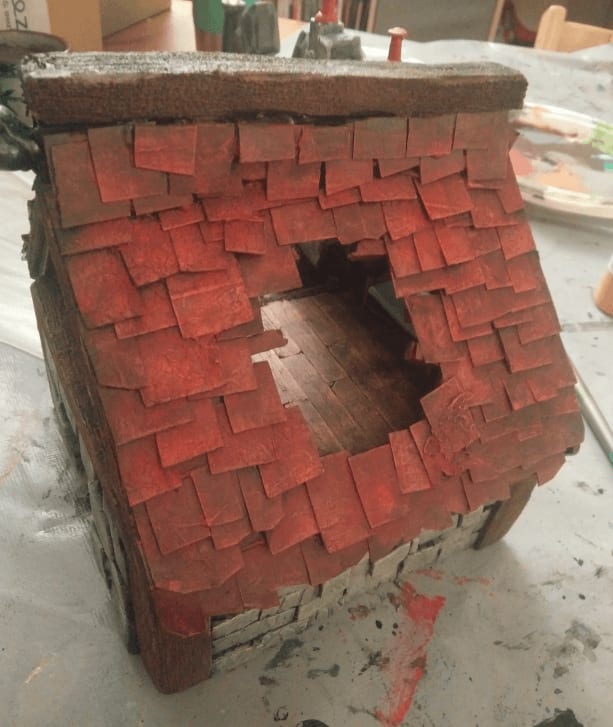
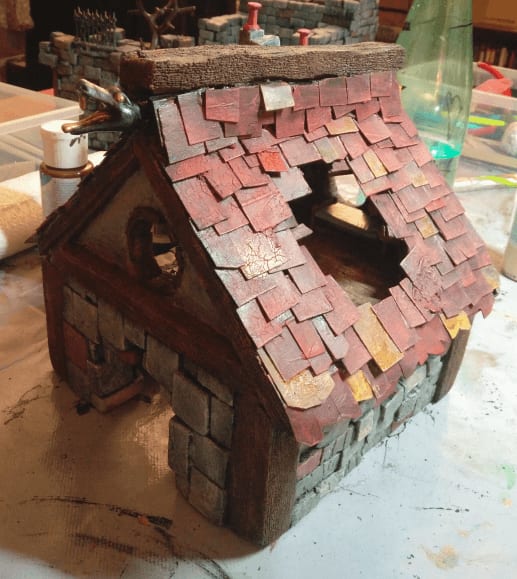
Wooden toy Mordheim House
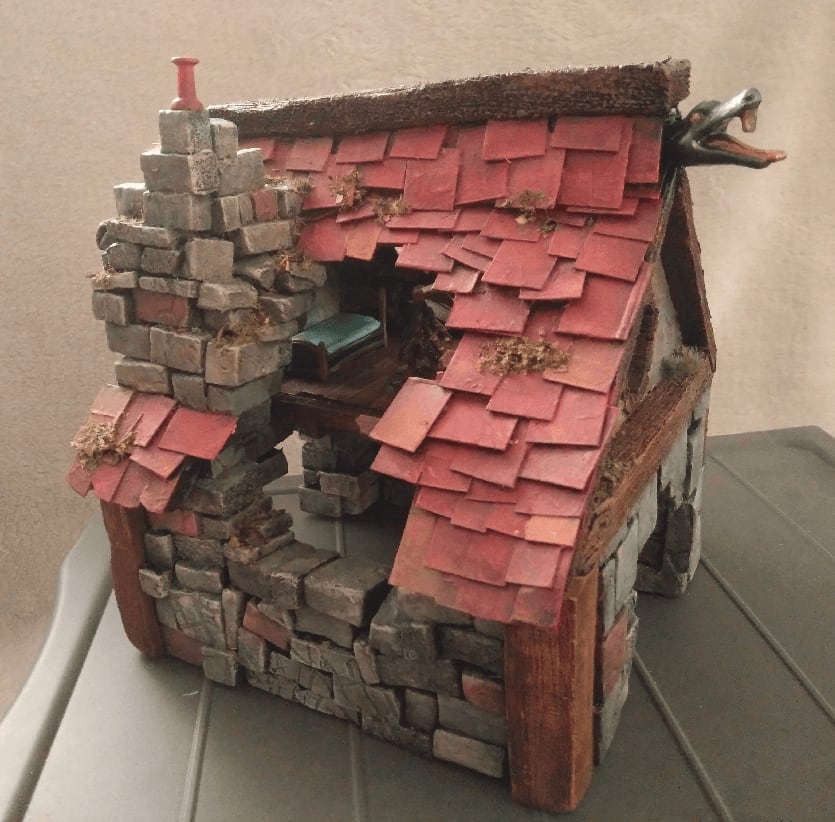
This is a ruined city house, with its roof destroyed by a fallen meteor.
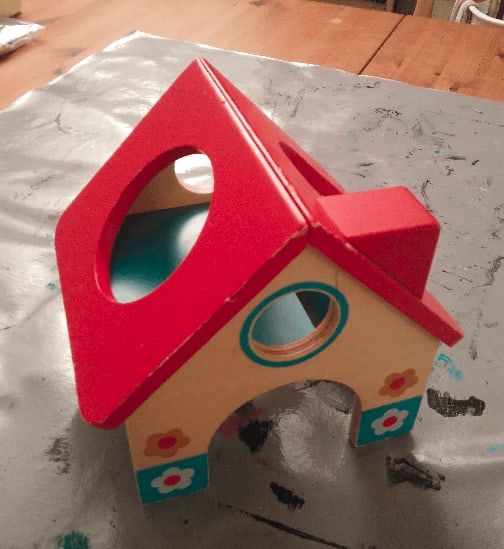
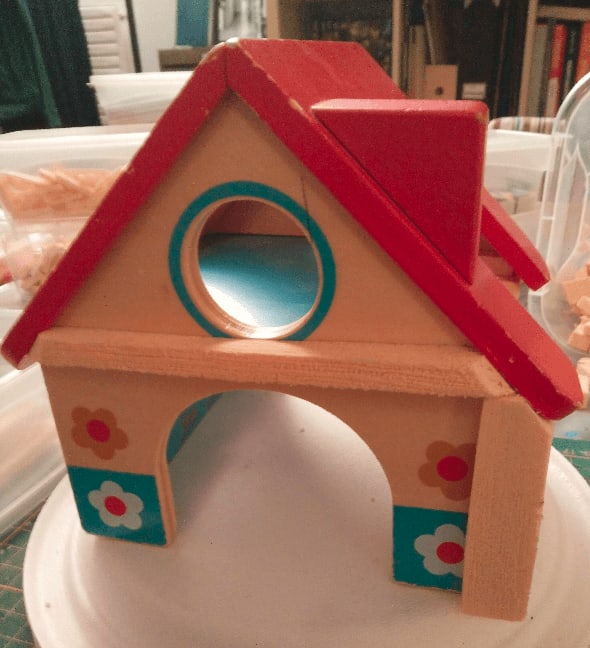
And it all started with this nice looking little wooden house. I had seen it in my local second hand shop a couple of time. I picked it a few times, wondering what I could do with it, and always put it back. I thought the scale was off, and that fixing the giant holes in the roof would be a pain. And even if I did, it would make playing in it pretty hard.
Then one day, it occurred to me that the giant holes might not need fixing; that they might actually be desirable if I wanted to craft a meteor-destroyed house.
Walls
So I started adding wooden beams on the outside, to better delimit the ground and first floor. Those are made from insulation foam, and textured with a wood scraping brush.
I also put the same kind of wood/foam at the house angles. I hat laying bricks at angles, so this provides a nice shortcut to cover the angles and still make it look like some kind of medieval construction.
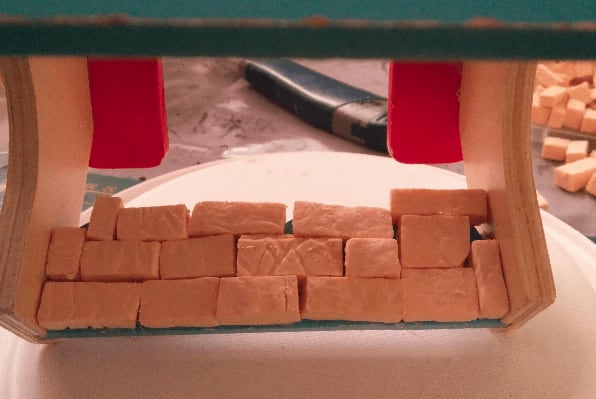
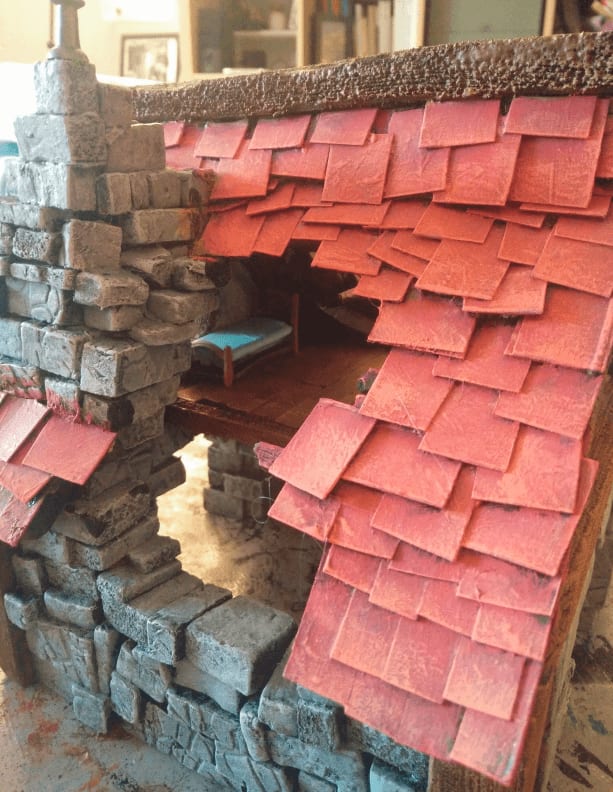
I then started laying bricks on all walls, even the interior ones. I decided not to glue this build on a base. Because the structure is already so durable (trust me, it's some really heavy and strong wood there), I knew I could just pick the build and lay it on the board anywhere and it wouldn't need a base.
More bricks, and a chimney. I glues some pins at the top of the chimney to simulate a top exhaust. Not sure if the illusion works though.
More and more brick laying. This took some time, but I did it while listening to the Dungeons of Drakkenheim podcast (very fitting in terms of atmosphere), so I had a good time.
Almost there. As you can see, I can hold the whole structure in one hand and everything stays attached. This is one of my most (if not the most) durable builds.
Floor
Now is time to cover the top floor with some wood. I took a lot of ice cream sticks, cut their rounded ends and textured them to add wood grain.
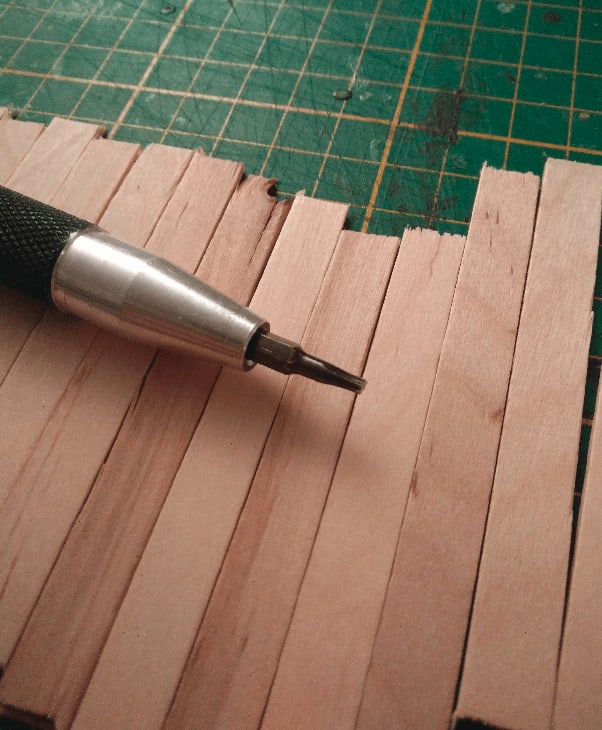
Here is what I use. It's a corx screwdriver, it has a star-like shape and with two or three passes on a stick, it simulates veins of a wooded plank.
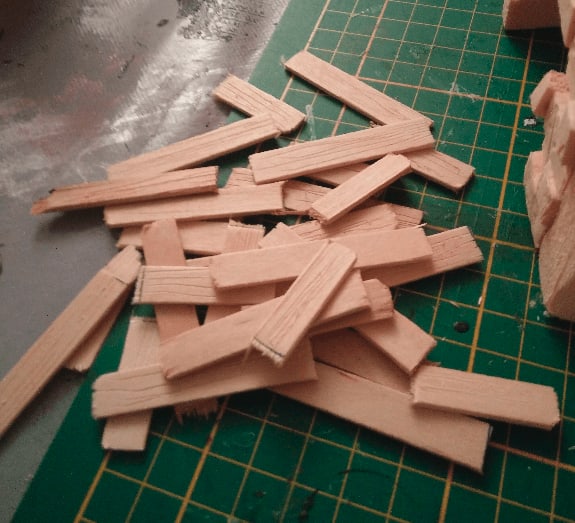
Then I cut them into smaller bits, so I could glue them into some sem-irregular pattern (one long and one small, in alternate rows).
For durability, I used a glue gun to glue them all, but this required some precise timing as I had to glue them quickly before the glue got cold and some were sometimes hard to get to.
Upper walls
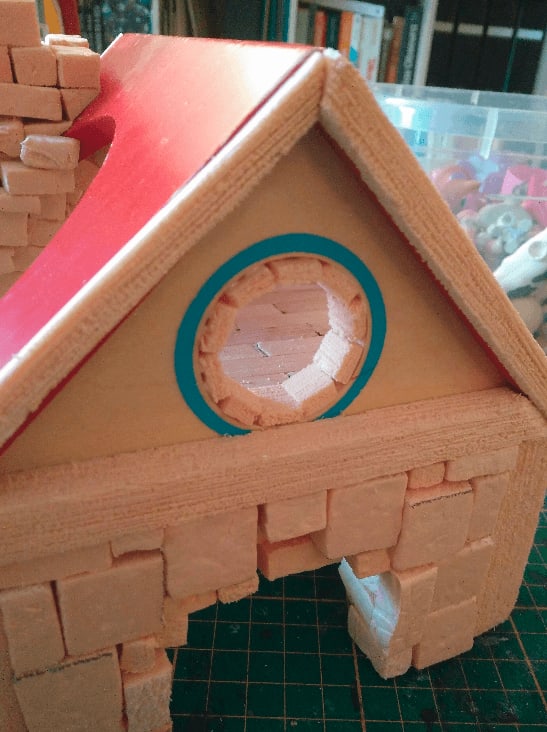
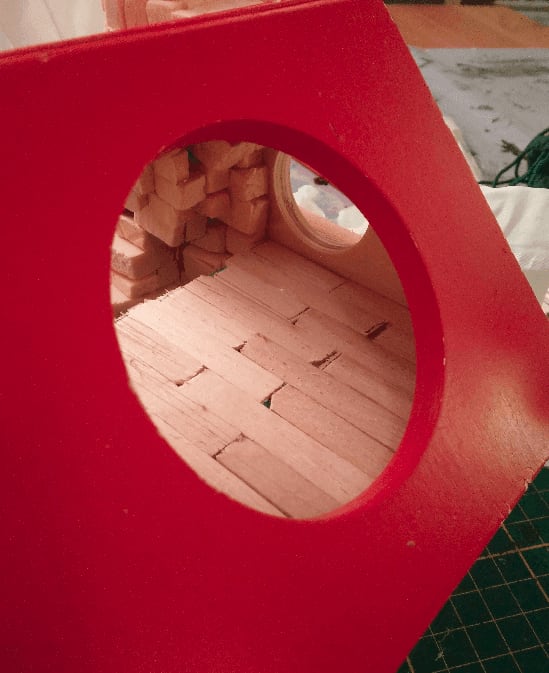
I wasn't exactly sure at first about what to do with the round windows. I decided to glue small "wood" blocks all around it. It does not make much sense from a real-life POV, but the crafting result looks good.
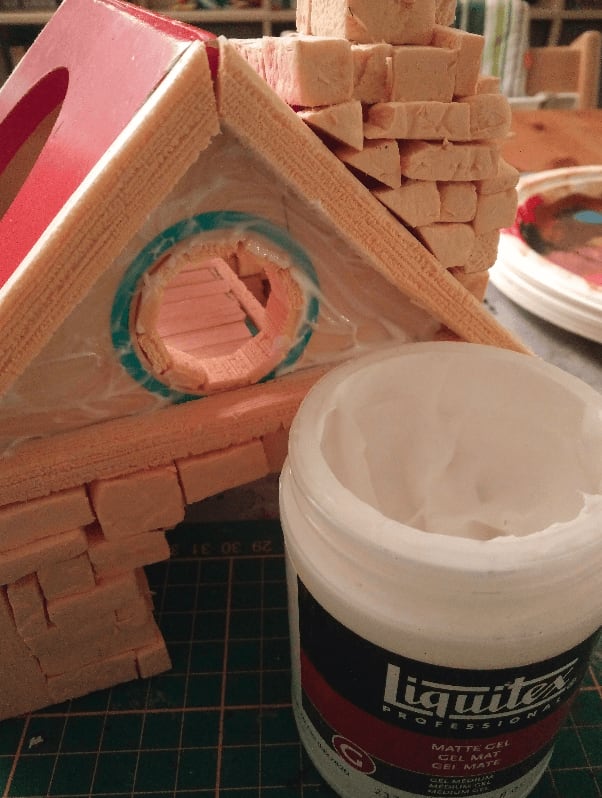
Covered the first floor walls with some matte gel to give it some texture.
Painting
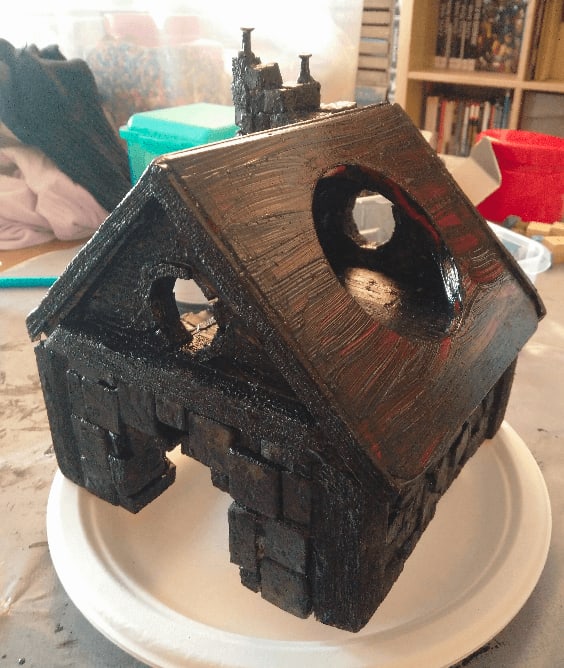
And then started painting. My modpodge/black paint mix was a bit too diluted. I used china black ink instead of craft paint thinking that the coverage would be better but... china ink is very liquid compared to craft paint and even if the pigment is stronger, it also added a lot of "water" to my mix, resulting in a way less covering result.
Still, I started painting on it. In hindsight, it was a mistake. I should have covered the whole structure in a second (or third) layer so it would be completely black. Because I skipped this step, the underlying red can be seen between the cracks of the bricks in some places.
After a few coats, it starts to look good!
Roof
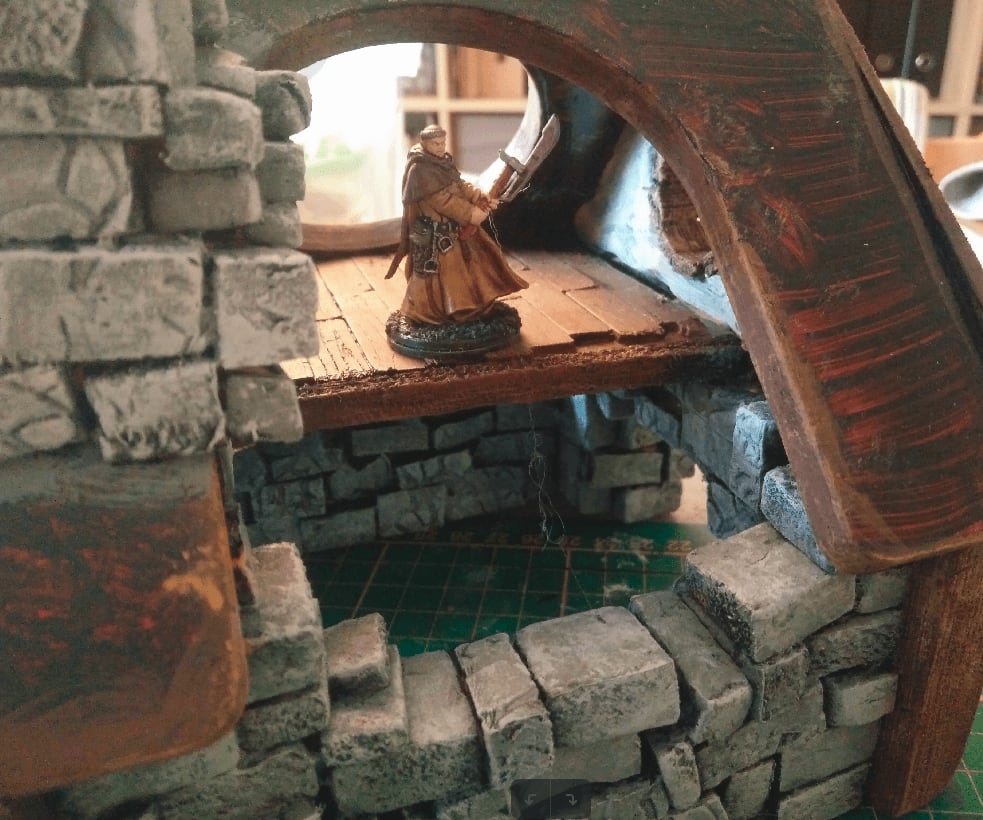
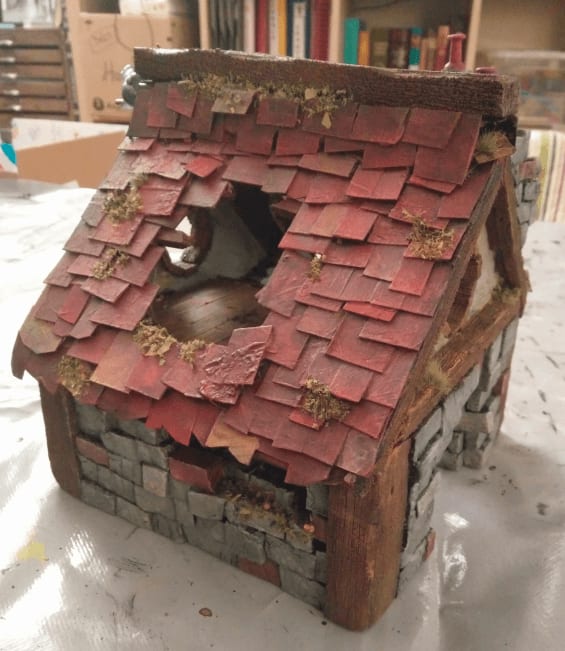
With a mini for scale. Now what I need to do is add the shingles around those giant holes.
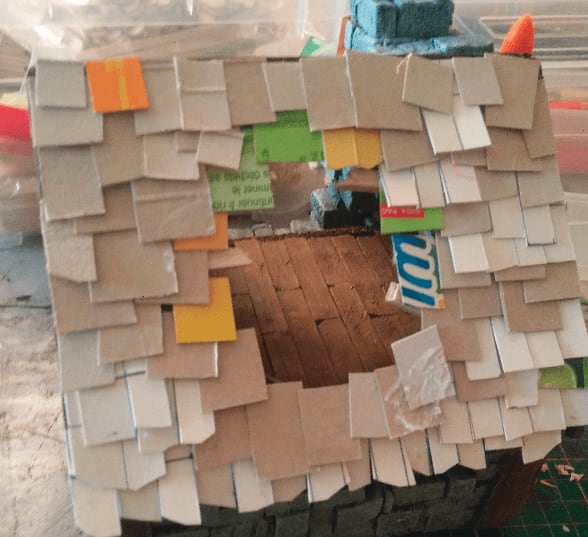
I went with shingles of greatly varying sizes, to give this a disarrayed look, which is how I envision the old cities of the Warhammer world, with their crumbling turrets built in defiance of gravity.
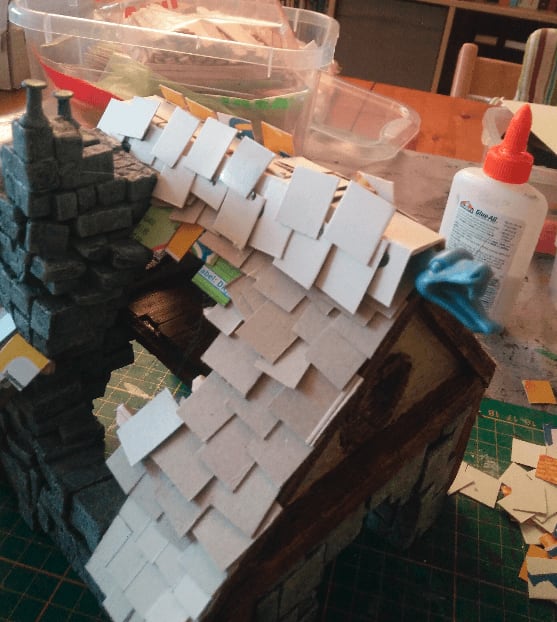
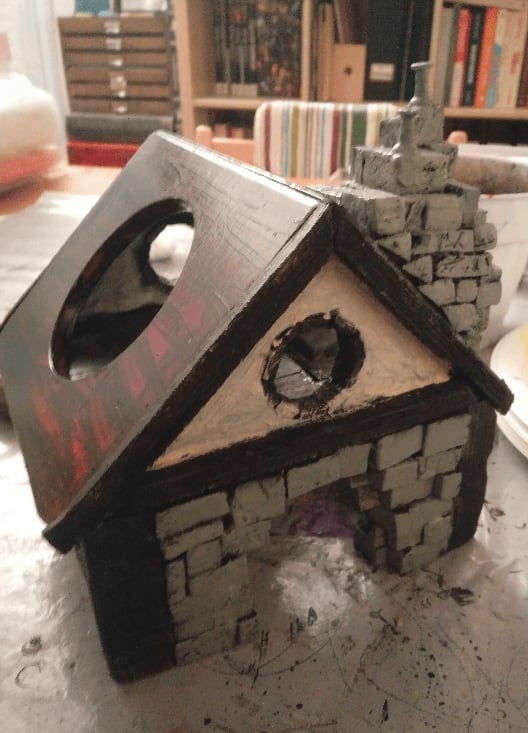
For the top ridge, I wanted to add some decoration and had this plastic snake laying around, so I glued them and covered it in more shingles. In hindsight, this was a mistake. The final look of the top of the roof is weird, and I should just have cut the snake head and glued is below the roof line.
To kinda make up for my mistake I added another wooden beam on top. I honestly can't say if it's better or worse.
This time I applied several coats of my highly diluted mixture, to be sure to cover all the shingles well (I don't want to have any Golden Grahams logo showing through!)
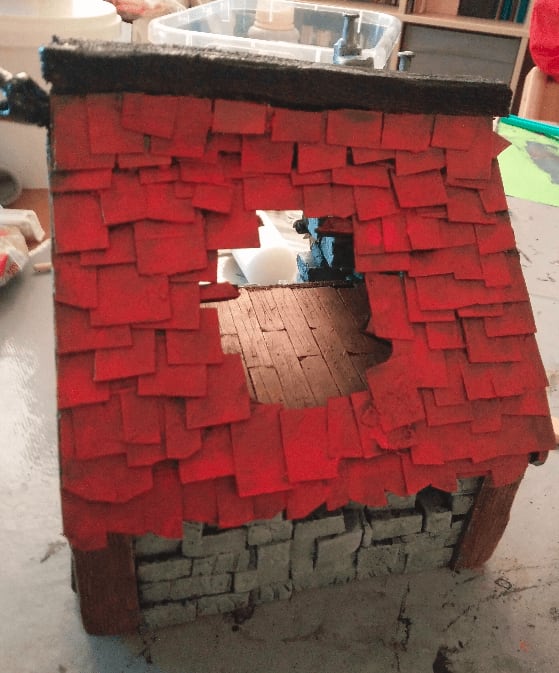
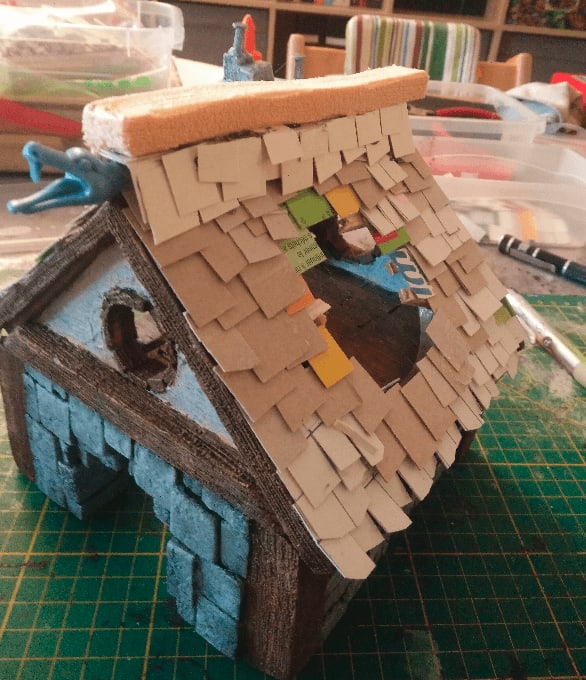
First coat is a deep red.

Drybrush of a more orange red.
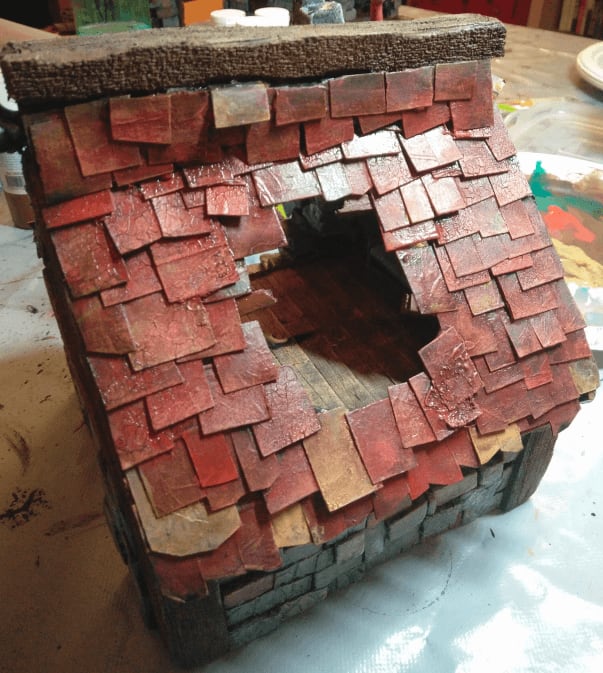
And finally a real orange on the last layer. The several layers of mixture I added to the shingles added some irregular grit which is a fortunate side effect.

The effect under my desk light was very dramatic!
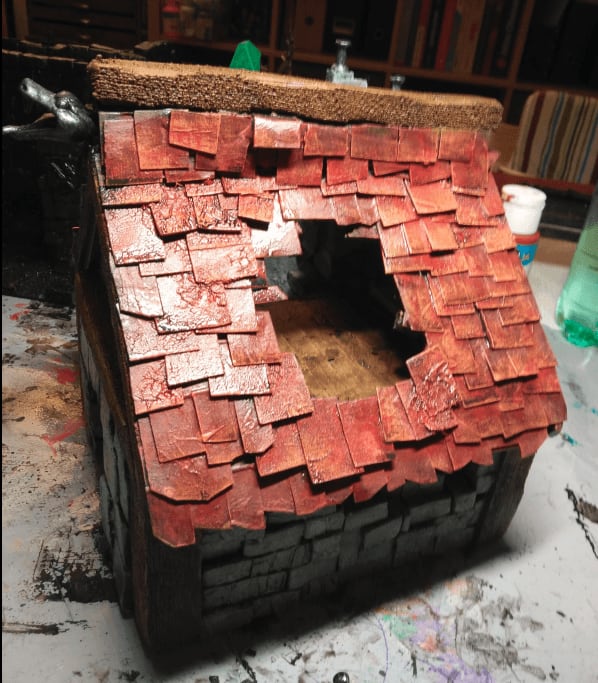
I then added a wash, which had the unfortunate effect to create rippled on some of the shingles. I think it's because the pigment of the paint somehow interacted with the plastic coating of the cardboard, dissolving it. It sure added some interesting texture to the build but not what I had been looking for.
And once dried, it gave way to that pretty nice gritty effect.
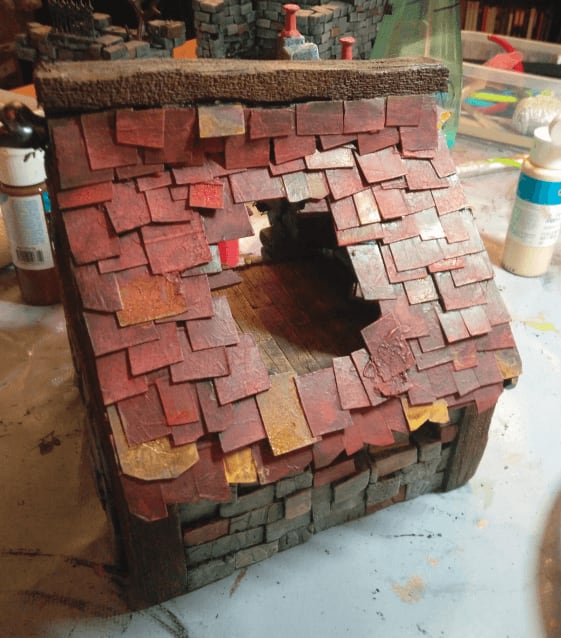
I went on and colored more individual shingles in various tones of red and orange, more like a real roof.
This, alongside a similar effect done on the wall stones gave a lot more life to the build.
I added another wash on top; otherwise the colored shingles were way too visible.
And then, we could move to flocking the whole piece.
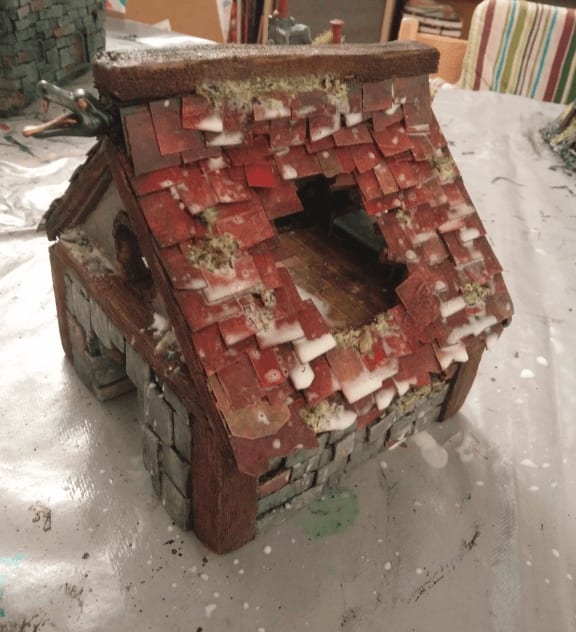
And putting watered down PVA glue on everything to really seal the flocking. This phase is still a bit scary to me. The build looks like a real mess at that stage with all those white splatters everywhere. Thankfully it all turns transparent when it's absorbed by the cardboard.
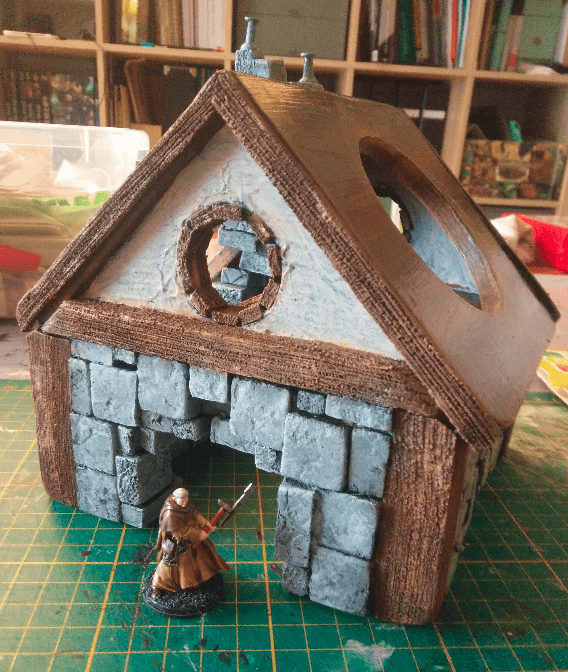
Final result
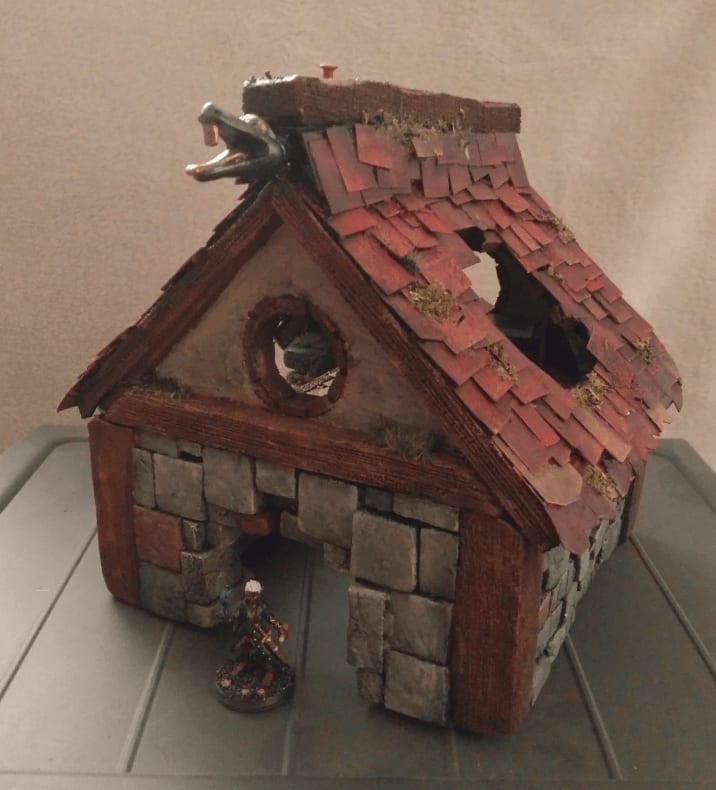
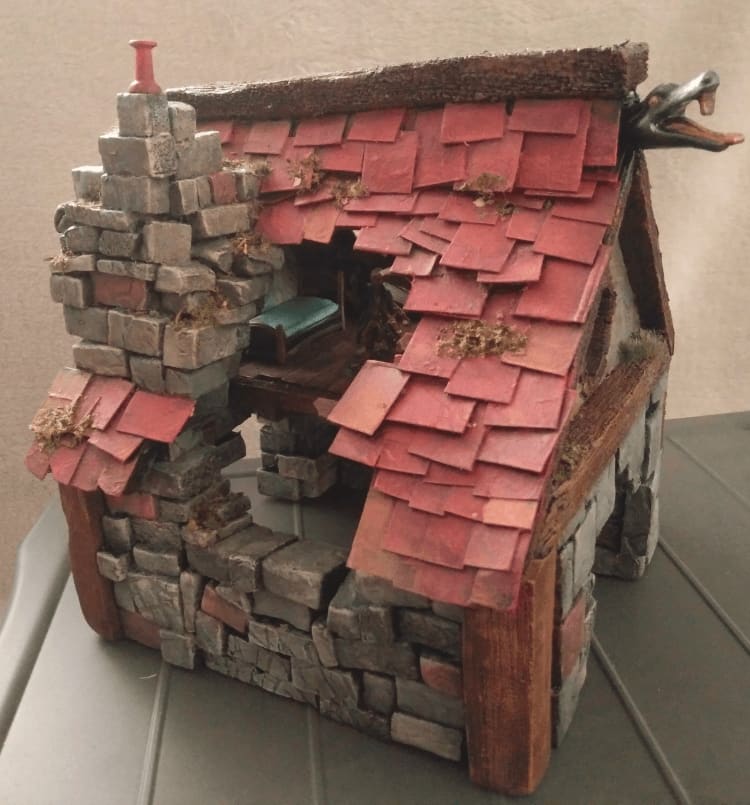
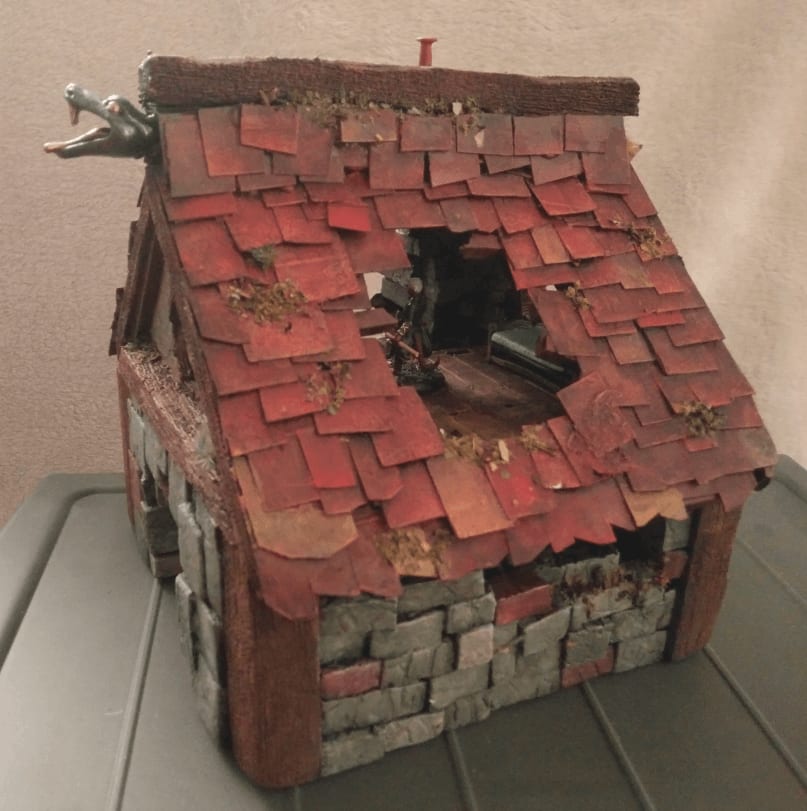
And a few glamor shots of the final results. I'm very pleased with this build. Mostly because it is durable and that's one of the main qualities I look for in my builds. But also because it conveys this feeling of decrepit city hit by a meteor very well.
Three-headed bird statue
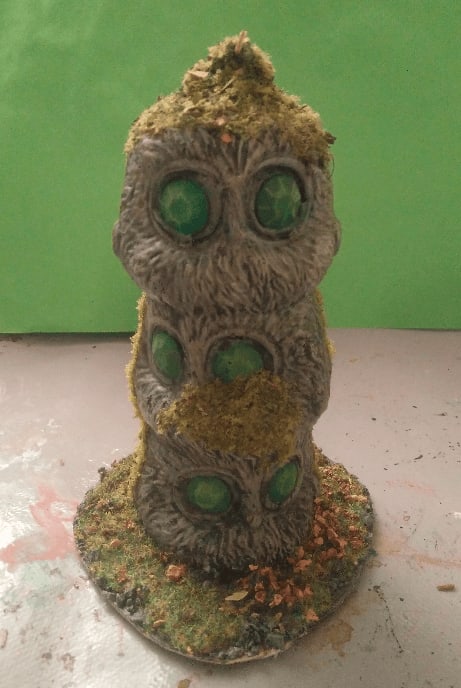
You walk into the jungle and come face to face with this horrible statue. Three bird heads stacked on top of each other, their eyes emerald green. What do you do?
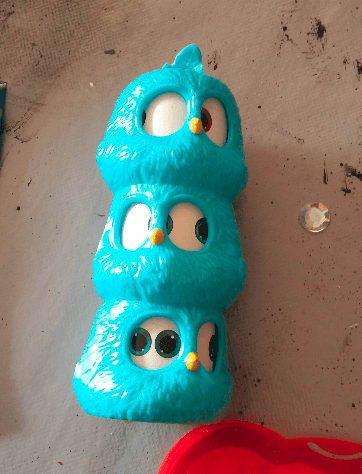
This all started with this weird Angry Bird / MacDonalds toy.
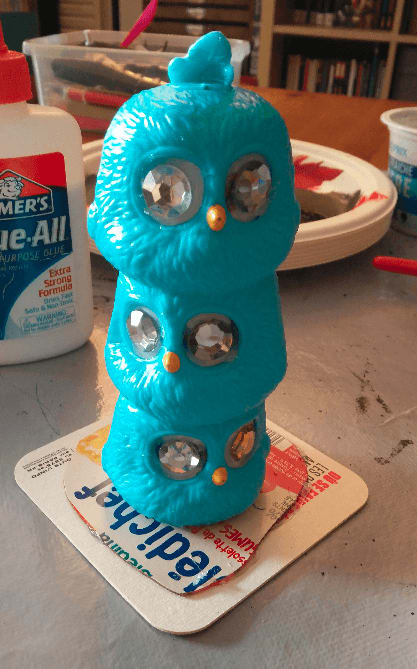
I glued it on a piece of plastic to secure it in place, and glued some cheap plastic jewels in place of its eyes.
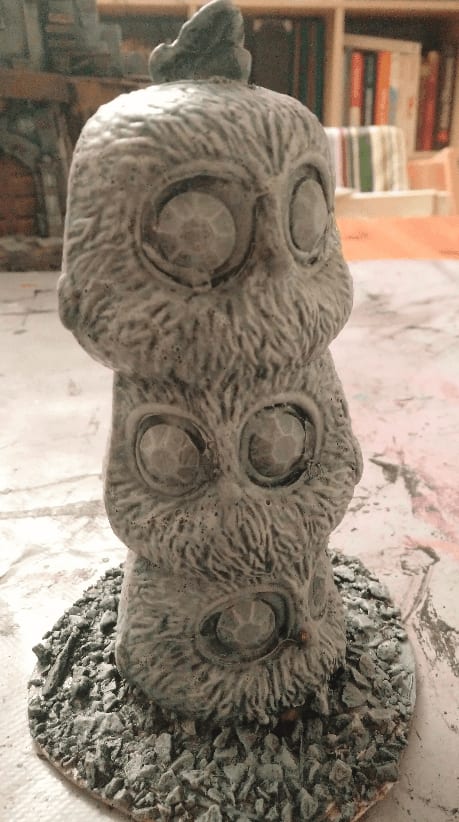
Then, I let the magic of the drybrush turn this into a statue.
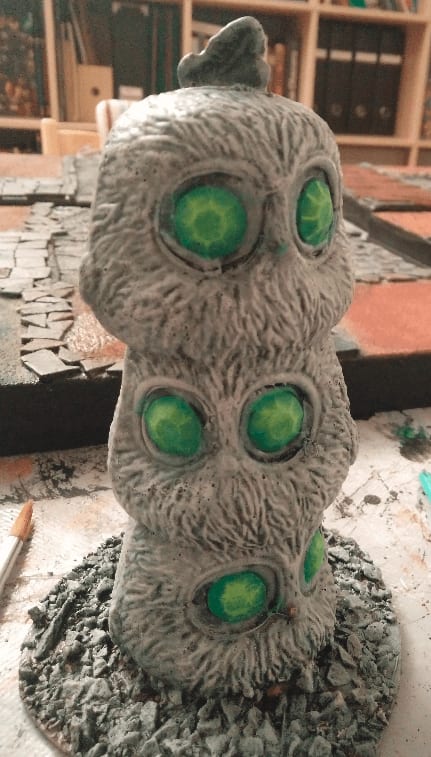
I painted the eyes emerald green and added a drybrush of a yellowish green on top.
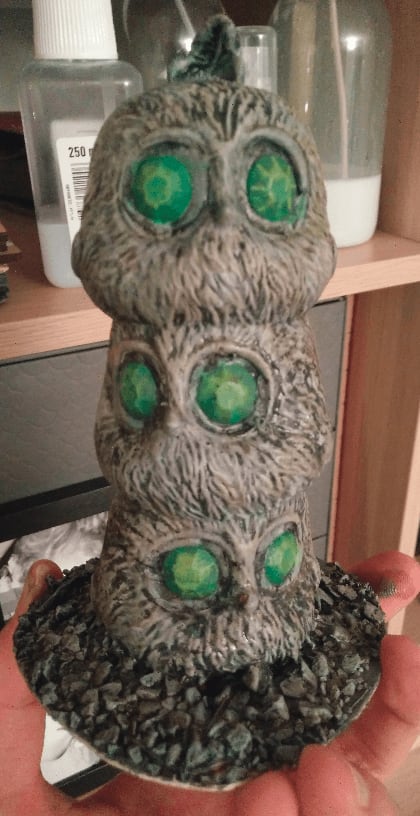
A dark brown wash on top.
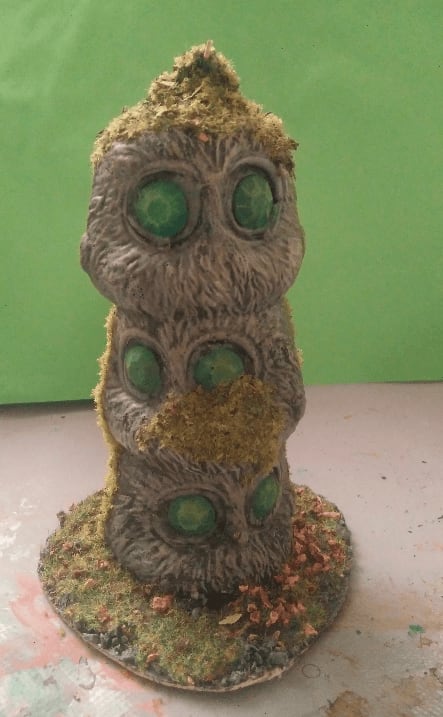
And heavy flocking to give it an air of forgotten statue covered in moss.
That was a very quick build, and to be honest I didn't expect it to look so great. The original toy is pretty goofy to begin with, but the addition of the emerald eyes on top of the cartoonish birds gives it an aura of weirdness.